JIRA Integration
Connection settings between JIRA and the API Portal are managed from this screen. You can define your JIRA connection information, API access key, and request types from this page.
Contents
Overview
The Jira Config portal screen is the management page where the necessary connection settings are made so that support requests created by API Portal users can be automatically opened in Jira Service/Software projects. The information defined here establishes a secure integration between the portal and Jira, requests are opened and tagged under a standard issue type, and portal information is transferred to Jira issue fields when necessary.
Important Note: Before enabling Jira integration, you must have created an API token in your Atlassian account and know the key (Project Key) of the Jira project you will be using and the required custom field ID values.
Details about the JIRA Integration Settings screen are provided in the image below:
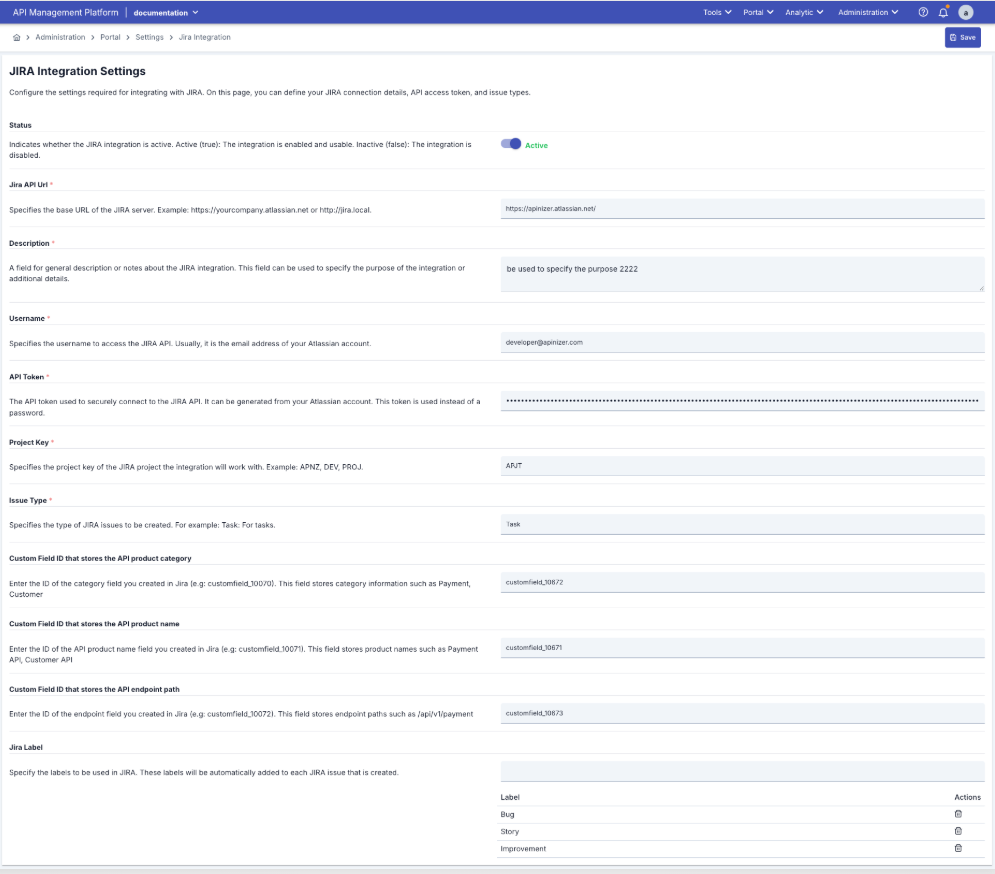
The fields used for the Jira Integration on the page are shown in the table below.
| # | Alan | Where it appears in the portal: | How it should be filled: | Impact on Jira: |
|---|---|---|---|---|
| 1 | Jira Integration Status | Sayfanın üst bölümündeki toggle. Aktif/Pasif bilgisi yanında yeşil/kırmızı etiketi gösterir. |
| status=true ise portal ticket formundan gelen kayıtlar Jira'ya REST çağrısı ile iletilir, false ise hiçbir REST çağrısı yapılmaz; portal sadece kendi içinde kaydeder. |
| 2 | Jira URL | Required text field. If the field is left empty, form validation shows a red error message. |
| Used as the base domain for REST API calls (https://.../rest/api/3/*). If incorrect, Jira returns NOTFOUND or 404, and the issue cannot be created. |
| 3 | Açıklama (Description) | A multi-line text field visible in admin information cards. |
| It is not synchronized with Jira. Stored only as a reference in the portal’s admin interface. |
| 4 | Kullanıcı Adı (Username) | Required text field. If empty, the system displays the entity.validation.required warning. |
| Used as the Basic Auth username in the Jira REST call (usually the Atlassian email address). If incorrect, a 401 Unauthorized response is returned. |
| 5 | API Token | Zorunlu parola alanı. Değer girilmezse hata mesajı verir. | It is used as the Basic Auth password. If the token is invalid, Jira returns a 401 error and the issue cannot be created. | |
| 6 | Project Key | Required text field. |
| It is written to the project area; if Jira returns a 404 error, the “Project does not exist” error is received. When successful, all Jira tickets are opened in this project. |
| 7 | Issue Type | The required text field displays a sample value with a placeholder. |
| It is written in the issue type field. If the type is invalid, Jira returns a 400 Bad Request; the portal completes the save operation, but issue creation fails. |
| 8 | Kategori Custom Field ID | Optional text field.metin alanı. |
⚠️ **Note:** For detailed information on creating custom fields in Jira and finding their IDs, please refer to the [Atlassian Custom Fields Documentation](https://confluence.atlassian.com/adminjiraserver/adding-custom-fields-1047552713.html). | The portal category is sent as fields[customfield_xxxxx] in the Jira issue JSON. If the field is empty, it is not sent. |
| 9 | API Product Custom Field ID | Optional text field. |
⚠️ **Note:** For detailed information on creating custom fields in Jira and finding their IDs, please refer to the [Atlassian Custom Fields Documentation](https://confluence.atlassian.com/adminjiraserver/adding-custom-fields-1047552713.html). | The API product name selected on the portal is set to the corresponding custom field in the same manner. If left blank, it is skipped. |
| 10 | API Product Endpoint Custom Field ID | Optional text field. |
⚠️ **Note:** For detailed information on creating custom fields in Jira and finding their IDs, please refer to the [Atlassian Custom Fields Documentation](https://confluence.atlassian.com/adminjiraserver/adding-custom-fields-1047552713.html). | Portal endpoint information is written as a custom field in the Jira issue; e.g., /payments/v1. |
| 11 | Label List | Input + table component. If the list is empty, the message “No labels found” is displayed. |
| Each label is added to the Jira issue labels list. It can be used for automation or filtering on existing issues. |
Step-by-Step Jira Integration Setup Guide
| Step | Function/Description |
|---|---|
| Step 1: Preliminary Preparation (Jira Side) |
|
| Step 2: Access the Jira Portal Configuration Page |
|
| Step 3: Enter Basic Connection Information |
|
| Step 4: Configure Optional Fields |
|
| Step 5: Activate the Integration |
|
| Step 6: Save and Test |
|
| Step 7: Troubleshooting |
|
Sık Karşılaşılan Senaryolar ve Çözüm Adımları
| Error | Possible Causes | Solution |
|---|---|---|
401 Unauthorized Error | Invalid username, expired/cancelled API token, Atlassian account lacks access permissions for the required project. |
|
404 Project Does Not Exist | Incorrect Project Key or the user does not have access permissions for the project. |
|
400 Issue Type Is Not Valid | The entered issue type is not valid or was entered incorrectly in the selected project. |
|
Label Information Not Appearing in Jira | The label list is empty, the issue is not updating after portal registration, and the Jira workflow does not allow adding labels. |
|
Portal Support Requests and JIRA Integration
Overview
The JIRA integration configured in Apinizer Manager enables support requests created by Portal users to be automatically transferred to JIRA. This section details the relationship and data flow between the configuration in Manager and support requests in the Portal.
- It allows Portal users to communicate issues they encounter, development requests, or suggestions to the support team.
- Submitted requests are created as tickets in JIRA, and their statuses can be tracked on this screen.
- Users can filter past requests and review their statuses.
- All users logged into their Portal account can access this page.
- Menu path: Portal → Support Requests.
- Required fields (label, summary, description) must be filled out to submit a request.
List View
The image containing the List View is shown below:

- When the page opens, existing requests are listed in a table.
- You can quickly search using the search boxes at the top in the Issue ID or Summary field.
- You can proceed to the new request creation form by clicking the “New” button.
- Clicking on the Issue ID link opens the details page for that request.
- The table columns include:
- The request code (Issue ID)
- Summary text
- Status, tag, and category information.
- Related API product and endpoint name (if applicable).
- Last update date information.
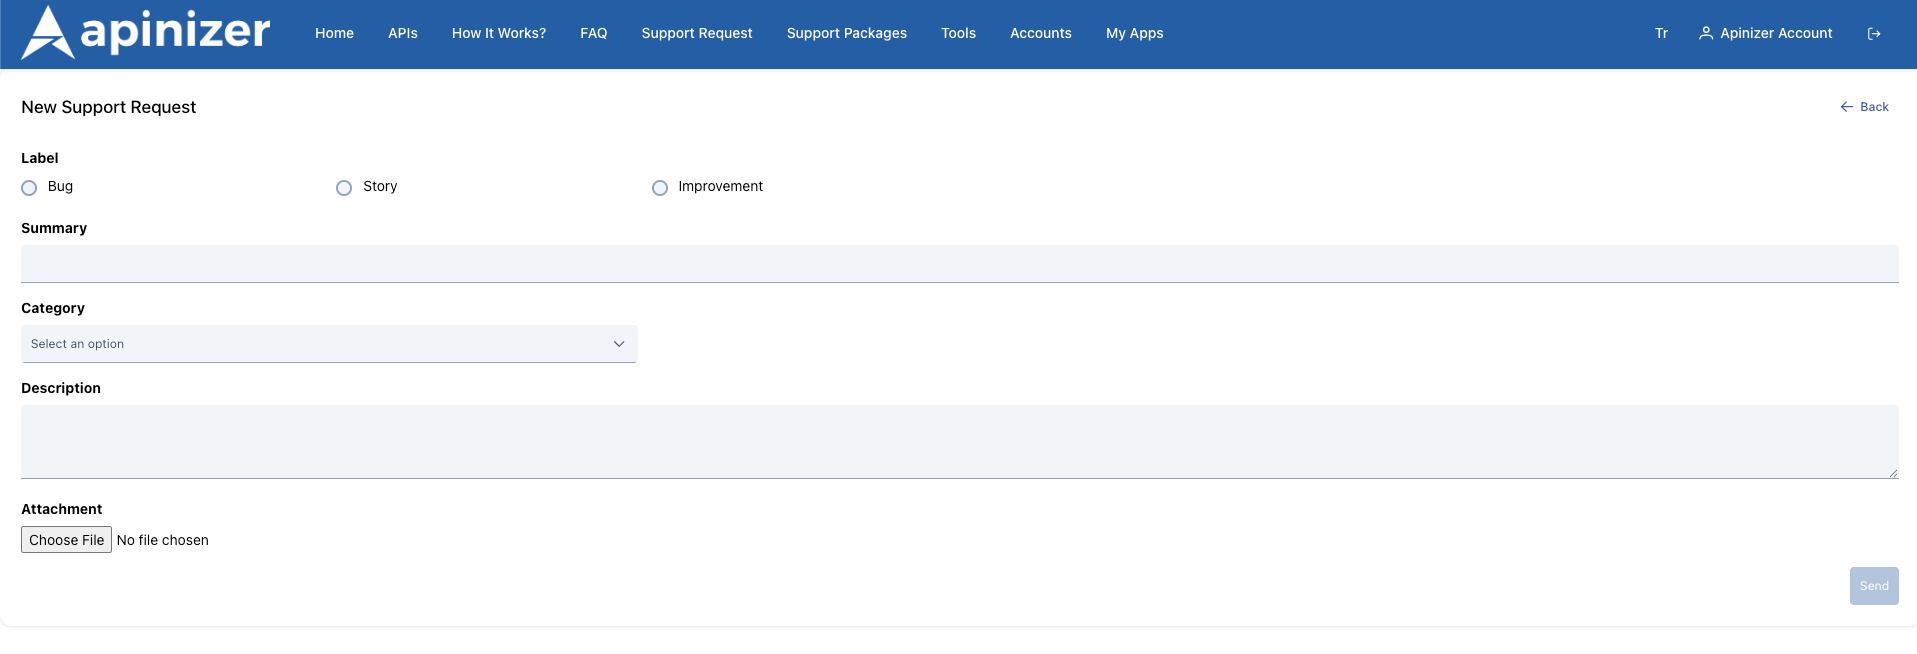
Create New Request
The screen for creating a new request is shown below.
| Step | Function/Description |
|---|---|
| Step 1: Click the New button | Press the New button on the list page. |
| Step 2: Fill in the fields in the form that opens |
|
| Step 3: Save | When you have completed the form, press the Send button. The process may take a few seconds; the created request is automatically added to the list. |
How to View Request Details?
- Click on the issue ID on the list screen.
- On the page that opens:
- The request code, tag, status, and reporter information are displayed.
- You can see which category, API product, and endpoint it is associated with.
- The summary and description texts are displayed in full.
- If there are any attachments, you can download them using the “Download” button.
- The “Comments” section lists notes and the history left by support teams.
- You can return to the list using the “Back” button.
Connection with API Manager
- This portal screen collects user requests and creates tickets in JIRA in the background.
- The API Product selection in the request form is based on products published in API Manager. This allows the support team to easily understand which product the issue relates to.
- The management of request processes (status changes, comments, solutions) is done through JIRA; the portal only provides viewing capabilities.
Manager JIRA Configuration and Portal Connection
1. Configuration Source
The support requests system in the Portal uses the JIRA integration settings defined directly in Manager.
- All settings made in Manager → Portal Management → Portal Jira Config apply to the Support Requests page in the Portal interface.
- The Portal does not have its own separate JIRA configuration; all connection information is centrally managed through Manager.
- Any changes made in Manager (URL, token, project key, custom field IDs, etc.) are automatically reflected in the Portal.
2. Integration Status and Its Impact on the Portal
The Jira Integration Status toggle in Manager plays a critical role for Portal support requests:
Active Status:
- When Portal users create a new request from the Support Requests page:
- The request information is sent to the Portal API
- The Portal API sends a request to the JIRA REST API using the JIRA configuration in Manager
- A new issue is automatically created in JIRA
- The Issue Key of the created issue (e.g., SUP-123) is returned to the Portal
- The request in the Portal is associated with this issue key
- The user can see the JIRA issue key in the request list in the Portal
Passive Mode:
- Portal users can create support requests
- However, no requests are sent to JIRA
- The request is only stored in the Portal database
- No issue is created on the JIRA side
- This mode is used when testing the integration or when it is temporarily disabled
Portal Support Requests Page and JIRA Integration Data Flow
Step 1: User Creates a New Request in the Portal
The portal user opens the request creation form by clicking Portal → Support Requests → New and fills in the following fields:
| Portal Form Field | Description | Equivalent in JIRA |
|---|---|---|
| Label | Request type (Bug, Enhancement, Question, etc.) | Added to the labels field of the JIRA issue |
| Summary | Brief description of the request | Summary field of the JIRA issue |
| Description | Detailed description of the request | JIRA issue'nun description alanı |
| Category | Request category (Payment, Customer, Other Request, etc.)Related | Written to the Category Custom Field ID defined in Manager |
| API Product | API product name | Written to the API Product Custom Field ID defined in Manager |
| Endpoint | Related API endpoint path | Written to the API Product Endpoint Custom Field ID defined in Manager |
| Attachment | Screenshot, log file, etc. | Added as an attachment to the JIRA issue |
Step 2: Retrieves the Portal API Manager Configuration
When the user clicks the Send button:
- The portal frontend sends the form data to the portal backend API via POST
- Portal backend:
- Retrieves JIRA integration settings from the Manager API
- Checks the integration status (Active/Passive)
- If Active, retrieves JIRA connection details
Step 3: JIRA REST API Call is Made
The portal backend sends a REST call to JIRA using the information it receives from Manager.
Authentication:
- Username: The Atlassian account email address defined in Manager.
- API Token: The token securely stored in Manager.
- Basic Auth: Sent in Base64-encoded username:token format.
Custom Field Mappings:
- The Category Custom Field ID defined in Manager (e.g., customfield_10070) carries the category information in the Portal
- The API Product Custom Field ID (e.g., customfield_10071) contains the selected API product name
- API Product Endpoint Custom Field ID (e.g., customfield_10072) stores the endpoint path
- If these fields are left blank in Manager, Portal only sends the basic fields (summary, description, labels)
Step 4: JIRA Response is Processed
When JIRA successfully creates an issue;
Portal backend:
- Receives the Issue Key (SUP-123) returned from JIRA
- Associates this key with the request record in the Portal database
- Displays a success message to the user
- When the list page is refreshed, SUP-123 appears in the Issue ID column
Step 5: Appears in the Request Portal List
On the Support Requests list page in the Portal:
- Each row displays the JIRA Issue Key (SUP-123) as a clickable link
- Clicking the link opens the details page in the Portal (does not redirect to JIRA)
- Status information is periodically synchronized from JIRA
- The user can track the status of their request in JIRA via the Portal
Frequently Asked Questions
| Question | Answer |
|---|---|
| Where is my request going? | Your request is created in JIRA for the relevant project. The support team tracks it from there. |
| When will the status be updated? | When the support team updates your request in JIRA, the status on the portal list is also updated shortly thereafter. |
| Can I edit or delete a request? | The portal only allows you to submit new requests and view existing ones. Updates/closures are performed by the support team. |
| Is it mandatory to attach a file? | No, but attaching screenshots or logs that could help identify the issue will speed up the process. |
A request was created in the portal, but why is there no issue in JIRA? | Possible Causes:
Solution Steps:
|
An issue is created in JIRA, but the custom fields are empty. | Possible Causes:
Solution Steps:
|
Result
The JIRA integration configuration performed in Manager is critical for automatically forwarding Portal users' support requests to JIRA. This integration enables:
- Centralized Management: All JIRA settings are controlled from a single point (Manager)
- Automatic Synchronization: Portal requests are instantly converted into JIRA issues
- Data Consistency: Portal and JIRA data remain synchronized thanks to custom field mappings
- Easy Tracking: Users can view JIRA issue statuses through the Portal
- Efficient Support: Support teams centrally manage all requests in JIRA
By following all the steps outlined in this document, you can establish a seamless integration between the Portal and JIRA and maximize the user experience.