Kubernetes Resources
In this section, you can define the environment settings of Apinizer Platform, manage your API Manager, API Integrator and API Portal deployments.
The picture below shows the Kubernetes Resources:

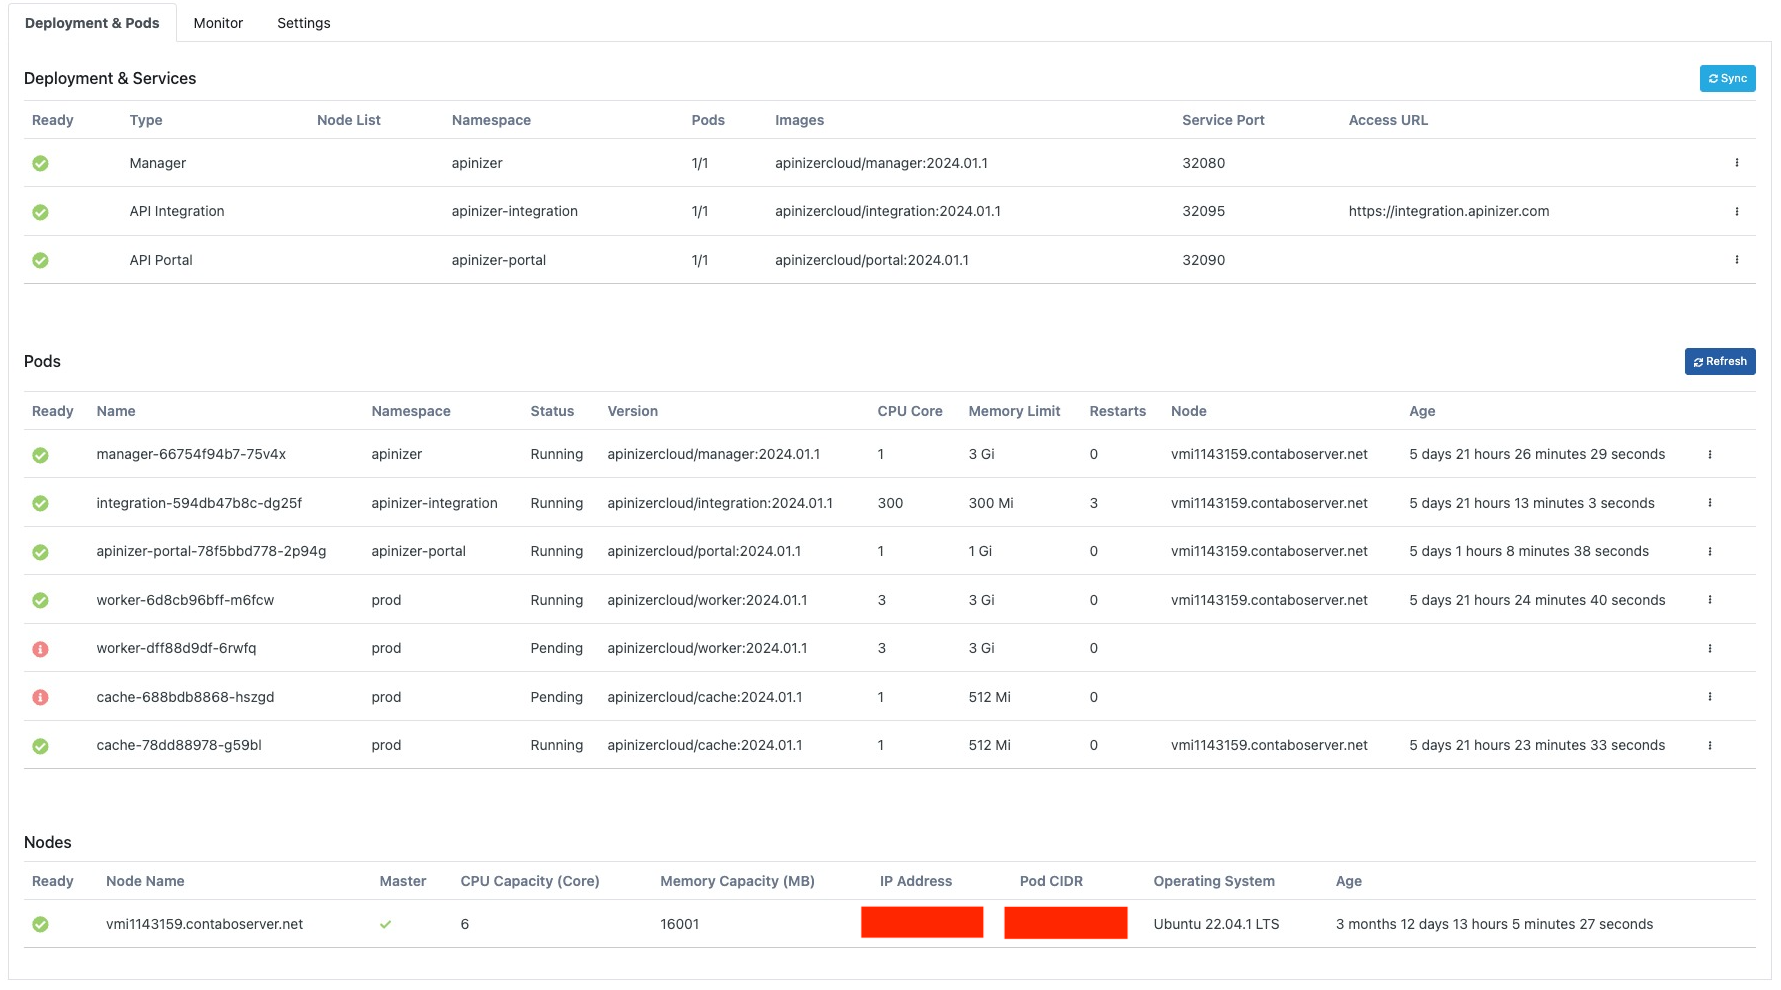
Deployment & Pods
On this screen, the services deployed in Kubernetes can be controlled and managed. Pods can be viewed and deleted from the Pods list.
The picture below shows the Deployment & Pods tab:
Deployment Operations
Sync
In this tab, the changes we will make are synchronized with the database.
Configure
This is the area where deployment information can be updated.
The configuration screen is opened with the Configure option from the drop-down menu at the end of the line.

The picture below shows the Configuration screen settings:
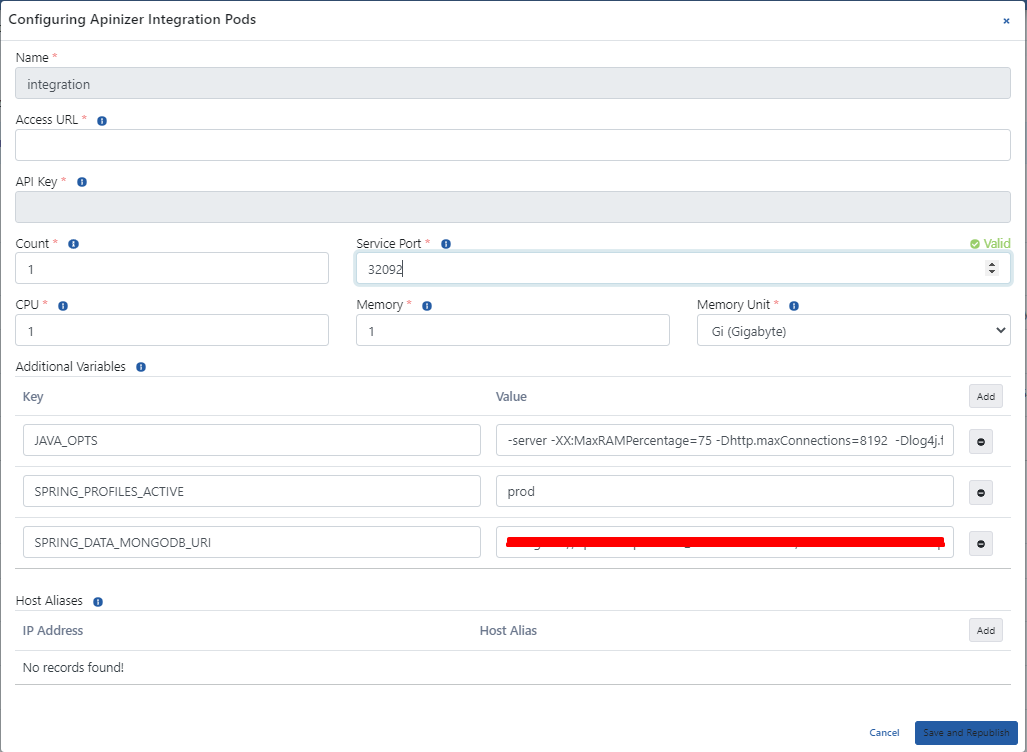
The fields used for configuration settings are shown in the table below.
| Field | Description |
|---|---|
Name | It is the name information field used under the Deployment namespace. |
Access URL | This is the field where the deployment access address is entered. |
API Key | It is the area where the key generated after the deployment operation is displayed. |
Count | Gateway engine count is equivalent to replicaSet in Kubernetes Cluster. |
Servis Port | It is the field that shows the active port that the pod will use. |
CPU | The maximum number of CPU cores that the pod will use. |
Memory | The maximum amount of memory the pod will use. |
Memory Unit | The unit of value required for the memory is selected; MB, GB. |
Additional Variables | Default and optional variables and their values to be run in the pod are defined. Default variables cannot be deleted, only their values can be edited. |
Host Aliases | IP addresses on the network can sometimes be put behind hostnames, if they are not defined in the nameserver or host file, or if Apinizer has not been able to resolve them somehow, Host Alias must be defined in order for the worker pods to resolve these names. |
Disable and Remove
Allows the selected deployment to be removed.
Restart Pods
It allows the pods running under the selected deployment to restart.
Pods Operations
View Log
The log information of the selected pod information is displayed.
Delete Pod
The selected pod is deleted and a new one is created automatically.
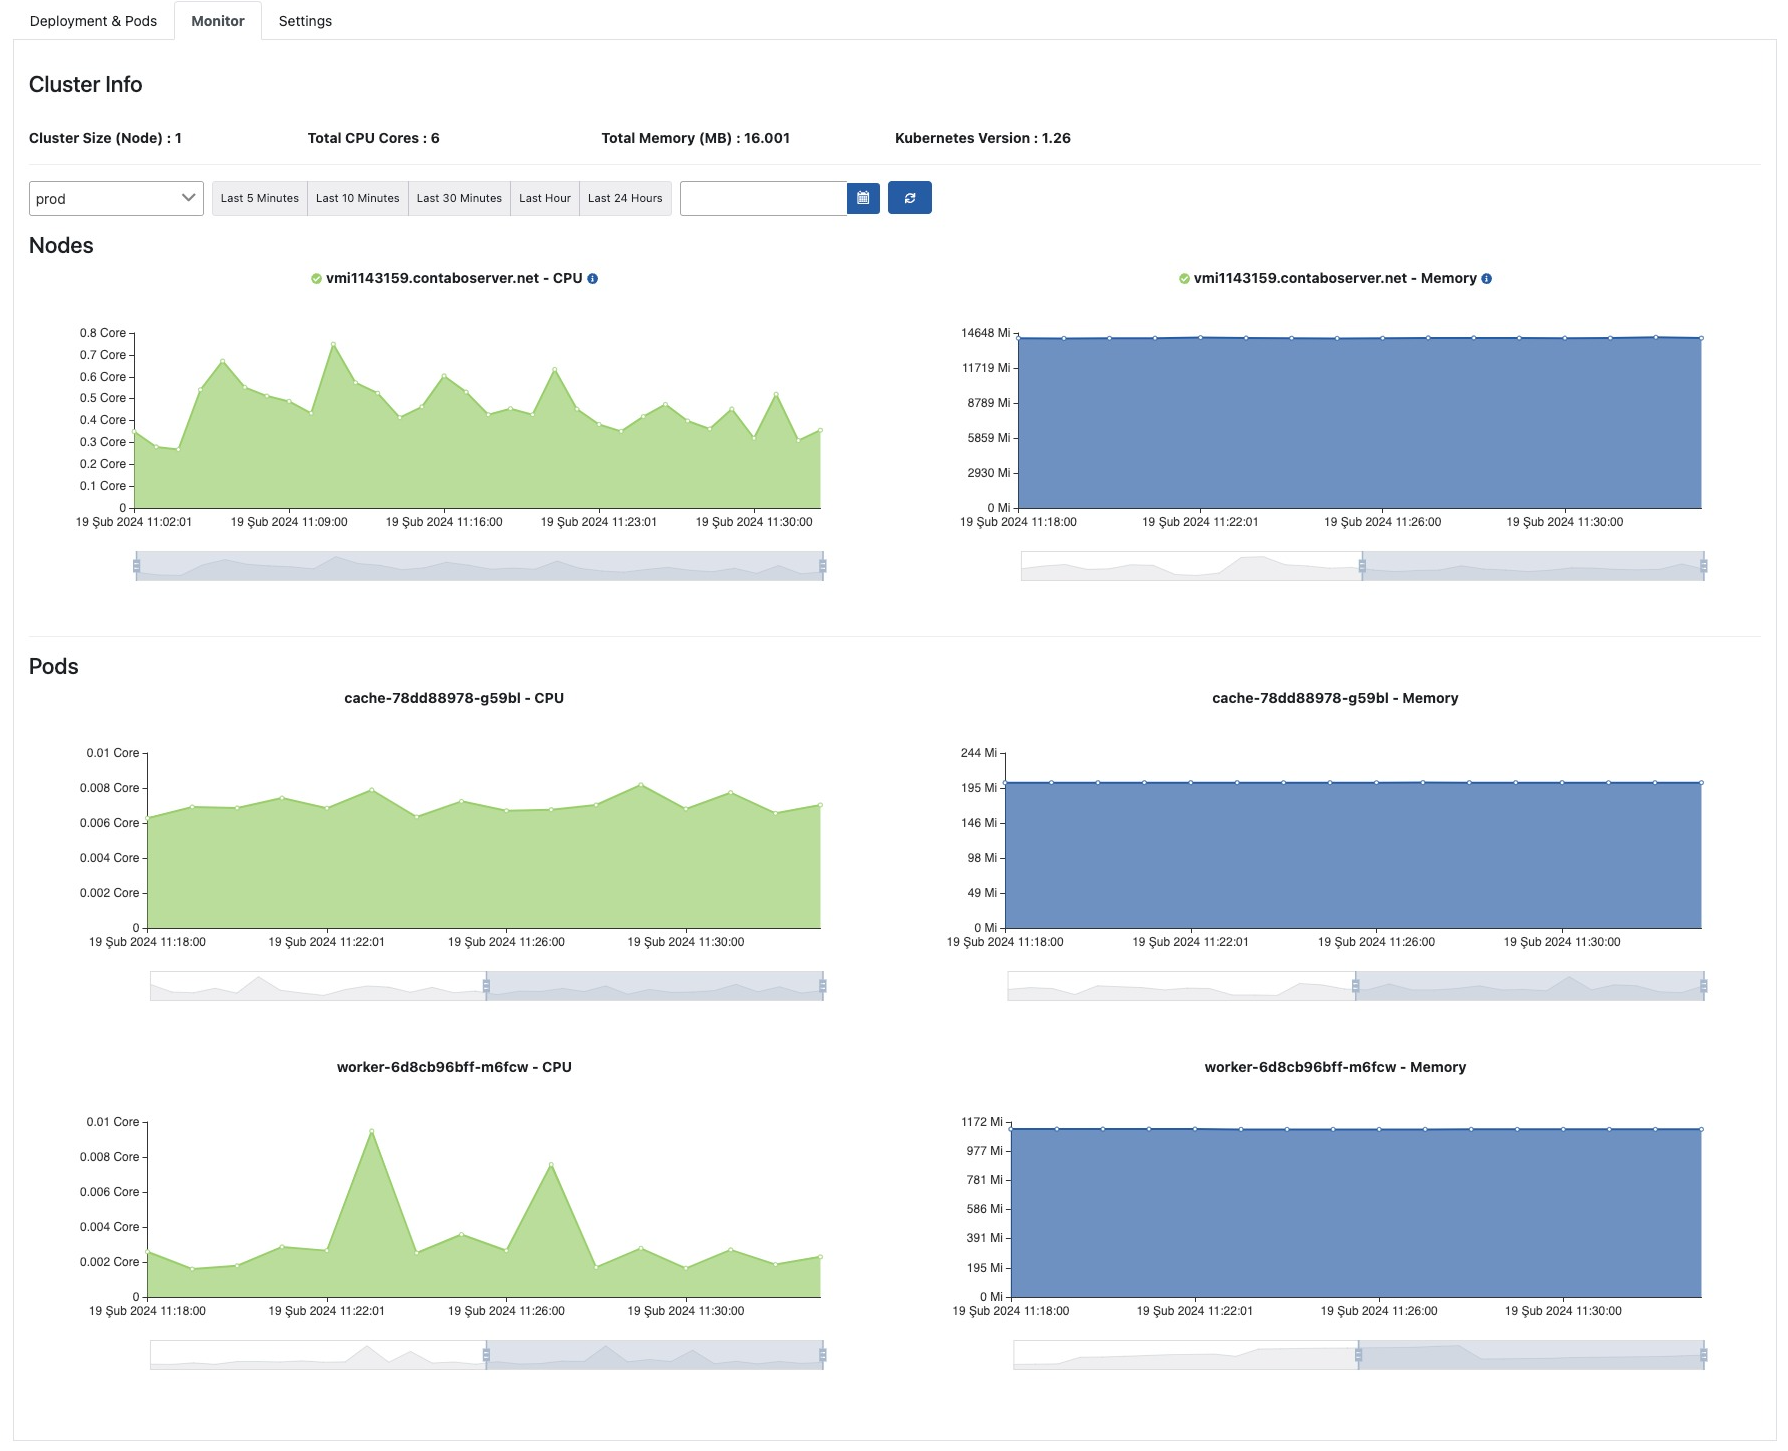
Monitor
The Kubernetes monitor is used to obtain information about the CPU and memory resources consumed by Apinizer Kubernetes cluster.
This screen allows the entire infrastructure to be monitored and managed as a single whole. The resources consumed for All Environments or for a selected environment are displayed separately for nodes and pods.
On the left side of the screen are green core-time graphs for CPU consumption and on the right side blue Mi (Megabytes)-time graphs for memory consumption.
The picture below shows the Monitor tab:
Settings
In this tab, general Kubernetes-based operations such as managing repository information of environments created for Apinizer, updating namespace information, and configuring Pod Security Context settings are performed.
The picture below shows the Settings tab:
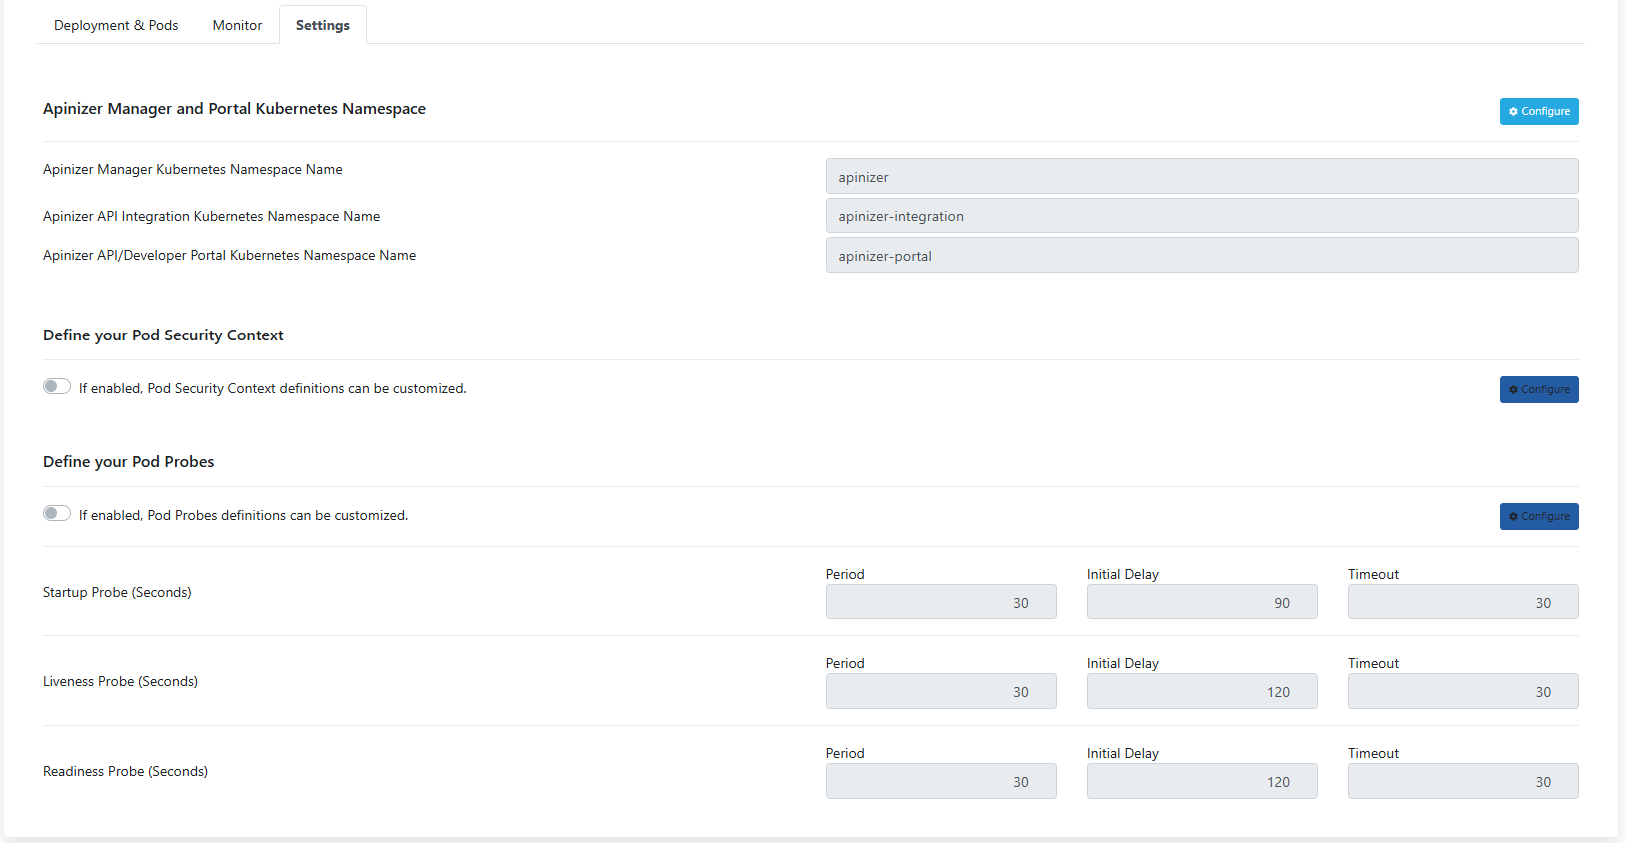
Apinizer Manager and Portal Kubernetes Namespace
Settings for this section can be made by clicking the Configure button on the right under the Apinizer Manager and Portal Kubernetes section.
The picture below shows the Kubernetes Namespace settings:
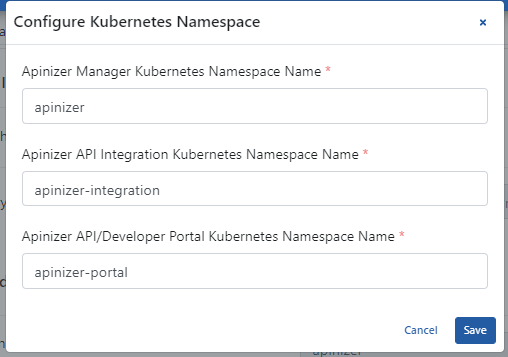
The fields used for Kubernetes Namespace settings are shown in the table below.
| Field | Description |
|---|---|
Apinizer Manager Kubernetes Namespace Name | Specifies the namespace where the manager deployment will run. |
| Specifies the namespace where the integration deployment will run. | |
Apinizer API/Developer Portal Kubernetes Namespace Name | Specifies the namespace where the portal deployment will run. |
Define your Pod Security Context
Settings for this section can be made by clicking the Configure button on the right under the Define Pod Security Context section.
The picture below shows the configuration settings:
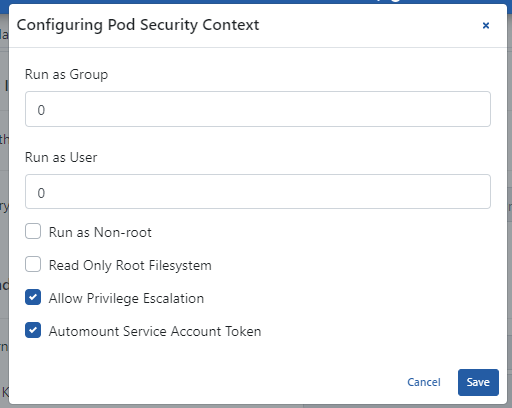
The fields used for configuration settings are shown in the table below.
| Field | Description |
|---|---|
Run as Group | It is the setting that allows Kubernetes Pods to be run with the user group. |
Run as User | It is the setting that allows Kubernetes Pods to be run with the user. |
Run as Non-root | It is the setting that allows Kubernetes Pods to be run only with Root user. |
Read Only Root Filesystem | It is the setting that makes Kubernetes Pod root files read-only. |
Allow Privilege Escalation | This is the setting indicating that the security policy of Kubernetes Pods is active (true). |
Automount Service Account Token | It is the setting where the service token created for the Kubernetes Pods to work is automatically renewed. |
If you want to turn off the activation of the Pod Security section; Pods for Gateway, Manager, API Integration, and API Portal environments are restarted.
Define your Pod Probes
Settings for this section can be made by clicking the Configure button on the right under the Define Pod Probes section.
The picture below shows the Pod Probes configuration settings:
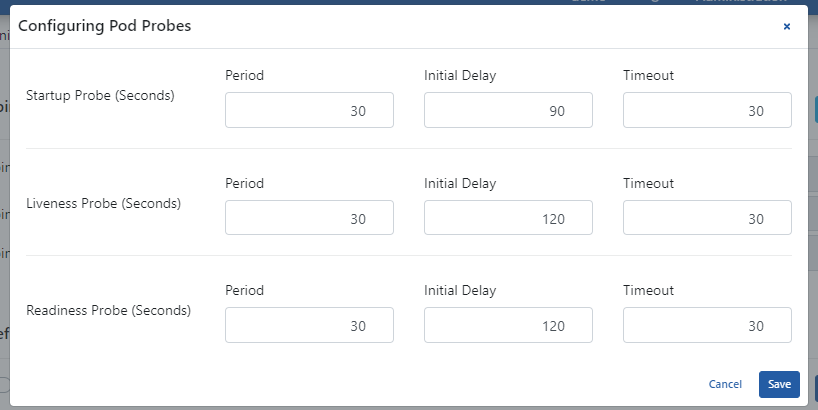
The fields used for Pod Probes configuration settings are shown in the table below.
| Field | Description |
|---|---|
Startup Probe | It is a type of probe that monitors the startup process of the container and checks whether it works for a certain period of time. It is used to determine how long the application startup process takes and to check whether it is fully ready before commissioning. |
Liveness Probe | It is a type of probe that monitors the running status of the application. Determines whether the application within the container is still running. If the application is not running, Kubernetes restarts this container. |
Readiness Probe | It is the type of probe that determines whether the container is ready for service. Checks whether the application is ready to accept user traffic. If it is not ready, service traffic will not be directed to this container. This is important to prevent service interruptions. |
Period | This parameter determines how often the probe will be operated. For example, when a specific period is specified for a Liveness Probe, Kubernetes runs that probe during those period intervals and monitors the running status of the application. It is in seconds. |
Initial Delay | This parameter waits a certain amount of time for the probe to initialize. Particularly in situations where the application startup process may be long, startup delay can be used to wait for the application to fully launch. This prevents the probes from starting before the initialization process of the container is completed. It is in seconds. |
Timeout | This parameter defines the situation when a probe does not receive a response within a certain period of time. For example, when a specific timeout is set for a Liveness Probe, if the application does not respond within a certain period of time, Kubernetes can mark that pod as faulty and initiate a restart. It is in seconds. |