API Products
İçindekiler
Overview
An API Product is a product that can be created and published to offer your APIs to end users via the portal. An API Product combines one or more APIs (API Proxy or Proxy Group) and offers them to portal users with different pricing plans, documentation, and visibility settings.
What Does the API Product Do:
- Package and present APIs to be published on the portal
- Monetize APIs with different pricing plans (Free, Subscription, Metered, Tiered)
- Share API documentation and usage examples
- Control visibility (Public, Private, Authorized Organizations)
- Management of user subscriptions
- Automatic management of API access permissions
Who Benefits:
- API Managers: To package and publish APIs on the portal
- Product Managers: To determine API monetization strategies
- Technical Writers: To create API documentation
- Portal Administrators: To control user access
Creating a New API Product
| Step | Description / İşlem |
|---|---|
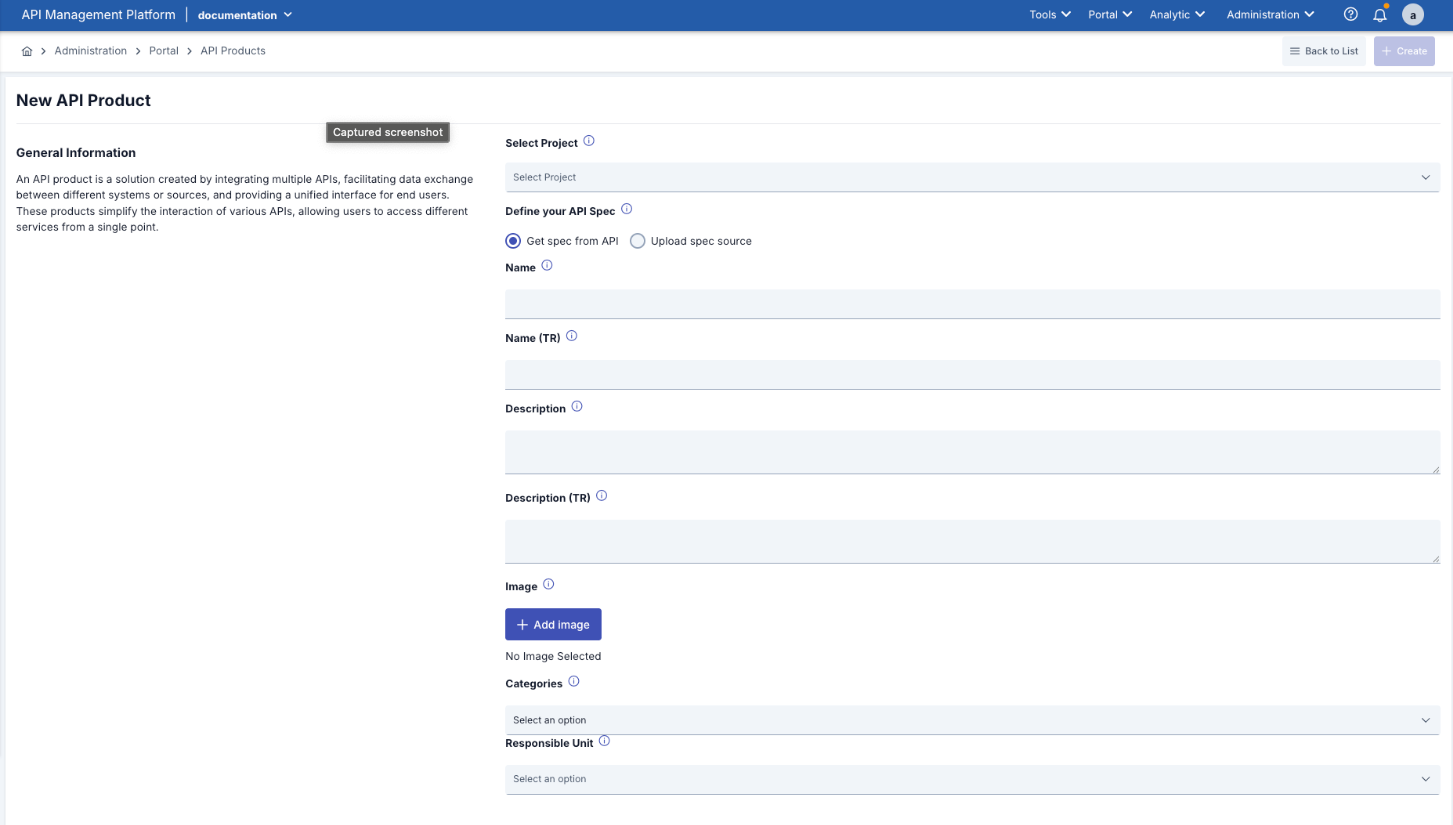
Step 1: Access the API Products Page | - Go to Administration → Portal → API Products in the left menu. - Click the [+ New API Product] button in the top right corner. |
| Step 2: Enter General Information | 1-Select Project Required
2-Define your API Spec Required Two options are available:
3-Name Required
4-Name (TR) Optional
5- Description Required
6- Description (TR) Optional
7-Image Optional
8- Categories Required
You can visit the relevant link to add or manage API Product Categories. 9-Responsible Unit Optional
|
Step 3: Click the Create Button |
System Checks:
Successful Creation:
|
Post-Creation Configuration
After creating an API Product, it is recommended that you complete the following steps:
| Process | Description |
|---|---|
API Specification Configuration (Required) | Specify which API Proxy or Proxy Group to use Select Environment Set the API Spec source |
Add Documentation (Recommended) | Create documentation pages for users Add usage examples |
Visibility and Plan Configuration (Required) | Set the visibility type (Public/Private/Authorized) Create pricing plans |
Publish (Final Step) | Publish after all configurations are complete |
API Product Listing and Display

| Process | Description |
|---|---|
API Products List | Access: Manager → Administration → Portal → API Products View Options: 1. Grid View (Card View)
2. List View (List View)
|
Filtering and Searching | Current Filters: 1. Search by API Product
2. Search by API Proxies
3. Search by API Proxy Groups
4. Search by Status
|
Ranking | Sorting Options:
How to Sort:
|
API Product Detail View
| Process | Description |
|---|---|
Access to the Details Page | Method 1: Click from the list
Method 2: Edit button
Method 3: Direct URL
|
Detail Page Components (Top Section:) | 1.Title and Image
2. Quick Info
3. Action Buttons
4. Information Cards Summary information in 4 cards:
|
Tabs | 1-API Specification (Default active tab)
2. Files
3. Documentation
4. Visibility and Plan
5. Danger Zone
|
API Specification Configuration
What is an API Specification?
Definition: It is the configuration that specifies which API the API Product represents and how it should be used.
Key Components:
- API Source Type: API Proxy or Proxy Group
- API Proxy/Group: Which API will be used
- Environment: In which environment (test, production, etc.)
- API Specification Source: Where the spec will be obtained (automatically from the API or manual upload)
API Specification Configuration Steps:

| Step | Process/ Description |
|---|---|
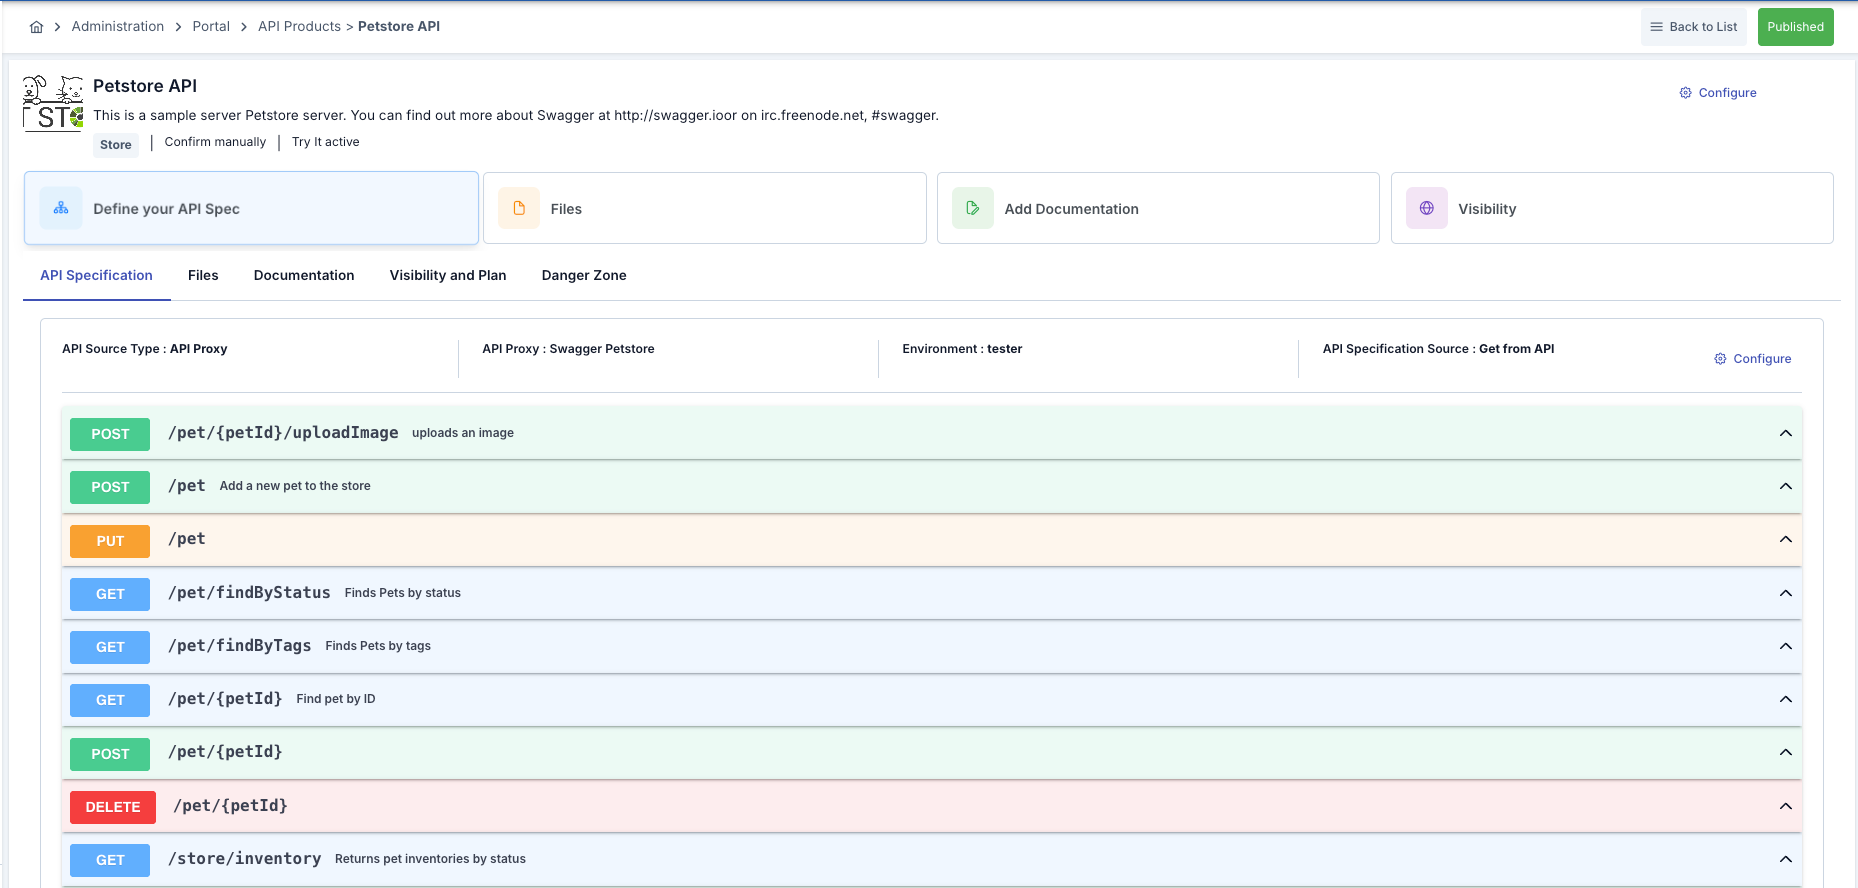
Step 1: Accessing the API Specification Tab | API Product detail page → API Specification If not yet configured: “Define your API Spec” card If configured: API information and operations list |
Step 2: Click the Configure Button | Click the “Configure” button (on the right side, on the card) The “API Configuration” dialog opens |
Step 3: Selecting the API Source Type | 1-API Proxy
2. Proxy Group
|
Step 4: Selecting the API Proxy/Group | API Proxy Selection:
API Proxy Group Selection:
API Proxy and Proxy Group cannot be used together. You must choose only one. After making your selection, the environments list will load automatically. |
Step 5: Environment Selection | The Environment dropdown is automatically populated The environments where the selected API Proxy/Group is deployed are listed An environment is selected Only deployed environments are listed If the API has not yet been deployed, it must first be deployed from API Manager Portal users use the API in the environment you selected |
Step 6: Selecting the API Specification Source | Two Options: 1. Get from API (Recommended)
When to Use:
2. Upload spec source
When to Use:
How to Upload:
|
Step 7: Save/Update |
|
What are Files?
Definition: These are additional files provided to users along with the API Product.
Usage Areas:
- SDK files (ZIP)
- Sample code files
- Postman collection files
- PDF guides
- Certificate files
- Test data
Steps to add files:
| Step | Process/ Description |
|---|---|
Accessing the Files Tab |
|
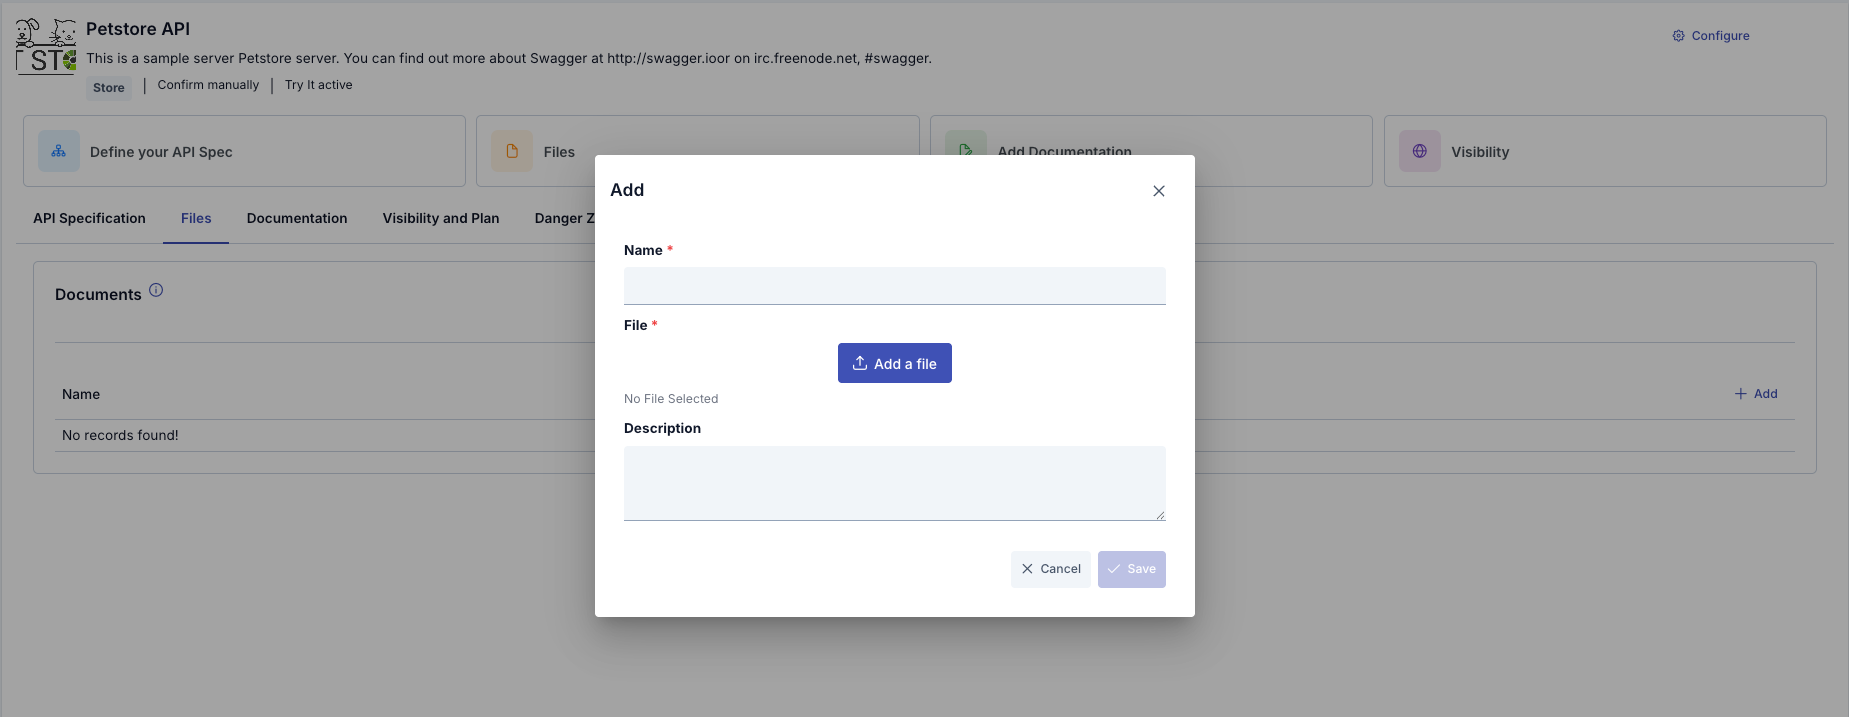
Click the Add Button | Click the “+ Add File” button The “Add File” dialog box opens |
Filling in File Information | 1-Name Required
2. File Required
3. Description
|
Save | Click the “Save” button |
File Download | Go to the Files tab on the API Product page Find the file you want to download Click the “Download” button The file will be downloaded |
File Editing | Find the file in the file list Select “Edit” from the three-dot menu Make your changes Click the “Save” button |
Deleting Files | Find the file in the Files list Select “Delete” from the three-dot menu Click “Yes” in the confirmation dialog The deletion cannot be undone |
Documentation Management
What is Documentation?
Definition: Special documentation pages provided with the API Product.
Difference from API Specification:
- API Specification: Automatically generated, endpoint-based technical documentation
- Documentation: Manually created, custom content pages
Use Cases:
- Getting Started (Getting Started Guide)
- Use Cases (Use Cases)
- Best Practices (Best Practices)
- Troubleshooting (Troubleshooting)
- Migration Guides (Migration Guides)
- FAQ (Frequently Asked Questions)
- Changelog (Change History)
Steps for adding a documentation page:
| Step | Process/ Description |
|---|---|
Step 1: Accessing the Documentation Tab | API Product detail page → Documentation tab |
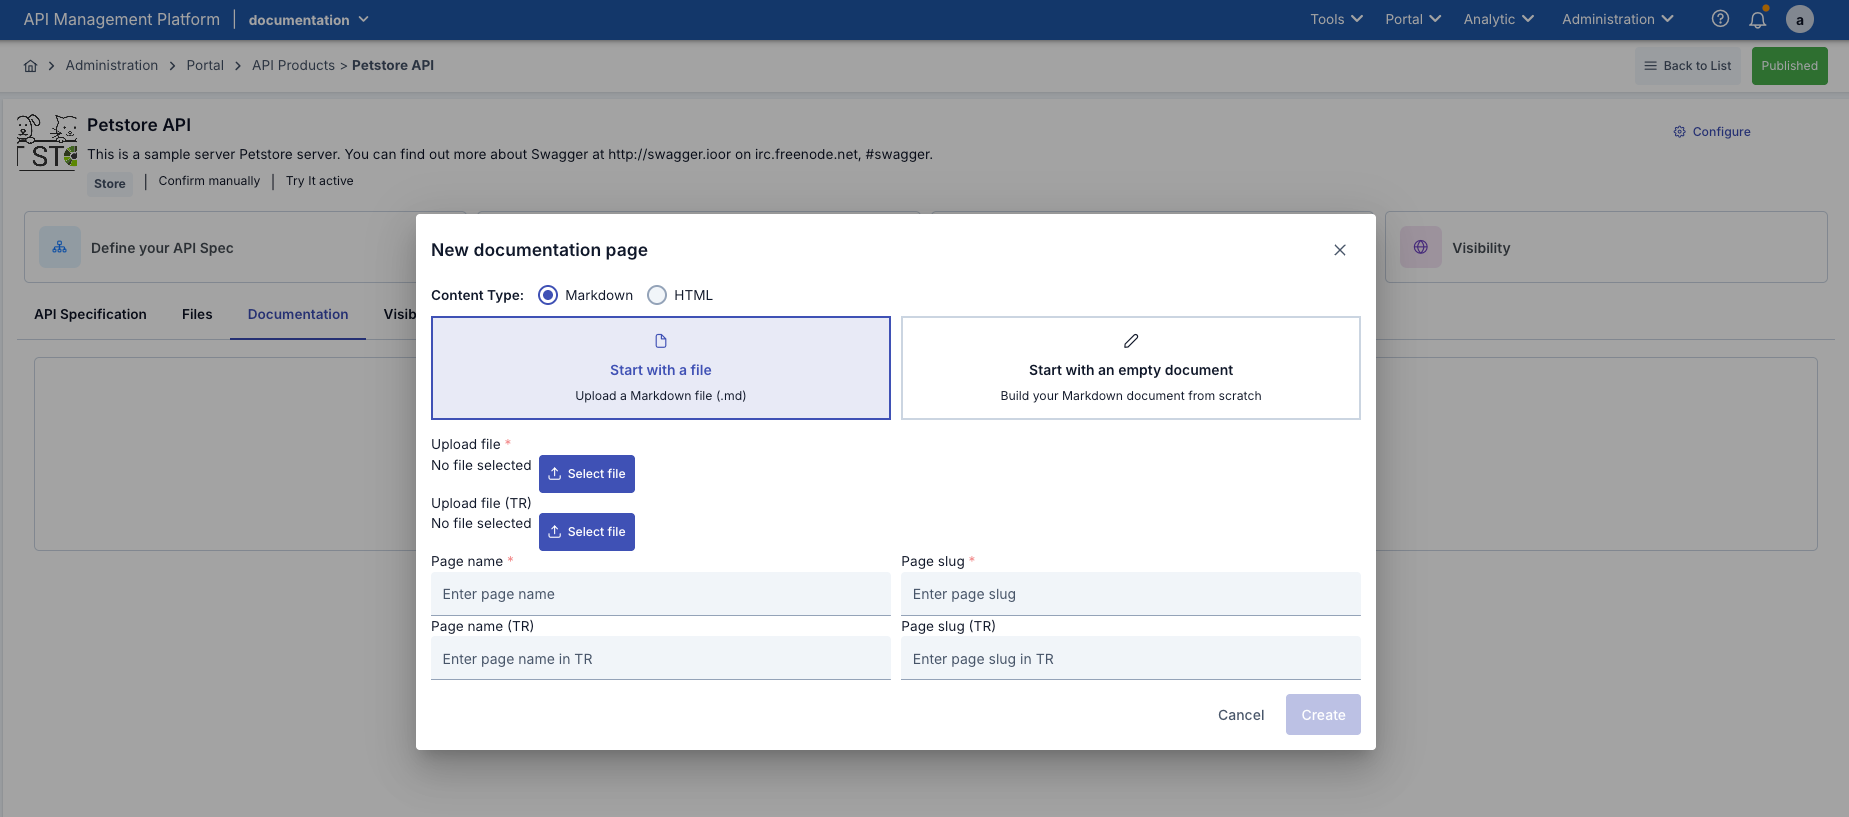
Step 2: Click the Add Page Button | Click the “+ Add Page” button The “Add Documentation Page” dialog opens |
Step 3: Fill in the Page Information | 1. Name Required
2. Slug Required
3. Content Required
|
Step 5: Save | Click the “Save” button |
Documentation Page Editing | Find the page in the Documentation tab Select “Edit” from the three-dot menu Make your changes Click the “Save” button |
Delete Documentation Page | Find the page in the Documentation tab Select “Delete” from the three-dot menu Click “Yes” in the confirmation dialog |
Visibility and Plan Management
What is Visibility?
Definition: Determines who can see and access the API Product in the Portal.
Three Visibility Types:
1. PUBLIC (Open to Everyone)
- All users in the Portal can see it
- Anyone can subscribe
- Listed in the API Catalog
When to Use:
- For general APIs
- Public services
- Marketing-purpose APIs
2. PRIVATE (Private)
- Only administrators can see it
- Regular users cannot see it
- Requires a special invitation
When to Use:
- Beta APIs
- Internal-use APIs
- APIs in the testing phase
3. AUTHORIZED_ORGANIZATIONS (Authorized Organizations)
- Only selected organizations can see it
- Organization members can subscribe
- Restricted access
When to Use:
- Partner APIs
- B2B integrations
- Enterprise APIs
Visibility Configuration stages:
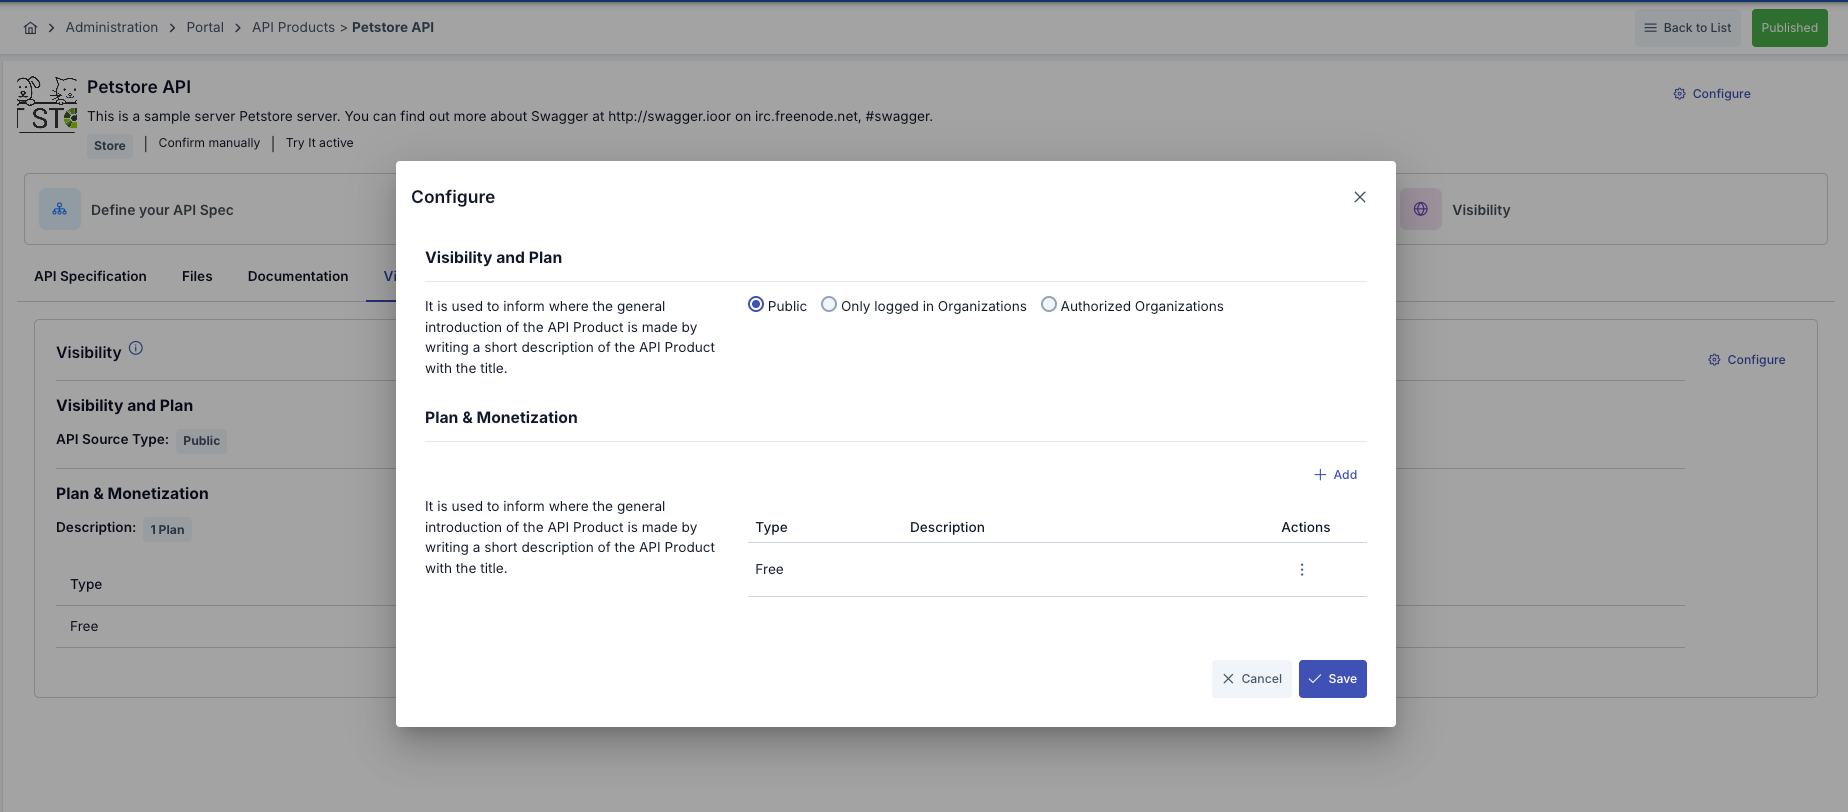
| Adım | İşlem/ Açıklama |
|---|---|
Step 1: Accessing the Visibility and Plan Tab | API Product detail page → Visibility and Plan tab |
Adım 2: Configure Visibility | Click the “Configure” button (on the Visibility tab) The “Configure Visibility” dialog opens |
Step 3: Selecting the Visibility Type | PUBLIC Selection:
PRIVATE Selection:
AUTHORIZED_ORGANIZATIONS Selection:
|
Step 4: Adding Authorized Organizations | (For AUTHORIZED_ORGANIZATIONS) You can visit the organizations link to add or edit a new organization. Action to be Performed:
Organization Selection:
Selected Organizations:
Removing an Organization:
|
What is a Plan?
Definition: Different pricing and limit options for API usage.
Why Plans are Created:
- To cater to different user segments
- To control usage limits
| Plan | Özellikler |
|---|---|
1. FREE PLAN | Free usage Within certain limits May include throttling and/or quotas |
2. SUBSCRIPTION PLAN | Fixed periodic fee (monthly/annual) Within specified usage limits Option to continue or discontinue service upon exceeding limits |
3. METERED PLAN | Usage-based pricing Fixed fee per API call Pay-as-you-go model |
4. TIERED PLAN | The unit price changes as usage increases Different prices for different usage ranges Volume discount |
Plan Creation
| Step | Process/ Description |
|---|---|
Step 1: Click the Add Plan Button | Visibility and Plan tab → “+ Add Plan” button |
Step 2: Selecting the Plan Type | Select the plan type from the dropdown:
Form fields will appear based on the selected plan type |
Step 3: Fill in the Plan Details | For the FREE PLAN:
For the SUBSCRIPTION PLAN:
For METERED PLAN:
For TIERED PLAN:
|
Adım 4: Save Plan | Click the “Save” button The plan is verified The plan is saved The plan is added to the list |
Deleting an API Product
How to Delete an API Product?
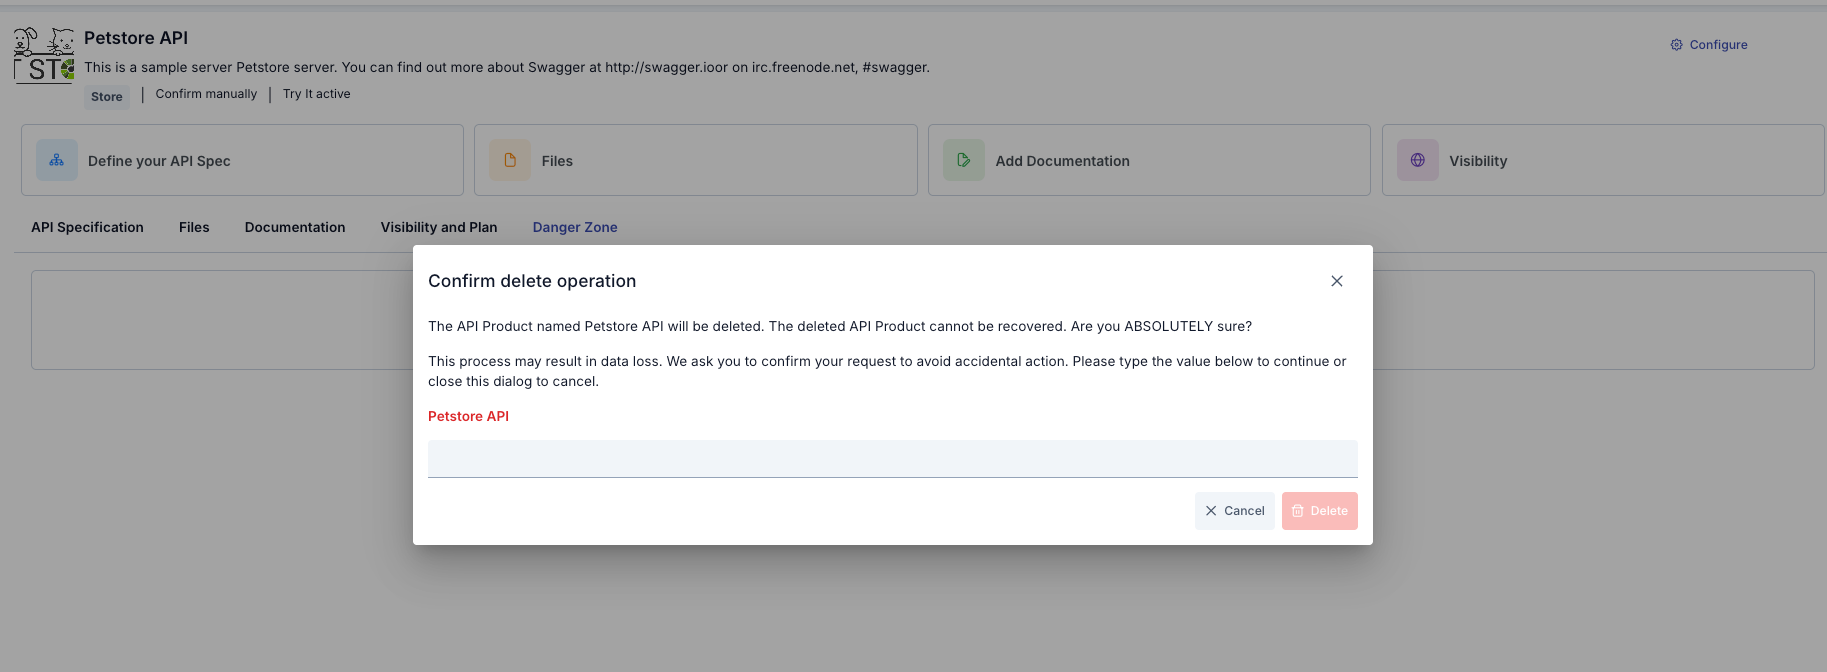
| Step | Description/Process |
|---|---|
Step 1: Enter the Danger Zone Tab | API Product detail page → Danger Zone tab |
Step 2: Click the Delete Button | Click the “Delete API Product” button A confirmation dialog box will appear |
Step 3: Granting Approval | Click the “Yes, Delete” button |
Step 4: Completing the Deletion Process | All active subscriptions are canceled User access permissions are revoked Files are deleted Documentation pages are deleted Plans are deleted API Product registration is deleted |
API Product Publishing and Unpublishing
| Step 1 | Adım 2 | Adım 3 | |
|---|---|---|---|
| Publish | Click the Publish Button API Product details page → Top right → “Publish” button (green) | Approve Click the “Yes, Publish” button | Publishing The published status is set to true. The status badge becomes “Published” (green). |
| Unpublish | Click the Unpublish Button API Product details page → Top right → “Unpublish” button (gray) | Confirm Click the “Yes, Remove from Publication” button | Removal from Publication The published status is set to false The status badge becomes “Unpublished” (gray) |
API Portal Interface View
Overview
API Product is the face of API packages published in Apinizer API Manager, presented to end users and applications through the API Portal.
Each product comes with visibility settings, multiple pricing plans (Free, Subscription, Metered, Tiered), documentation, files, a Try It console, and analytics capabilities.
Portal users can browse these products, subscribe to plans, make calls via the Try It console, and manage their subscriptions.
Roles and Prerequisites
- Portal Manager / Portal Business: Sees all products and administrative options. Can also use advanced dialogs (e.g., API product selection).
- Standard Portal User: Sees products that are visible to them (Public or authorized organization).
- To start a subscription:
- You must be logged in with your portal account.
- You must have at least one Portal App definition (if not, you can create one from the details page).
- Product content (plan, document, file) is prepared in API Manager; it is only consumed on the Portal side.
API Product List Page
Visual containing the API Portal API Product page view and configurations:
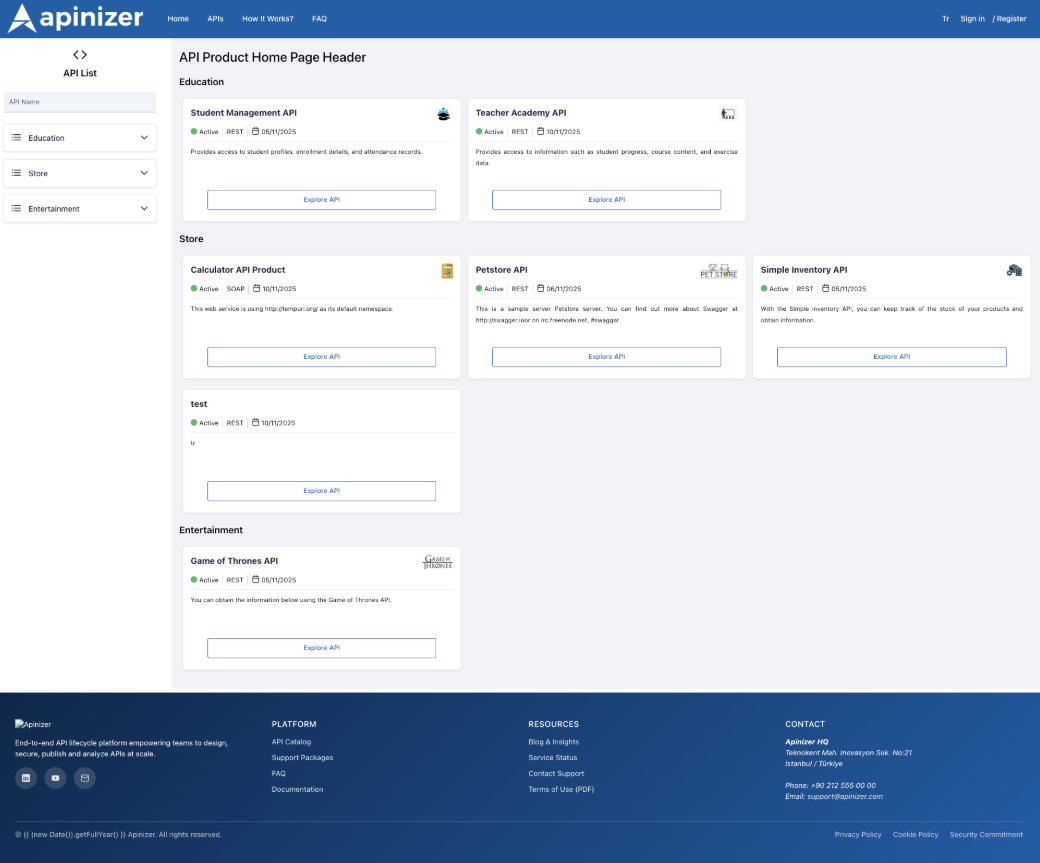
Access:
- Menu: Portal → API Products.
- The spot text at the top of the page can be customized by the administrator in the portal settings.
Left Panel (Category Tree)
- Categories are listed in PrimeNG panels. You can view the API products within each category by clicking on the category header.
- The search box filters both the category tree and the card list on the right; debounced search is performed as you type.
Right Panel (Card List)
- Product cards for each category are listed in a grid layout.
- Card content:
- Product name and optional image.
- Publication status (green/pink icon), API type, last update date.
- The first 300 characters of the description; full text can be viewed via tooltip.
- The “Explore API” button directs you to the product details page.
- Category selection can be reset with the clear button to return to “All”.
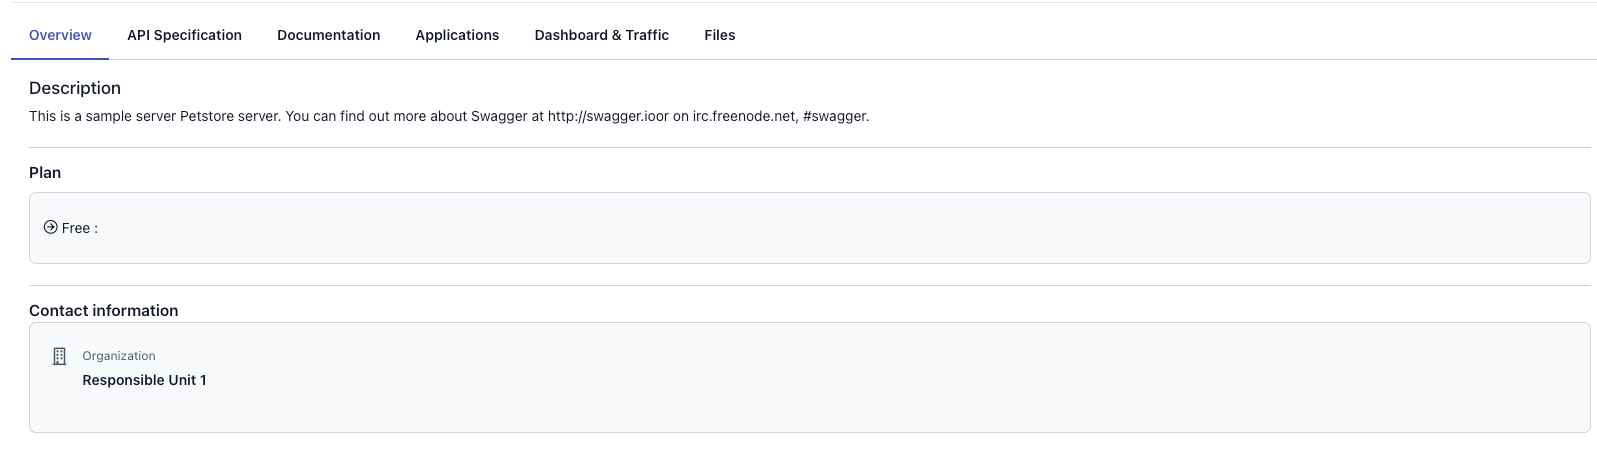
API Product Details Page
Visual showing the API Portal API Product details page view and configurations:
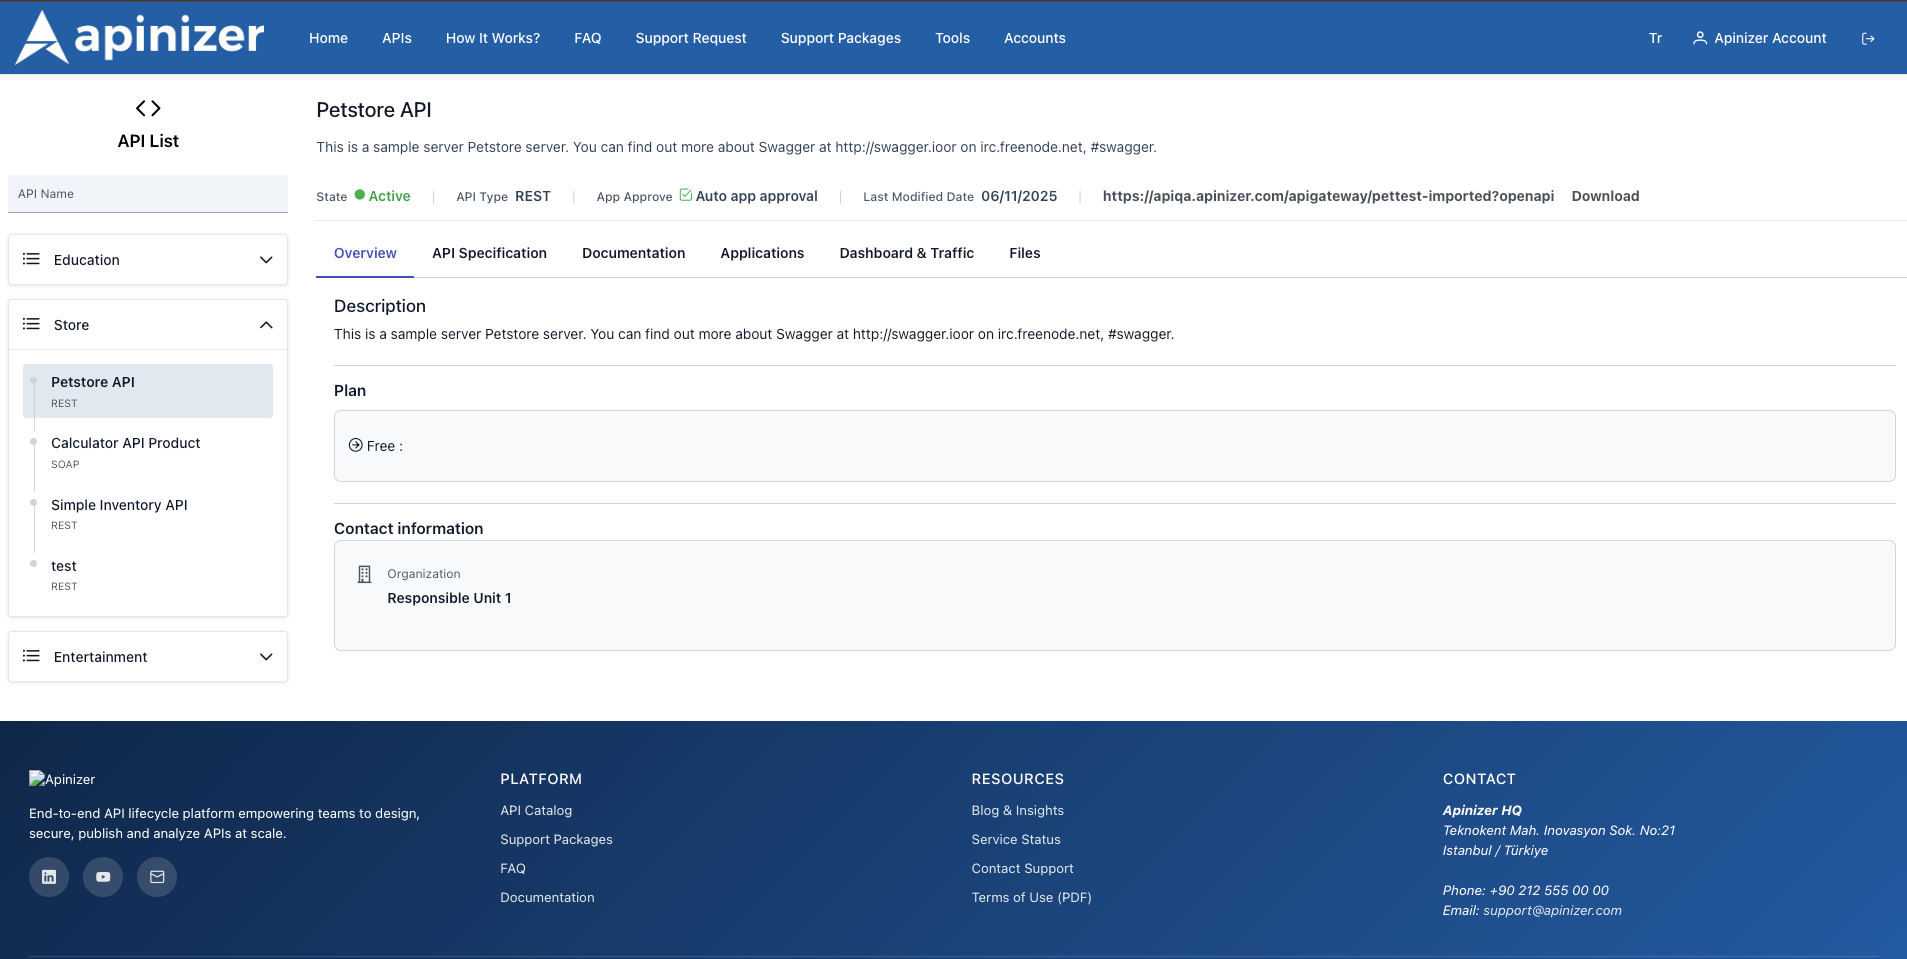
The category tree is again located on the left panel; you can click to switch to another product without leaving the page.
The product name, short description, publication status (Active/Passive), API type, auto-approval information, and last modification date are displayed at the top.
The “Access URL” link (OpenAPI or WSDL) provides direct access; the “Download” button next to it downloads the spec file.
| Sekme | Açıklama/ İşlev | Görünüm |
|---|---|---|
| Overview |
|
|
| API Specification |
|
|
| Documentation |
|
|
| Applications |
|
|
| Analytics | (If Analytics is enabled in the portal settings and the user is logged in)
|
|
| Files |
|
|
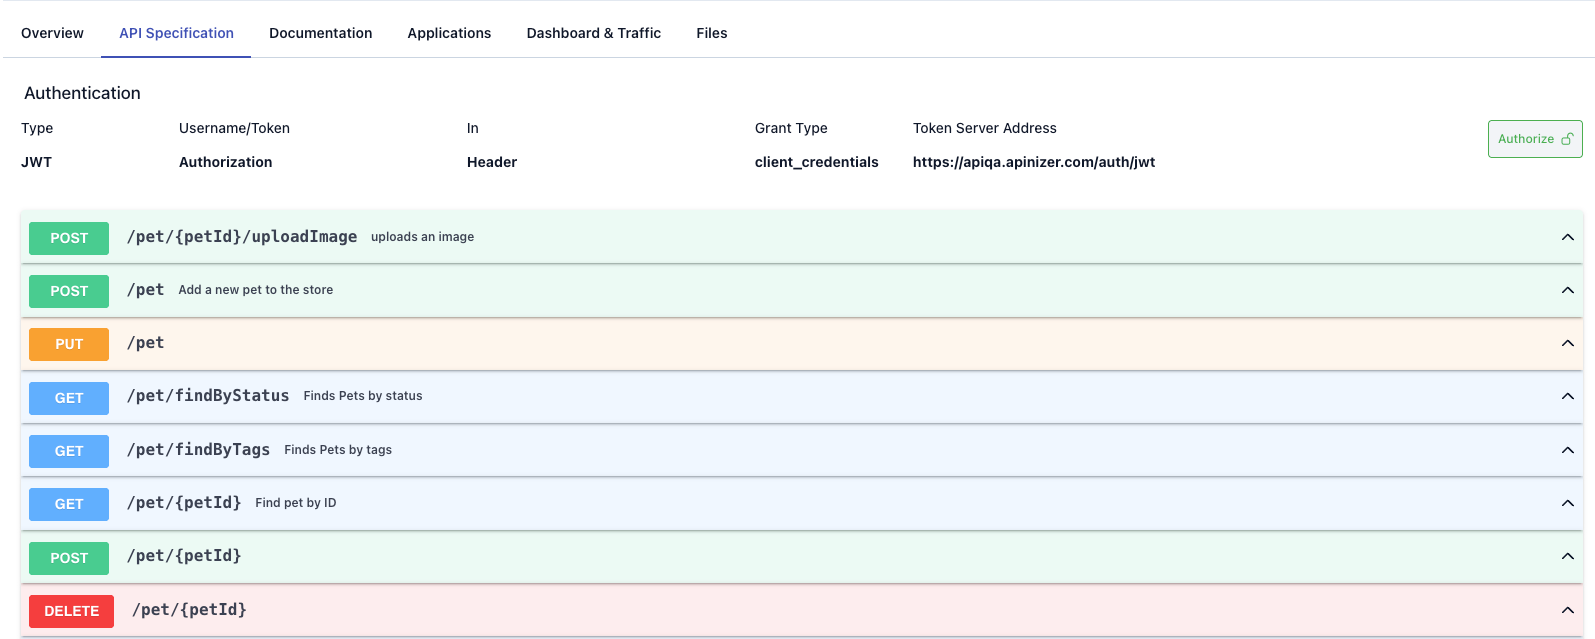


API Specification and Test Console
Authentication Summary
- The authentication type required by the API (No Auth / Plain Text / Basic / JWT) is clearly displayed.
- Plain Text: Specifies which header the username/password will be sent in and which field will be retrieved from the portal credentials.
- JWT: Lists the token server address, client information, and grant type information.
Authorize Dialog
- Non-logged-in users are redirected to the login page.
- Logged-in users can select existing credentials for their subscribed plans.
- Authorization headers (Basic, Bearer, etc.) are automatically prepared based on the authentication type and transferred to the test console.
- A warning is displayed if there are no credentials associated with the relevant Portal App.
Endpoint Accordions
- For each endpoint:
- Summary and description fields.
- Parameter table (name, typeIn, required, example).
- Request body – schema and examples based on media type.
- Response list – status code, media type, example.
- Try It button (if Try It is enabled).
Test Console (Try It)
- The endpoint dialog opens in an expandable p-dialog.
- The HTTP method can be changed from the dropdown, URL parameters are dynamically updated.
- You can add or remove query/header/path parameters.
- The request body editor comes ready with JSON/XML examples; the test button sends the request.
- The response editor color-codes based on the status code; lbl-color-success, etc.
- WSDL download link for SOAP endpoints, OpenAPI downloadable for REST endpoints.
- Security with JSON signing and WS-Security dialogs.
Code Examples in the API Specification Tab
When you enter the details of an API product on the Portal and open the API Specification tab, there is a section titled Code Examples at the end of each endpoint card. The purpose of this section is to show how endpoints are called using ready-made templates in different programming languages and to enable you to start running them in a matter of seconds.
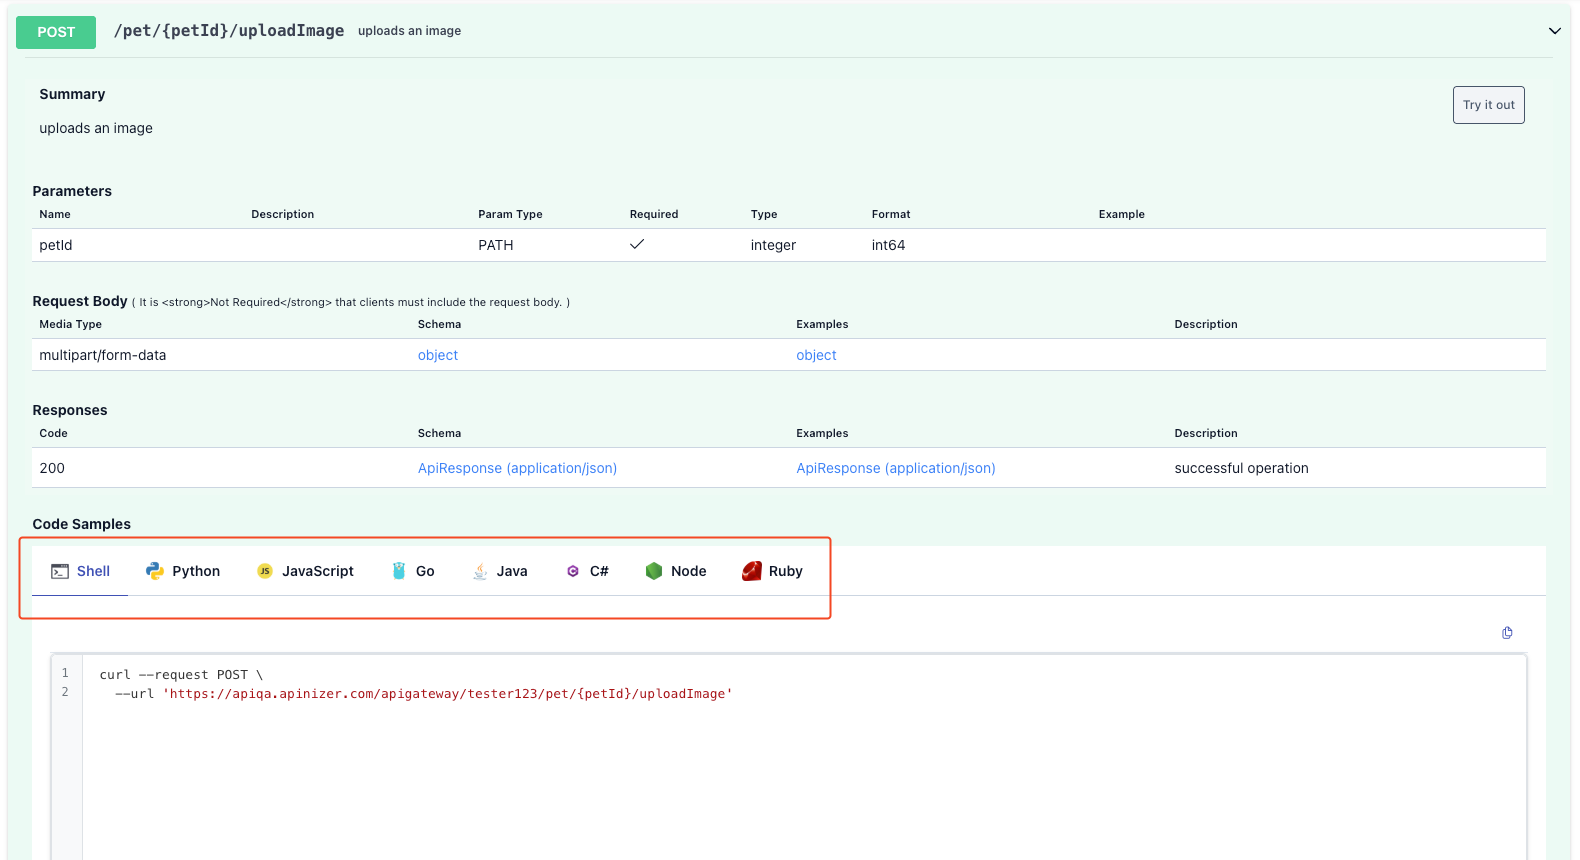
How does it work?
| Step | Description |
|---|---|
Select Enpoint |
|
Select the Language Tab |
|
Review the Code |
|
Copy with a single click |
|
Adapt it to your own environment |
|
Why Should You Use It?
- Quick Start: You'll find the answer to “How do I call this API?” in seconds.
- Language Flexibility: Different teams (Python, Java, Node, Go, etc.) instantly access examples tailored to their language.
- Stay Up-to-Date: Examples are generated from the API's OpenAPI specification, so your code automatically adapts when endpoints are updated.
- Copy & Run: Ready-made templates speed up your testing or integration process.
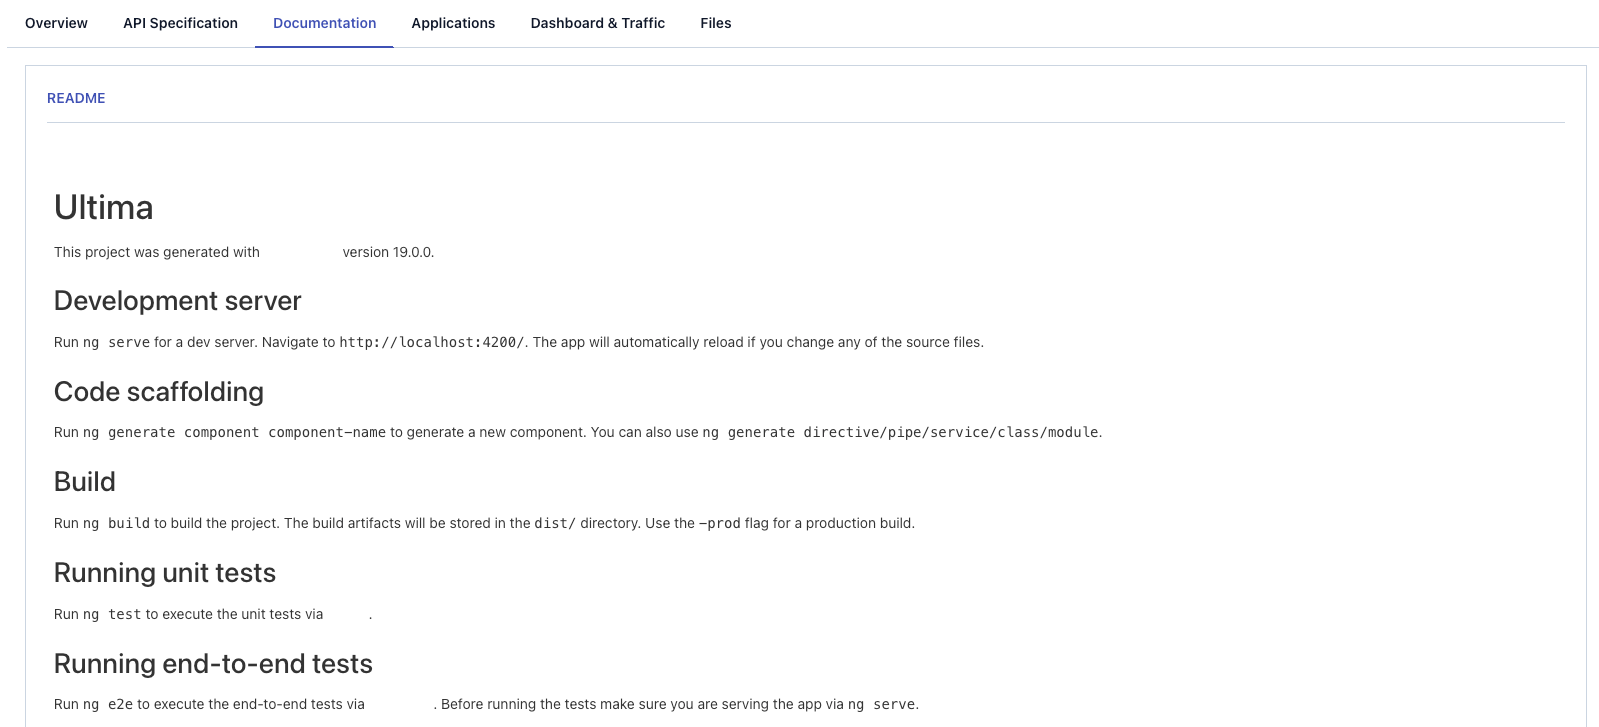
Documentation and Files
Documentation Tab
- Only visible for published products; a lock icon is displayed for unpublished products.
- If there are multiple documents, a list of links without tabs is displayed between the titles.
- Markdown content is rendered using GitHub-style formatting; HTML content is displayed securely using innerHTML.
Files Tab
- File name, description, and size are listed using p-table.
- Each file row has a download button (downloadFile).
- If the file does not exist, an informational message is displayed.
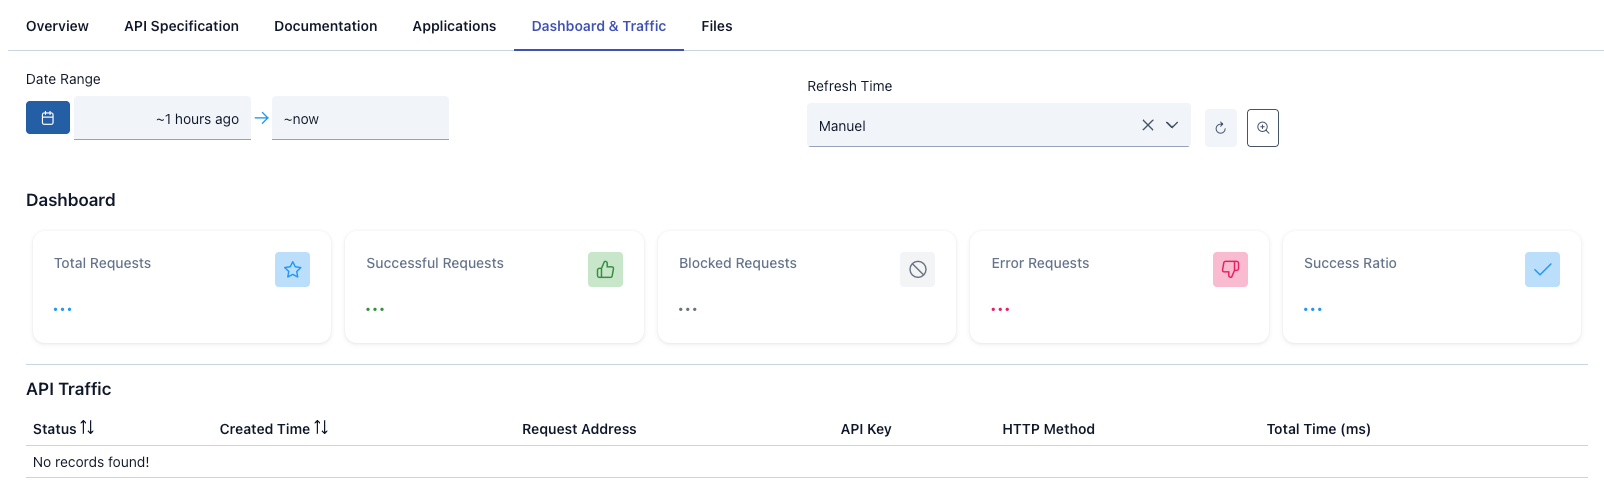
Analytics and Usage Tracking
- If enableAnalytics is enabled in the portal settings and the user is logged in, the Analytics tab is visible.
- The Dashboard contains graphs such as total calls, error distribution, and most popular plans.
- The date range can be changed (EnumDateRangeUsedComponents.API_DASHBOARD).
- This module is provided through ApiProductAnalyticsCoreModule.
Portal–Manager Workflow
- The actual source of API Product content is API Manager. The portal reads published content and presents it to the end user.
- Operations that cannot be performed in the Portal:
- Changing plan text/price
- Updating documentation pages
- Changing API visibility
- Enabling/disabling Try It settings
- These changes are made in API Manager; Portal pages are updated automatically.
- When the Publish status is turned off in API Manager, the product is automatically removed from the Portal list.
Frequently Asked Questions
| Question | Answer |
|---|---|
What is the difference between API Product and API Proxy? | API Proxy: The proxy/gateway in front of the backend API, includes technical configuration, policies, routing, security settings, for developers/technical teams API Product: The product offered on the portal, business-focused packaging, pricing, documentation, visibility, prepared for end users.
|
Should I create separate API Products for multiple environments? | No, it's not necessary. Correct Approach: Create an API Product and change it by selecting Environments How It Works:
|
What is Try It and how do I use it? | Feature to test the API directly on the portal Swagger UI-like interactive interface Test the API without writing code |