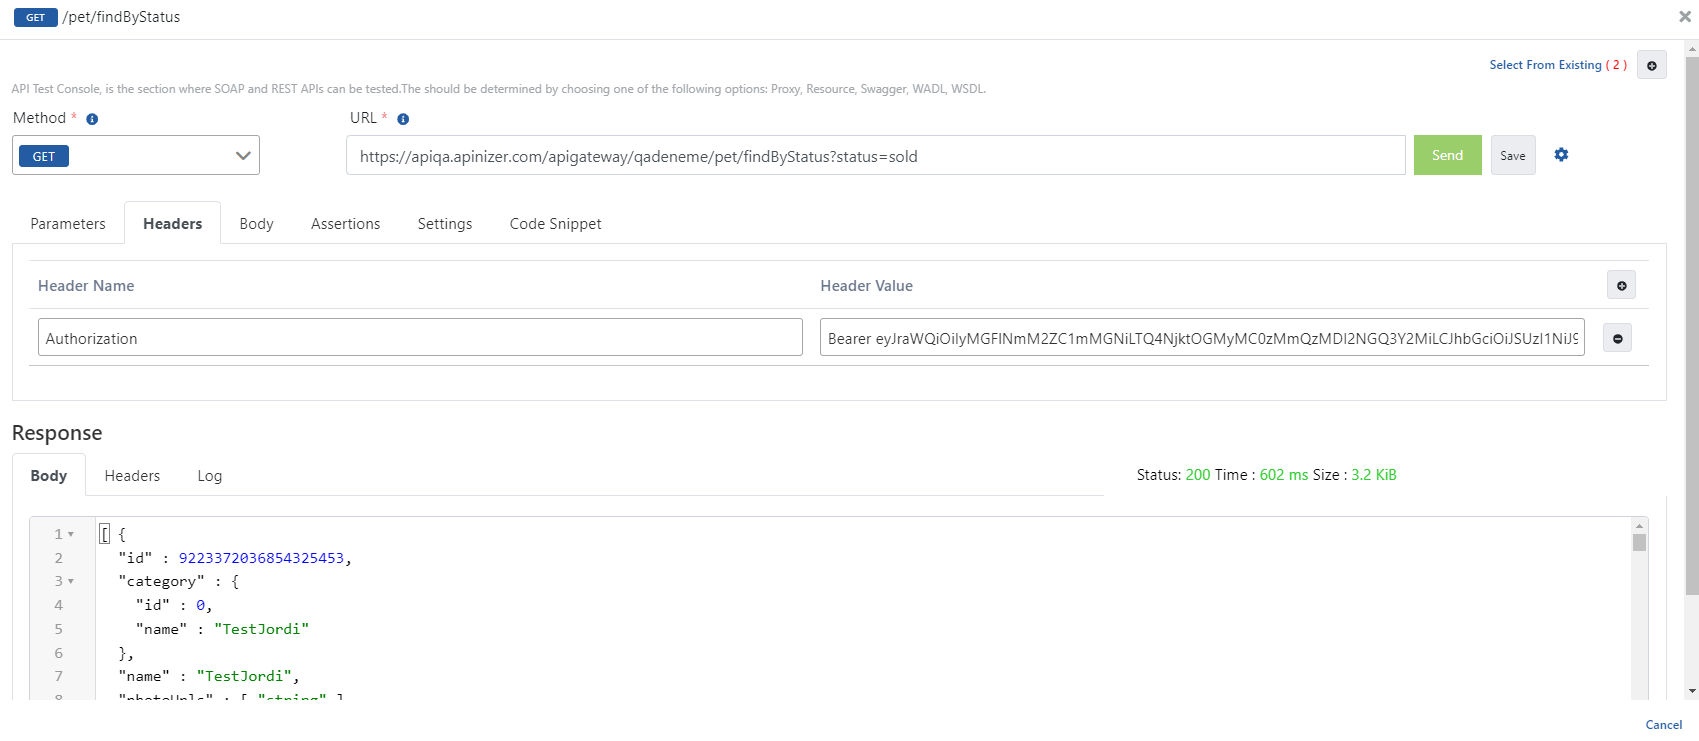
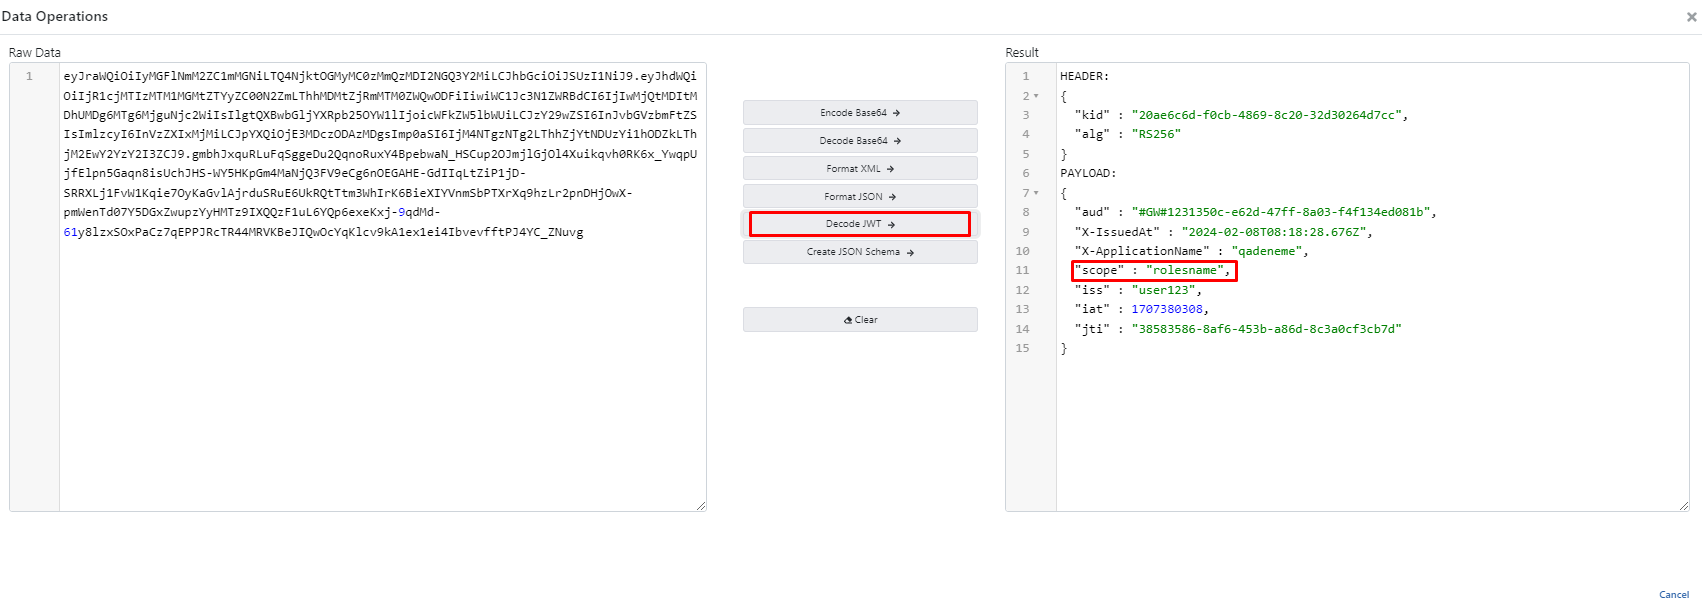
Methods of Obtaining Tokens
There are two types of methods to get tokens. These methods are activated by selecting one of the "Manage From This Policy" or "Manage From ACL" options over the created JWT/OAuth2 Policy. The process of obtaining tokens by both methods will be explained in detail.
1. Obtaining Tokens with the "Manage From This Policy" Option
The ways to get client_id and client_secret values according to the administration level of the authentication policy are as follows:
If Authentication Policy is added to API Proxy: client_id and client_secret values are retrieved from “Show Proxy Key” in the Overview section of API Proxy.
- If Authentication Policy is added to Proxy Group: client_id and client_secret values are retrieved from “Show Proxy Key” in the Overview section of API Proxy Group.
- If Authentication Policy is added to Policy Group: client_id and client_secret values are retrieved from “Show Proxy Key” in the Definition section of the relevant Policy Group.
1.1. Obtaining Tokens with JWT
If the "Manage From This Policy" option is selected in the created JWT Policy, tokens are obtained by this method.
Prepare a new HTTP request using the Apinizer Test Console ot another application of your choice.
The address should be entered in accordance with your own Apinizer access address, something like "https://apinizerAccessAddress/auth/jwt".
If Allow URL Parameters option is selected, information can be sent with GET method and using URL parameter. (See the table below for the parameters to be sent)
- HTTP Method must be POST.
- "x-www-form-urlencoded" value should be selected in the body field. If Apinizer Test Console is not used, a title should be added with the name "Content-Type" and the value "application/x-www-form-urlencoded".
- The values to be entered in the body fields are as in the table below.
Key Name | Value To Be Entered If "client_credentials" is Selected While Defining The Policy | Value To Be Entered If "password" is Selected While Defining The Policy |
|---|---|---|
| grant_type | client_credentials | password |
| client_id | Public Key value retrieved from API Key field | Public Key value retrieved from API Key field |
| client_secret | Private Key value retrieved from API Key field | "-" (hyphen) |
| username | This field is not added | Username of one of the records in the validation repository you selected |
| password | This field is not added | Password of one of the records in the validation repository you selected |
Refreshing Token
If the Token Never Expires option is turned off and the Refresh Token Allowed option is turned on, the tokents that will become invalid after a certain period of time can be renewed within the period specified in the Refresh Token Expires In field
Prepare a new HTTP request using the Apinizer Test Console or another application of your choice.
- The address should be entered in accordance with your own Apinizer access address, something like "https://apinizerAccessAddress/auth/jwt".
If Allow URL Parameters option is selected, information can be sent with GET method and using URL parameter. (See the table below for the parameters to be sent)
- HTTP Method must be POST.
- "x-www-form-urlencoded" value should be selected in the body field. If Apinizer Test Console is not used, a title should be added with the name "Content-Type" and the value "application/x-www-form-urlencoded".
- The values to be entered in the body fields are as in the table below.
Key Name | Key Value |
|---|---|
| grant_type | refresh_token |
| client_id | Public Key value retrieved from API Key field |
| client_secret | "-" (hyphen) |
| refresh_token | value in key "refresh_token" in previously retrieved token |
Example Usage #1
GrantType: Client Credentials
Add a JWT Authentication policy with default values. While doing this, copy your API Key information somewhere to be used.
Send your token request with a message like the example below.
The image containing the settings for sending requests to the Token Service via Apinizer Test Console is given below:
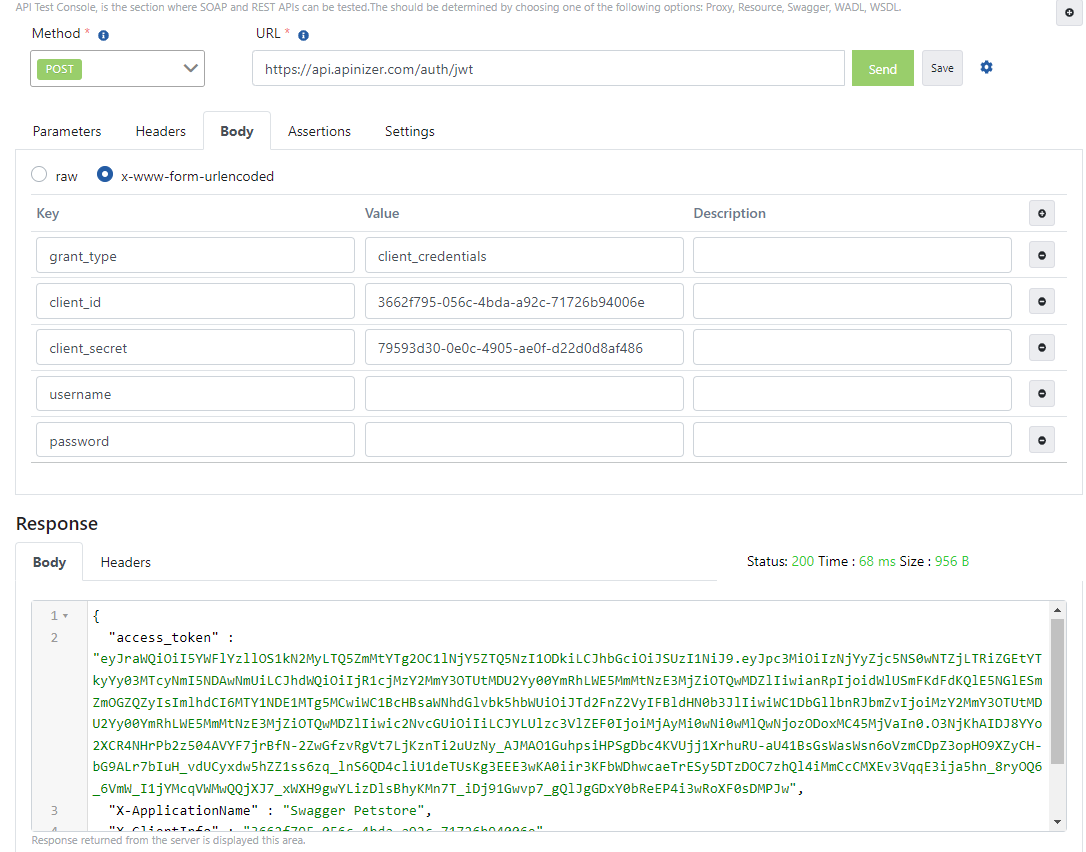
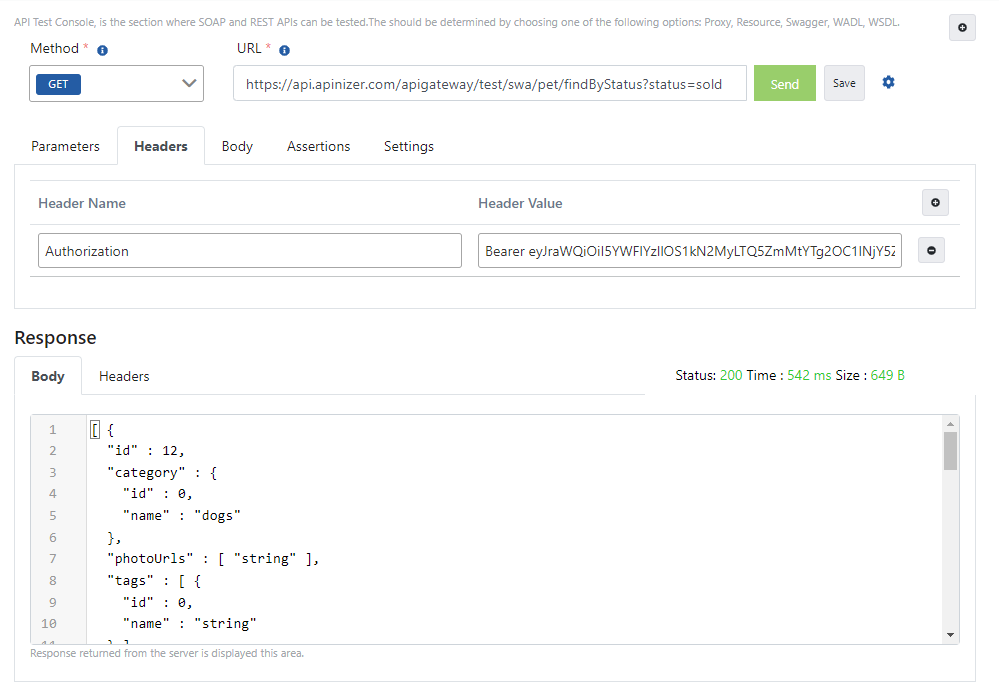
The value in the "access_token" field in the response message is given as a value to the "Authorization" key in all requests to be sent to this API Proxy, providing secure access to the relevant API.
The image containing the process of sending a request with token information via Apinizer Test Console is given below:
Example Usage #2
GrantType: Password
Add a JWT Authentication policy whose Grant Type value is Password. While doing this, copy your API Key information somewhere to be used.
Send your token request with a message like the example below.
The image containing the settings for sending requests to the Token Service via Apinizer Test Console is given below:
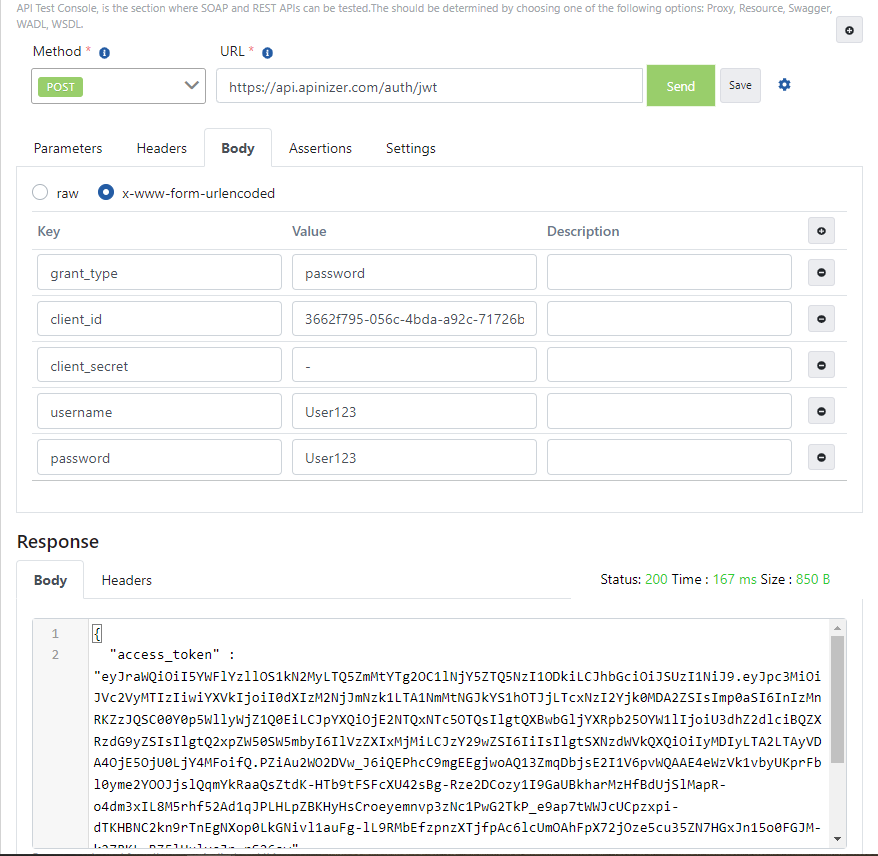
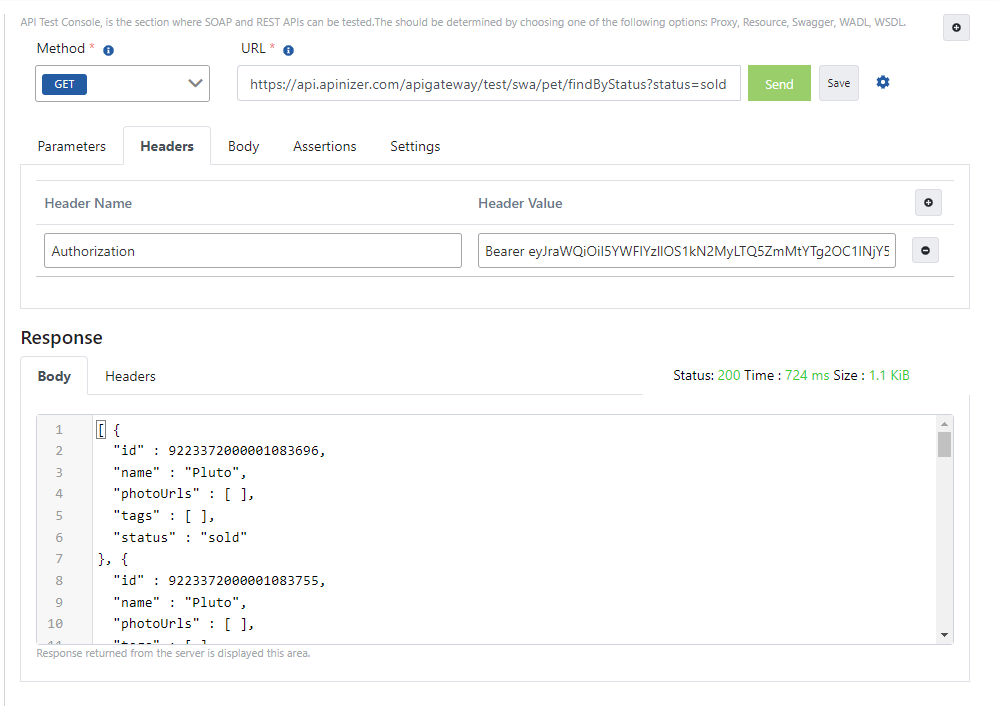
The value in the "access_token" field in the response message is given as a value to the "Authorization" key in all requests to be sent to this API Proxy, providing secure access to the relevant API.
The image containing the process of sending a request with token information via Apinizer Test Console is given below:
Example Usage #3
GrantType: Refresh Token
Add a JWT Authentication policy with the renewal option turned on. While doing this, copy your API Key information somewhere to be used.
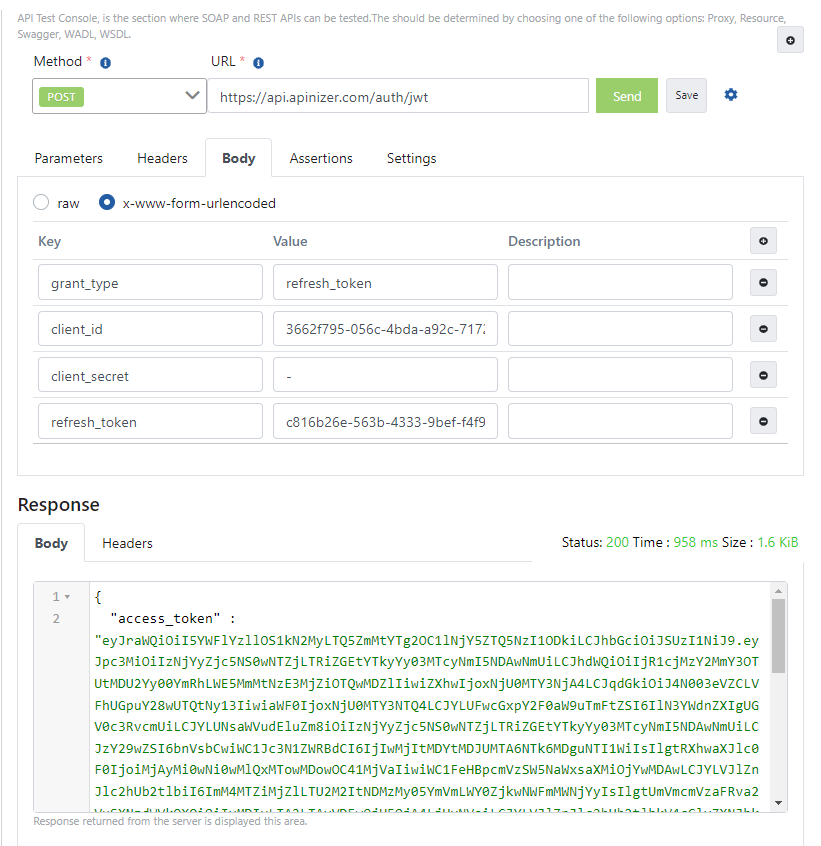
Send your token request with a message like the example below.
The image containing the settings for sending requests to the Token Service via Apinizer Test Console is given below:
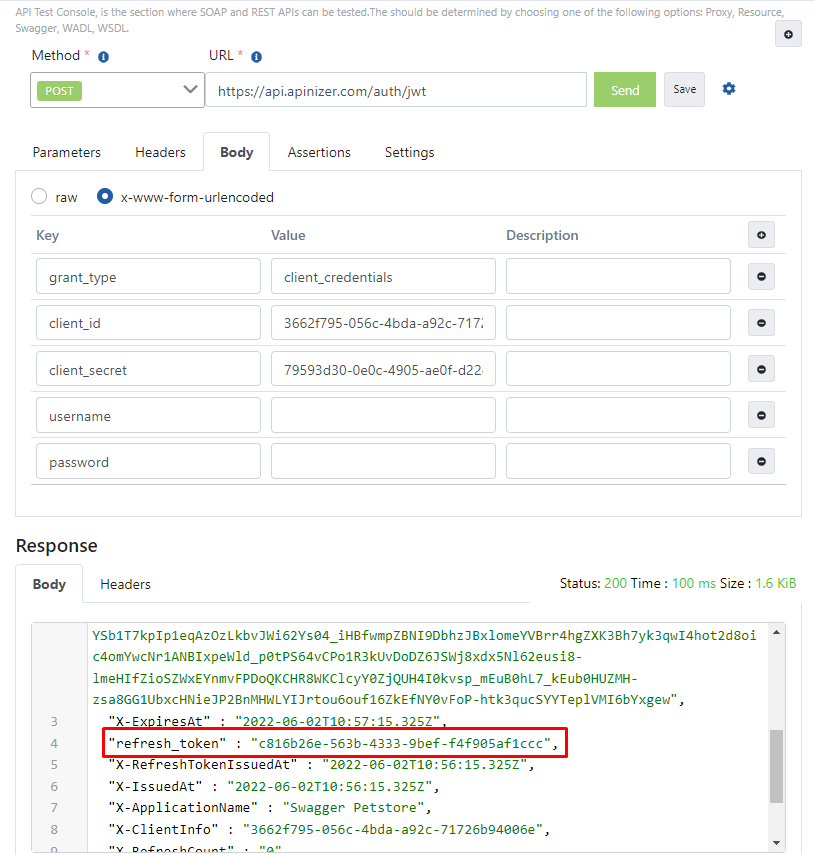
To refresh the token, take the value in the "refresh_token" field in the response from the first request and set the value for the refresh_token key in the message you prepared as below.
The value in the "access_token" field in the next answer will be your renewed token value.
The image of the request sample sent to renew the token via the Apinizer Test Console is given below:
1.2 Obtaining Tokens with OAuth2
If the "Manage From This Policy" option is selected in the created OAuth2 Policy, tokens are obtained by this method.
Prepare a new HTTP request using the Apinizer Test Console ot another application of your choice.
- The address should be entered in accordance with your own Apinizer access address, something like "https://apinizerAccessAddress/auth/token".
If Allow URL Parameters option is selected, information can be sent with GET method and using URL parameter. (See the table below for the parameters to be sent)
- HTTP Method must be POST.
- "x-www-form-urlencoded" value should be selected in the body field. If Apinizer Test Console is not used, a title should be added with the name "Content-Type" and the value "application/x-www-form-urlencoded".
- The values to be entered in the body fields are as in the table below.
Key Name | Value To Be Entered If "client_credentials" is Selected While Defining The Policy | Value To Be Entered If "password" is Selected While Defining The Policy |
|---|---|---|
| grant_type | client_credentials | password |
| client_id | Public Key value retrieved from API Key field | Public Key value retrieved from API Key field |
| client_secret | Private Key value retrieved from API Key field | Private Key value retrieved from API Key field |
| username | This field is not added | Username of one of the records in the validation repository you selected |
| password | This field is not added | Password of one of the records in the validation repository you selected |
Refreshing Token
If the Token Never Expires option is turned off and the Refresh Token Allowed option is turned on, the tokents that will become invalid after a certain period of time can be renewed within the period specified in the Refresh Token Expires In field
Prepare a new HTTP request using the Apinizer Test Console or another application of your choice.
- The address should be entered in accordance with your own Apinizer access address, something like "https://apinizerAccessAddress/auth/token".
If Allow URL Parameters option is selected, information can be sent with GET method and using URL parameter. (See the table below for the parameters to be sent)
- HTTP Method must be POST.
- "x-www-form-urlencoded" value should be selected in the body field. If Apinizer Test Console is not used, a title should be added with the name "Content-Type" and the value "application/x-www-form-urlencoded".
- The values to be entered in the body fields are as in the table below.
Key Name | Key Value |
|---|---|
| grant_type | refresh_token |
| client_id | Public Key value retrieved from API Key field |
| client_secret | Private Key value retrieved from API Key field |
| refresh_token | value in key "refresh_token" in previously retrieved token |
Example Usage #1
GrantType: Client Credentials
Add a OAuth2 Authentication policy with default values. While doing this, copy your API Key information somewhere to be used.
Send your token request with a message like the example below.
The image containing the settings for sending requests to the Token Service via Apinizer Test Console is given below:
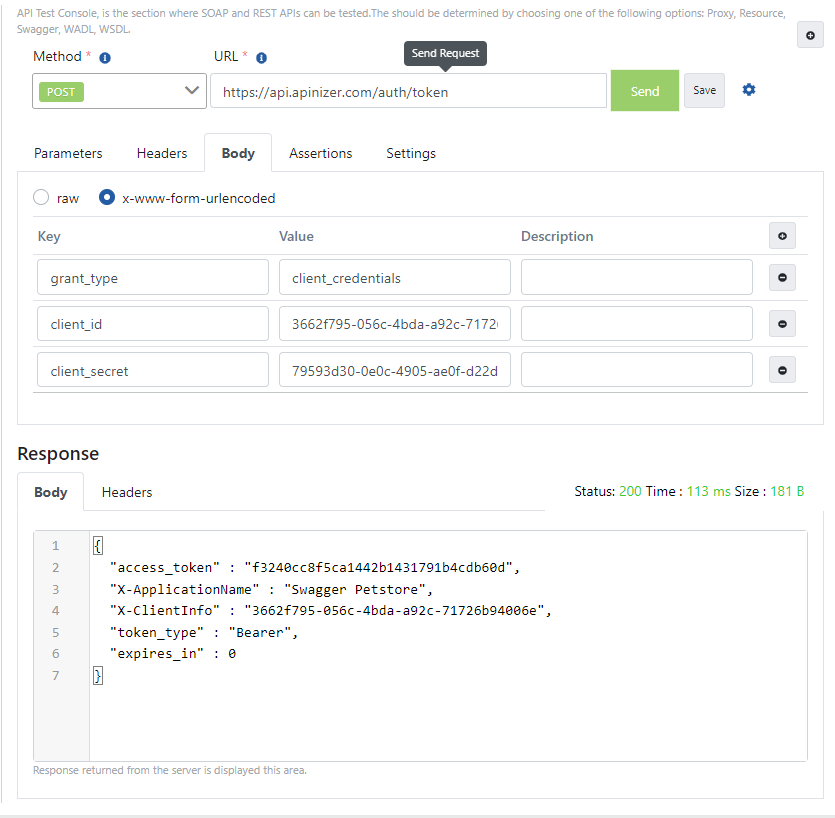
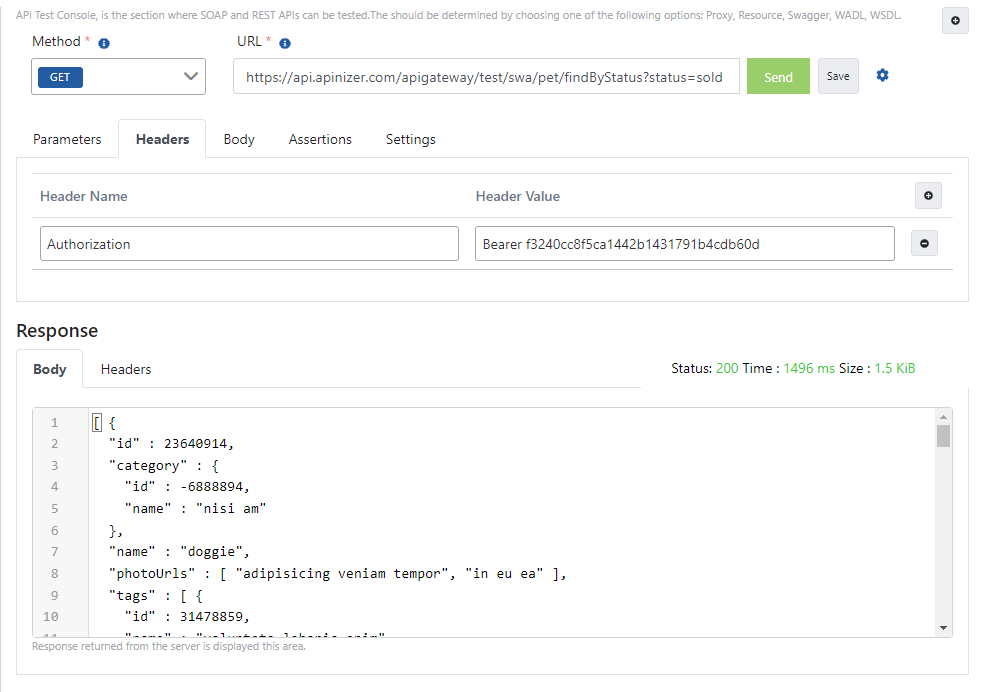
The value in the "access_token" field in the response message is given as a value to the "Authorization" key in all requests to be sent to this API Proxy, providing secure access to the relevant API.
The image containing the process of sending a request with token information via Apinizer Test Console is given below:
Example Usage #2
GrantType: Password
Add a OAuth2 Authentication policy whose Grant Type value is Password. While doing this, copy your API Key information somewhere to be used.
Send your token request with a message like the example below.
The image containing the settings for sending requests to the Token Service via Apinizer Test Console is given below:
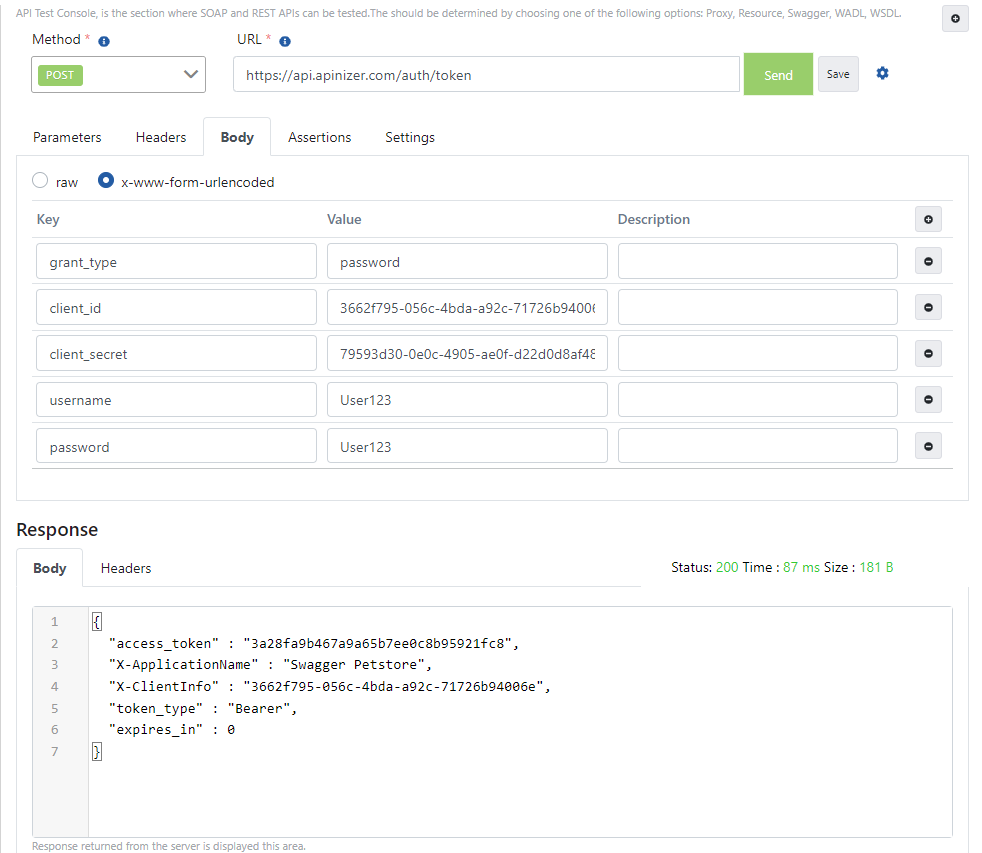
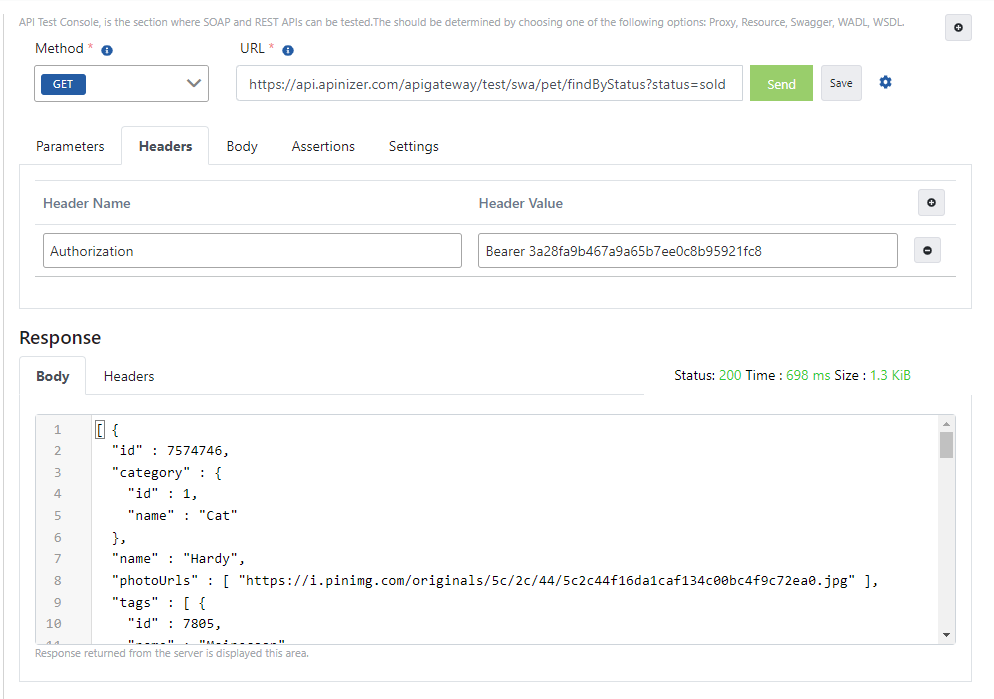
The value in the "access_token" field in the response message is given as a value to the "Authorization" key in all requests to be sent to this API Proxy, providing secure access to the relevant API.
The image containing the process of sending a request with token information via Apinizer Test Console is given below:
Example Usage #3
GrantType: Refresh Token
Add a OAuth2 Authentication policy with the renewal option turned on. While doing this, copy your API Key information somewhere to be used.
Send your token request with a message like the example below.
The image containing the settings for sending requests to the Token Service via Apinizer Test Console is given below:
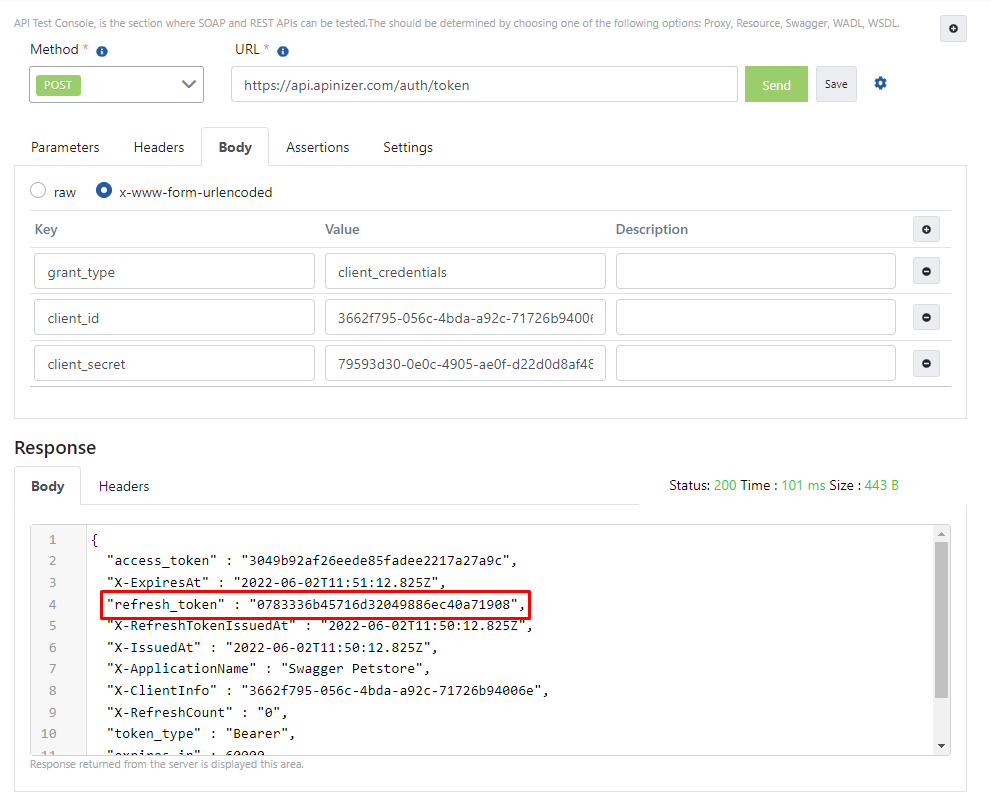
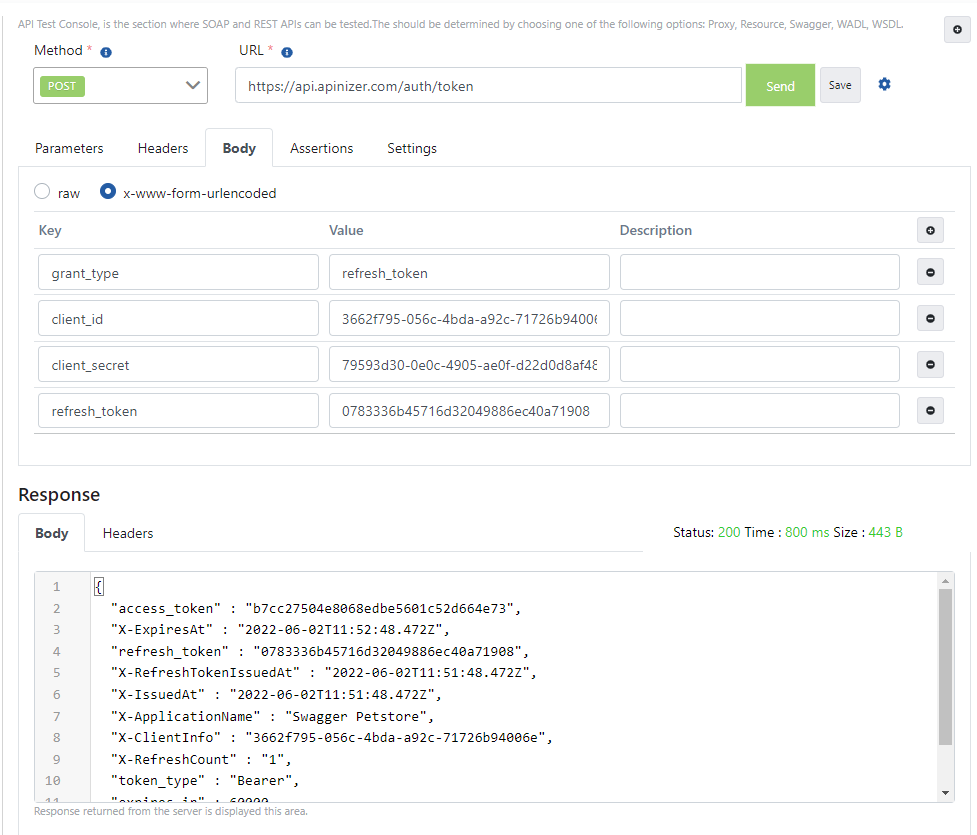
To refresh the token, take the value in the "refresh_token" field in the response from the first request and set the value for the refresh_token key in the message you prepared as below.
The value in the "access_token" field in the next answer will be your renewed token value.
The image of the request sample sent to renew the token via the Apinizer Test Console is given below:
1.3. Obtaining Tokens with Scope
Prepare a new HTTP request using the Apinizer Test Console ot another application of your choice.
The address should be entered in accordance with your own Apinizer access address, something like "https://apinizerAccessAddress/auth/jwt".
- HTTP Method must be POST.
- "x-www-form-urlencoded" value should be selected in the body field. If Apinizer Test Console is not used, a title should be added with the name "Content-Type" and the value "application/x-www-form-urlencoded".
- The values to be entered in the body fields are as in the table below.
Key Name | Value To Be Entered If "client_credentials" is Selected While Defining The Policy | Value To Be Entered If "password" is Selected While Defining The Policy |
|---|---|---|
| grant_type | client_credentials | password |
| client_id | Public Key value retrieved from API Key field | Public Key value retrieved from API Key field |
| client_secret | Private Key value retrieved from API Key field | "-" (hyphen) |
| username | This field is not added | Username of one of the records in the validation repository you selected |
| password | This field is not added | Password of one of the records in the validation repository you selected |
| scope | User role name | User role name |
Assigning a role to a user
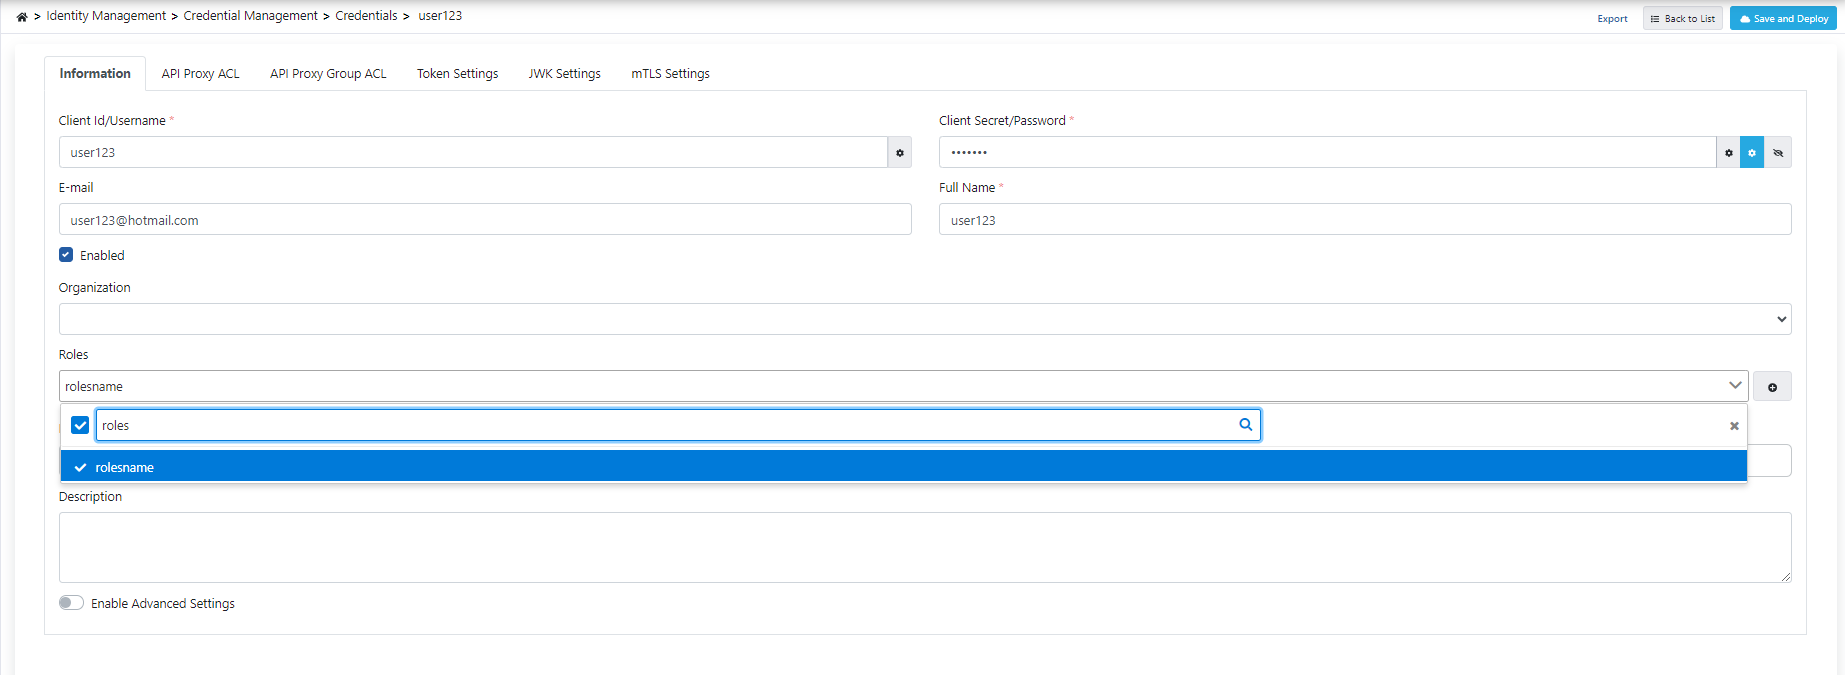
- To assign a role to a user, a new role should be added from the 'Roles' section, and then that proxy should be added to the user via the 'API Proxy ACL' section.
GrantType: Client Credentials
Add a JWT Authentication policy with default values. Copy your API Key information to be used somewhere.
Send a token retrieval request with a message like the one below.
The image containing the settings for sending a request to the Token Service via the Apinizer Test Console is provided below:
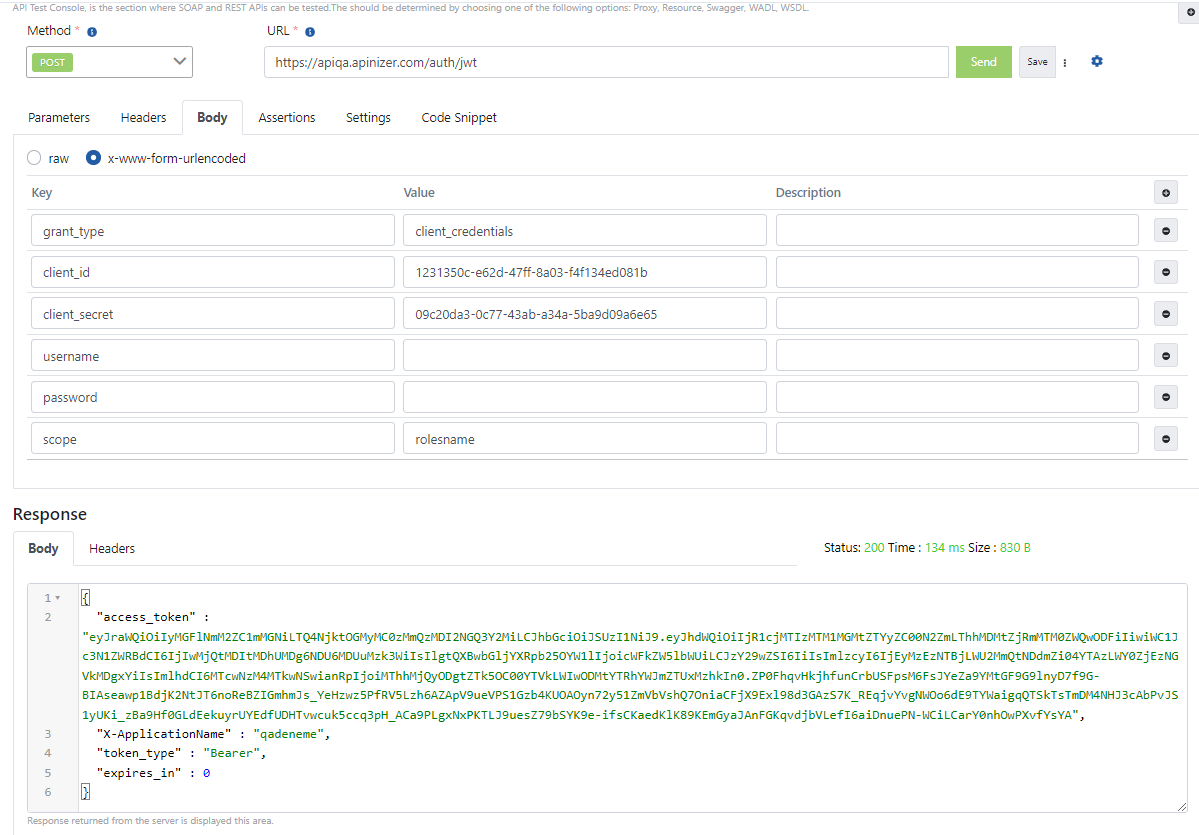
The value in the 'access_token' field within the response message, when provided as the value for the 'Authorization' header, grants secure access to the respective API for all requests sent to this API Proxy.
The image below illustrates the process of sending a request with token information via the Apinizer Test Console.
GrantType: Password
Add a JWT Authentication policy with the Grant Type value set to Password. Copy your API Key information to be used somewhere.
Send a token retrieval request with a message like the one below.
The image below provides the settings for sending a request to the Token Service via the Apinizer Test Console.
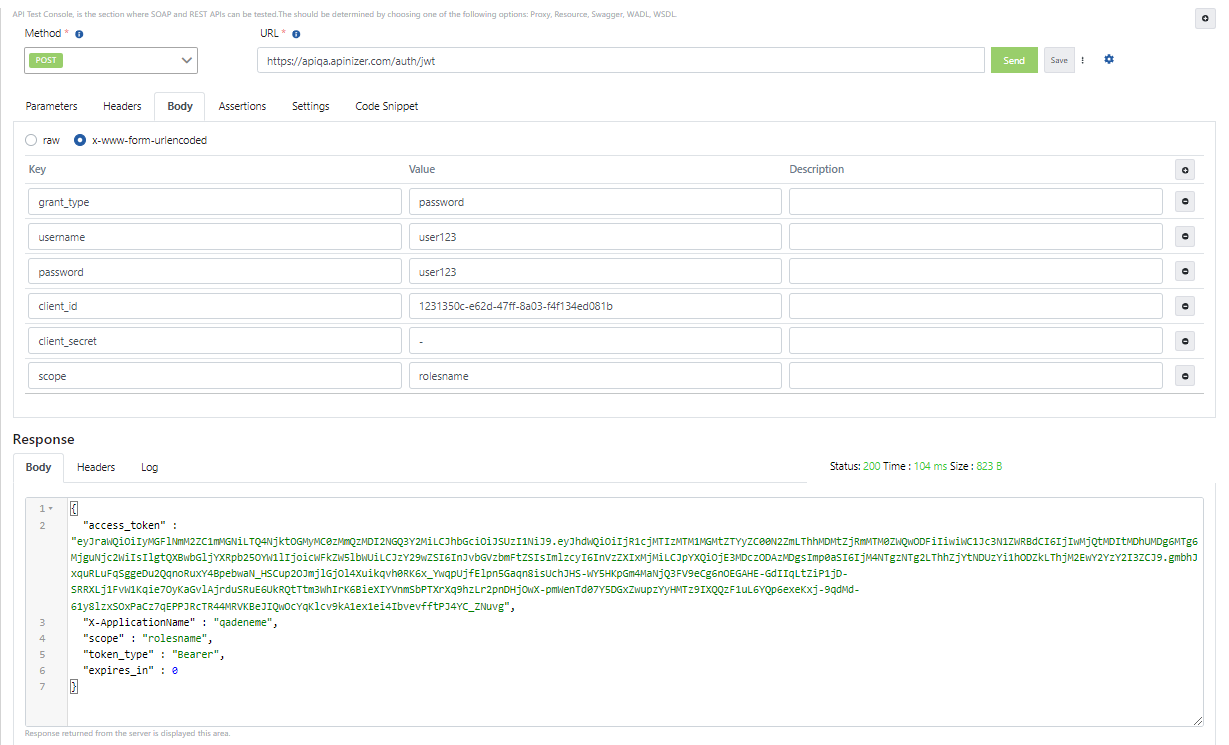
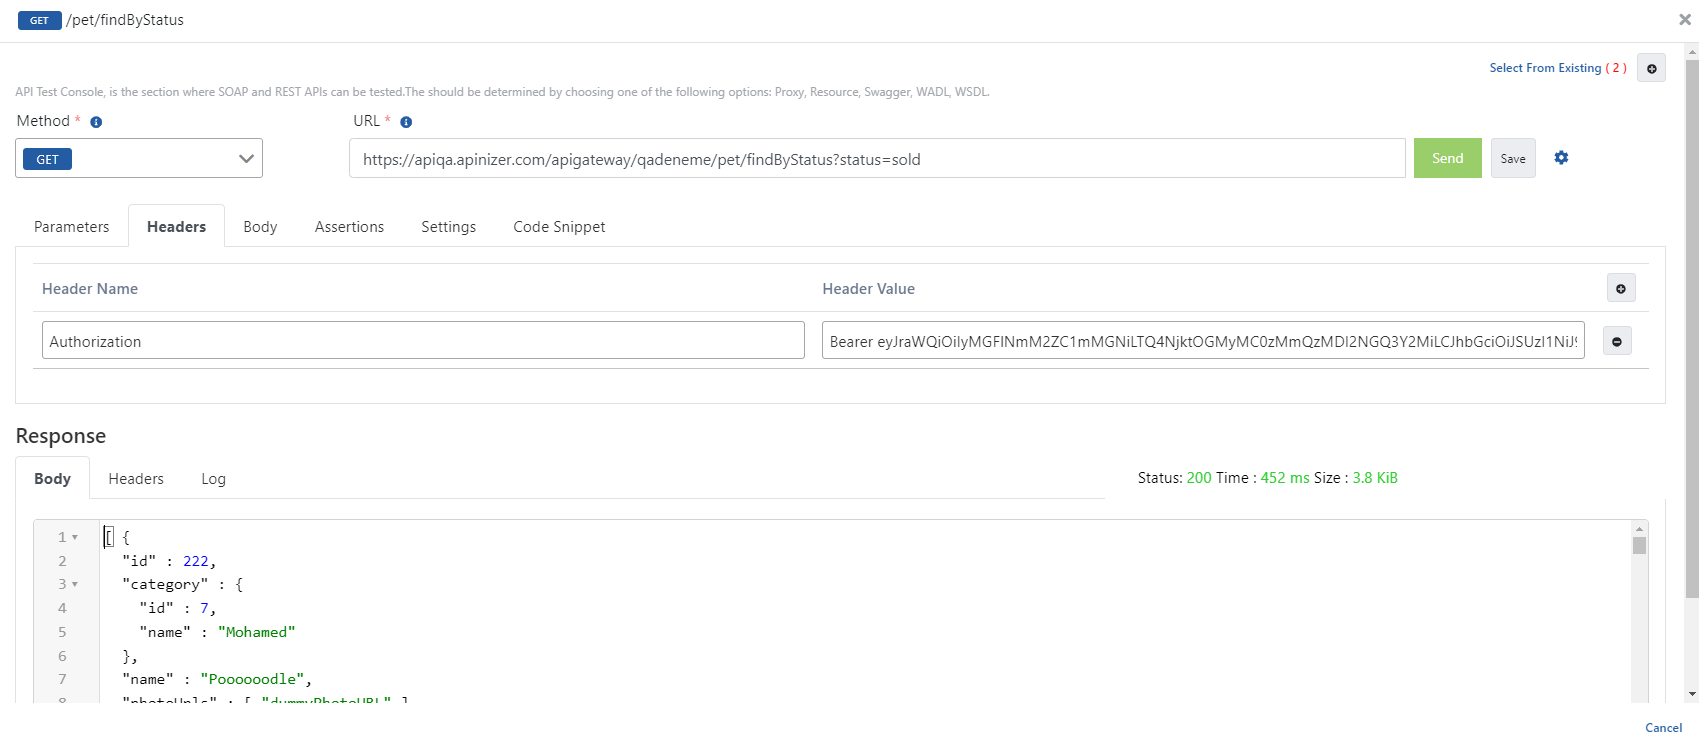
The value in the "access_token" field within the response message, when provided as the value for the "Authorization" header, grants secure access to the respective API for all requests sent to this API Proxy.
The image illustrating the process of sending a request with token information via the Apinizer Test Console is provided below:
2. Obtaining Tokens with the "Manage From ACL" Option
2.1 Obtaining Tokens with JWT
If the "Manage From ACL" option is selected in the created JWT Policy, tokens are obtained by this method.
Prepare a new HTTP request using the Apinizer Test Console ot another application of your choice.
- The address should be entered in accordance with your own Apinizer access address, something like "https://apinizerAccessAddress/credential/jwt".
If Allow URL Parameters option is selected, information can be sent with GET method and using URL parameter. (See the table below for the parameters to be sent)
- HTTP Method must be POST.
- "x-www-form-urlencoded" value should be selected in the body field. If Apinizer Test Console is not used, a title should be added with the name "Content-Type" and the value "application/x-www-form-urlencoded".
- The values to be entered in the body fields are as in the table below.
Key Name | Value To Be Entered If "client_credentials" is Selected While Defining The Policy | Value To Be Entered If "password" is Selected While Defining The Policy |
|---|---|---|
| grant_type | client_credentials | password |
| client_id | Client Id value of Credentials | Client Id value of Credentials |
| client_secret | Client Secret value of Credentials | Client Secret value of Credentials |
| username | This field is not added | Username of one of the records in the validation repository you selected |
| password | This field is not added | Password of one of the records in the validation repository you selected |
Refreshing Token
If the Token Never Expires option is turned off and the Refresh Token Allowed option is turned on, the tokents that will become invalid after a certain period of time can be renewed within the period specified in the Refresh Token Expires In field
Prepare a new HTTP request using the Apinizer Test Console or another application of your choice.
- The address should be entered in accordance with your own Apinizer access address, something like "https://apinizerAccessAddress/credential/jwt".
If Allow URL Parameters option is selected, information can be sent with GET method and using URL parameter. (See the table below for the parameters to be sent)
- HTTP Method must be POST.
- "x-www-form-urlencoded" value should be selected in the body field. If Apinizer Test Console is not used, a title should be added with the name "Content-Type" and the value "application/x-www-form-urlencoded".
- The values to be entered in the body fields are as in the table below.
Key Name | Key Value |
|---|---|
| grant_type | refresh_token |
| client_id | Client Id value of Credentials |
| client_secret | Client Secret value of Credentials |
| refresh_token | value in key "refresh_token" in previously retrieved token |
Example Usage #1
GrantType: Client Credentials
Add a JWT Authentication policy with the Manage From ACL option. Save the default values by coming to the Token Settings panel from the Credential screen.
Send your token request with a message like the example below.
The image containing the settings for sending requests to the Token Service via Apinizer Test Console is given below:
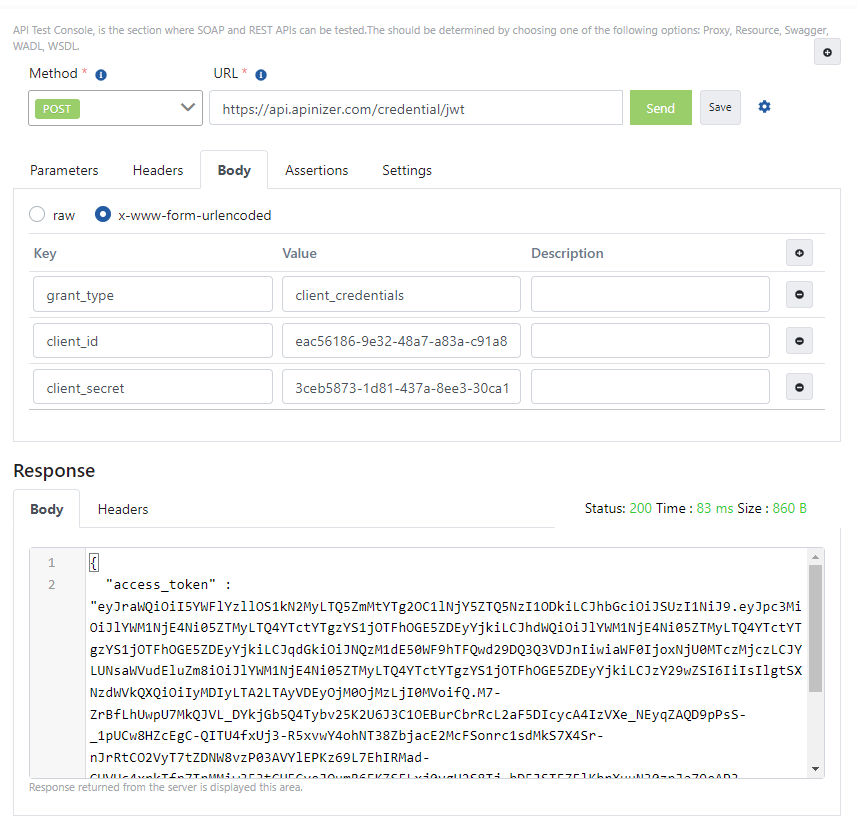
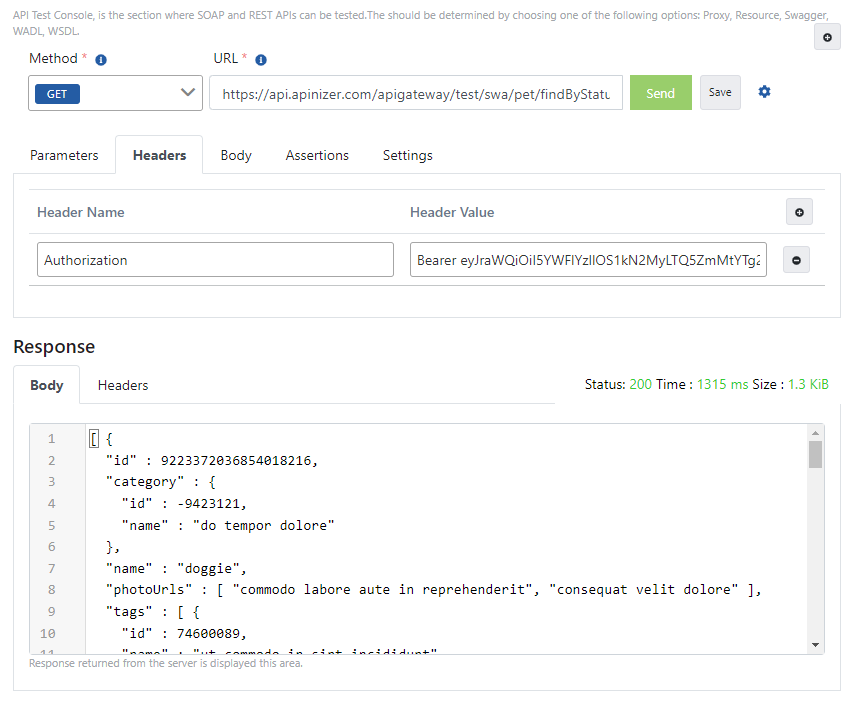
The value in the "access_token" field in the response message is given as a value to the "Authorization" key in all requests to be sent to this API Proxy, providing secure access to the relevant API.
The image containing the process of sending a request with token information via Apinizer Test Console is given below:
Example Usage #2
GrantType: Password
Add a JWT Authentication policy with the Manage From ACL option. From the Credential screen, go to the Token Settings panel, select the Grant Type value as Password and save it.
Send your token request with a message like the example below.
The image containing the settings for sending requests to the Token Service via Apinizer Test Console is given below:
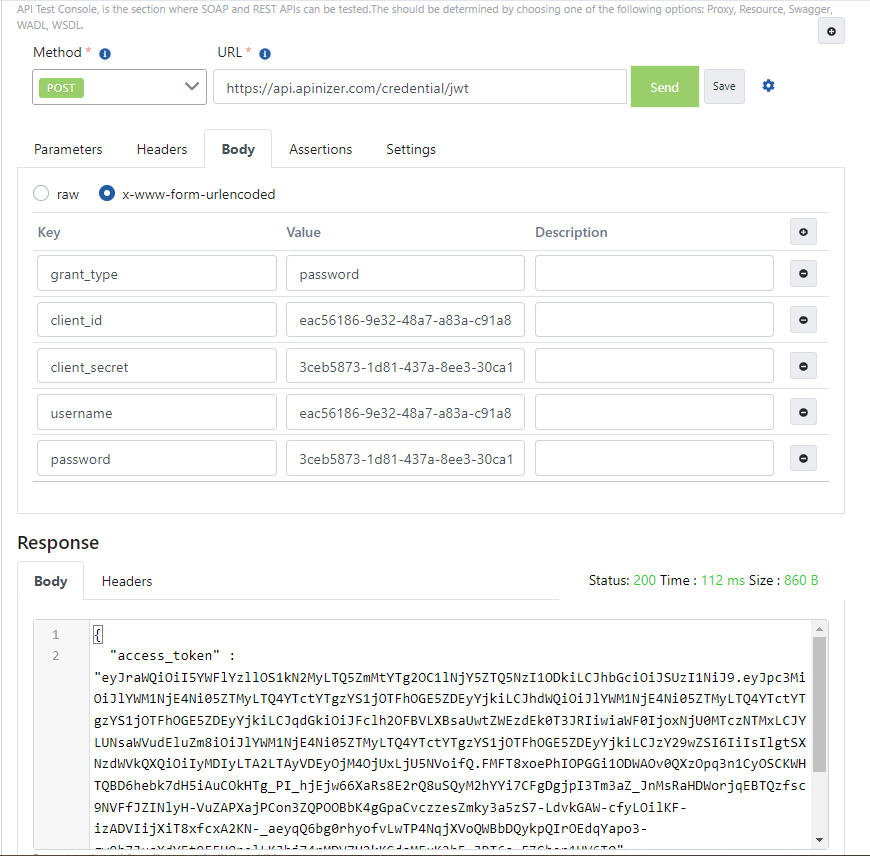
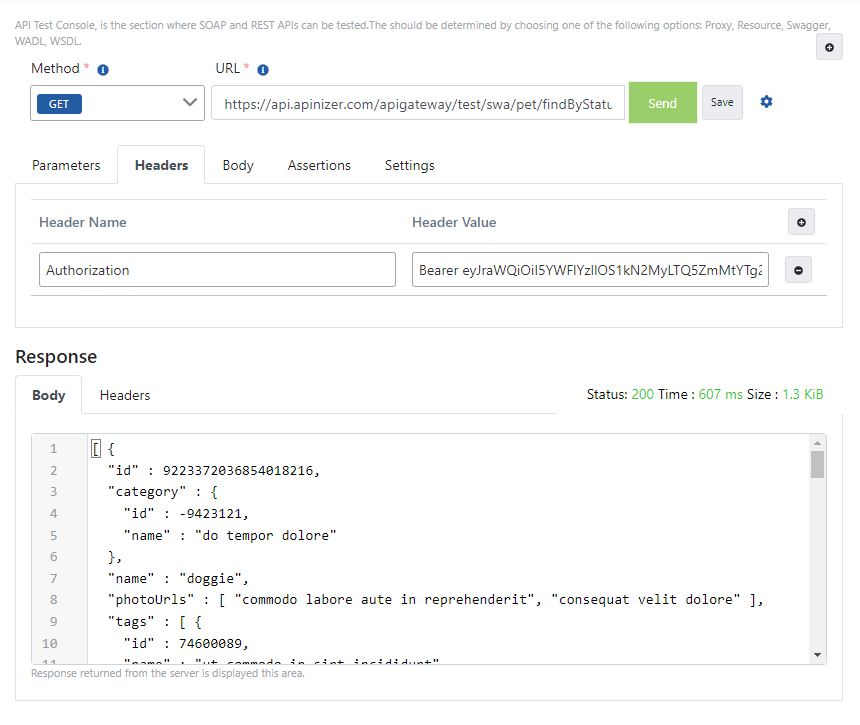
The value in the "access_token" field in the response message is given as a value to the "Authorization" key in all requests to be sent to this API Proxy, providing secure access to the relevant API.
The image containing the process of sending a request with token information via Apinizer Test Console is given below:
Example Usage #3
GrantType: Refresh Token
Add a JWT Authentication policy with the Manage From ACL option. From the Credential screen, go to the Token Settings panel, activate the Refresh Token option and save it.
Send your token request with a message like the example below.
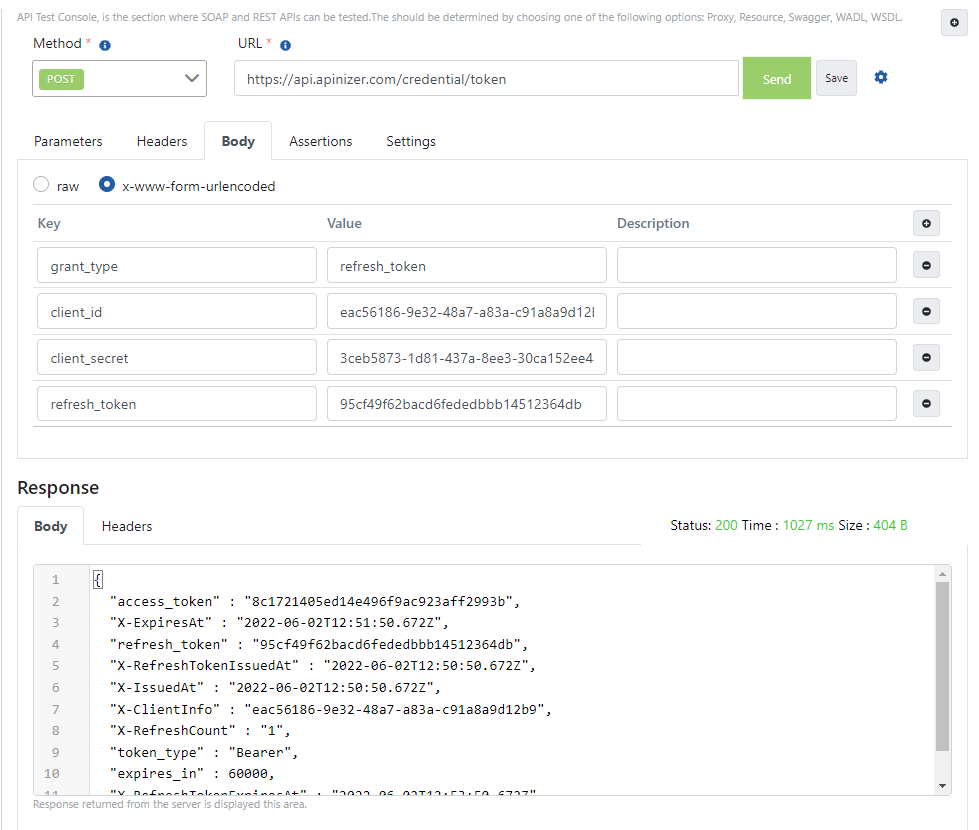
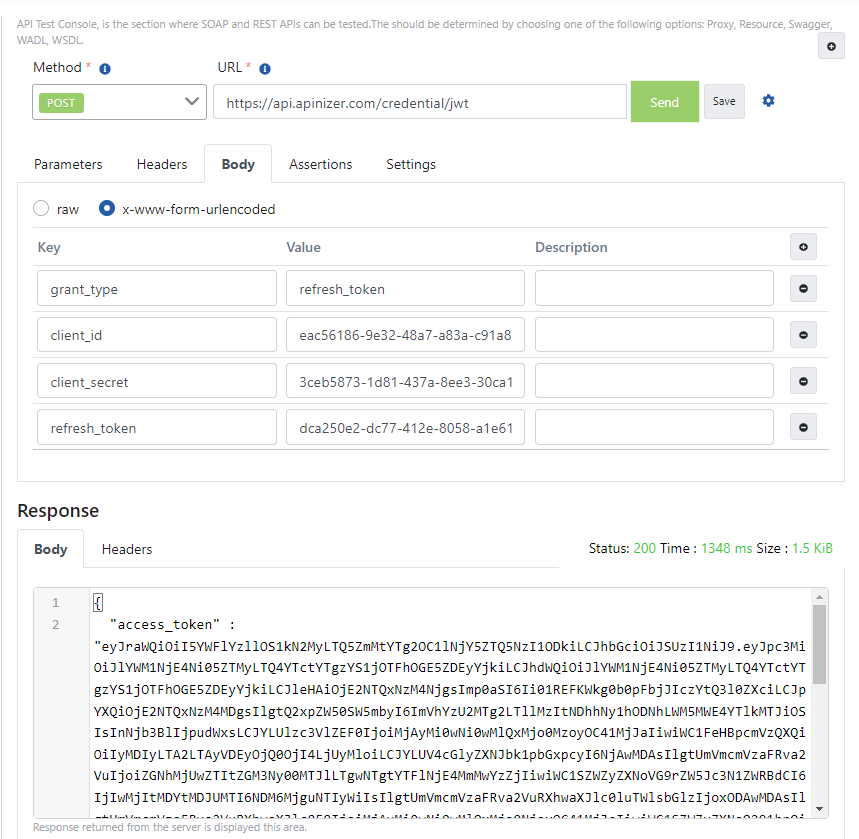
The image containing the settings for sending requests to the Token Service via Apinizer Test Console is given below:
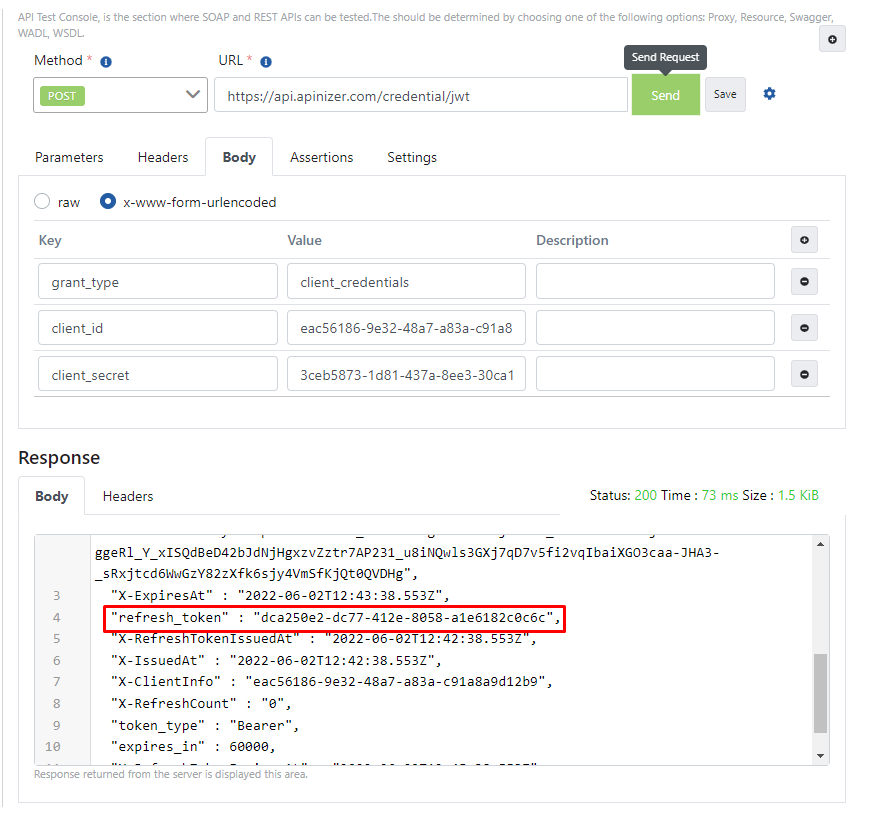
To refresh the token, take the value in the "refresh_token" field in the response from the first request and set the value for the refresh_token key in the message you prepared as below.
The value in the "access_token" field in the next answer will be your renewed token value.
The image of the request sample sent to renew the token via the Apinizer Test Console is given below:
2.2 Obtaining Tokens with OAuth2
If the "Manage From ACL" option is selected in the created OAuth2 Policy, tokens are obtained by this method.
Prepare a new HTTP request using the Apinizer Test Console ot another application of your choice.
- The address should be entered in accordance with your own Apinizer access address, something like "https://apinizerAccessAddress/credential/token".
If Allow URL Parameters option is selected, information can be sent with GET method and using URL parameter. (See the table below for the parameters to be sent)
- HTTP Method must be POST.
- "x-www-form-urlencoded" value should be selected in the body field. If Apinizer Test Console is not used, a title should be added with the name "Content-Type" and the value "application/x-www-form-urlencoded".
- The values to be entered in the body fields are as in the table below.
Key Name | Value To Be Entered If "client_credentials" is Selected While Defining The Policy | Value To Be Entered If "password" is Selected While Defining The Policy |
|---|---|---|
| grant_type | client_credentials | password |
| client_id | Client Id value of Credentials | Client Id value of Credentials |
| client_secret | Client Secret value of Credentials | Client Secret value of Credentials |
| username | This field is not added | Username of one of the records in the validation repository you selected |
| password | This field is not added | Password of one of the records in the validation repository you selected |
Refreshing Token
If the Token Never Expires option is turned off and the Refresh Token Allowed option is turned on, the tokents that will become invalid after a certain period of time can be renewed within the period specified in the Refresh Token Expires In field
Prepare a new HTTP request using the Apinizer Test Console or another application of your choice.
- The address should be entered in accordance with your own Apinizer access address, something like "https://apinizerAccessAddress/credential/token".
If Allow URL Parameters option is selected, information can be sent with GET method and using URL parameter. (See the table below for the parameters to be sent)
- HTTP Method must be POST.
- "x-www-form-urlencoded" value should be selected in the body field. If Apinizer Test Console is not used, a title should be added with the name "Content-Type" and the value "application/x-www-form-urlencoded".
- The values to be entered in the body fields are as in the table below.
Key Name | Key Value |
|---|---|
| grant_type | refresh_token |
| client_id | Client Id value of Credentials |
| client_secret | Client Secret value of Credentials |
| refresh_token | value in key "refresh_token" in previously retrieved token |
Example Usage #1
GrantType: Client Credentials
Add a OAuth2 Authentication policy with the Manage from ACL option. Save the default values by coming to the Token Settings panel from the Credential screen.
Send your token request with a message like the example below.
The image containing the settings for sending requests to the Token Service via Apinizer Test Console is given below:
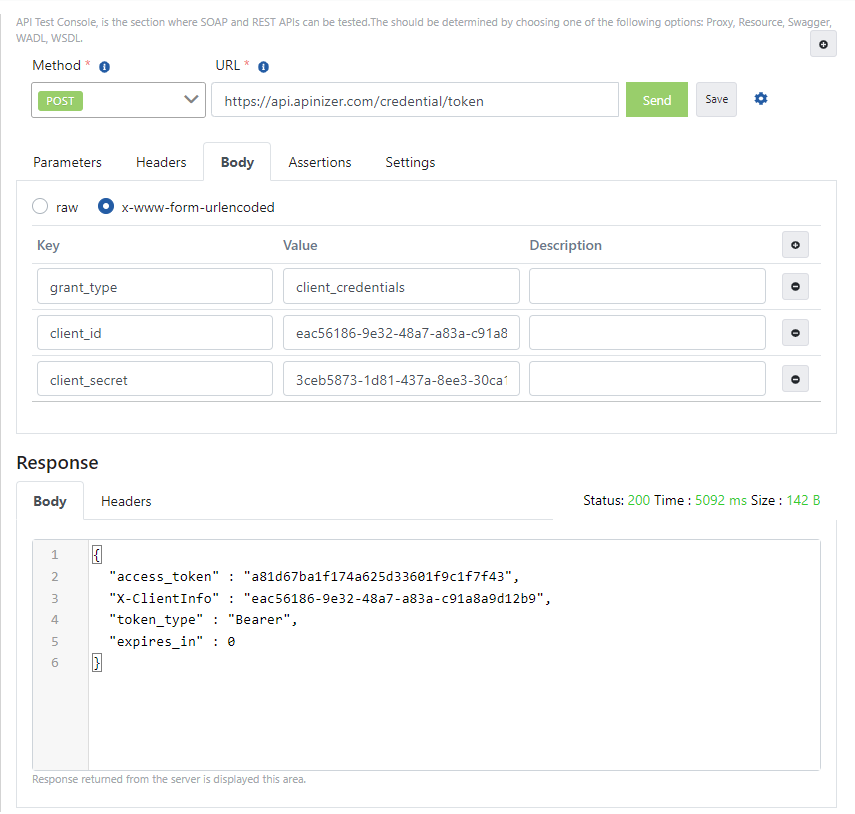
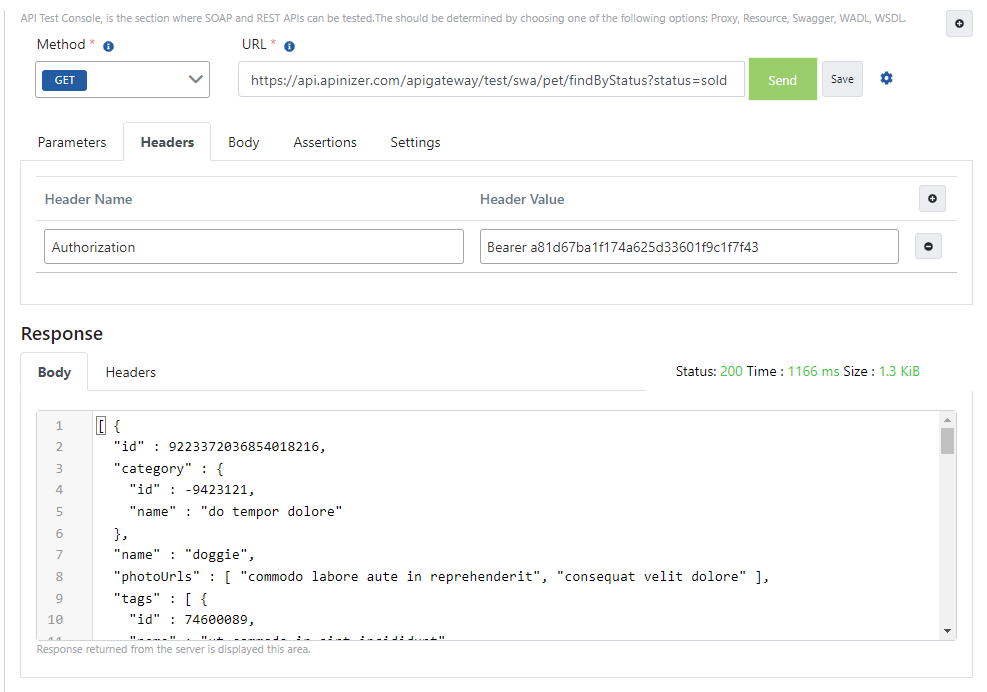
The value in the "access_token" field in the response message is given as a value to the "Authorization" key in all requests to be sent to this API Proxy, providing secure access to the relevant API.
The image containing the process of sending a request with token information via Apinizer Test Console is given below:
Example Usage #2
GrantType: Password
Add a OAuth2 Authentication policy with the Manage from ACL option. From the Credential screen, go to the Token Settings panel, select the Grant Type value as Password and save it.
Send your token request with a message like the example below.
The image containing the settings for sending requests to the Token Service via Apinizer Test Console is given below:
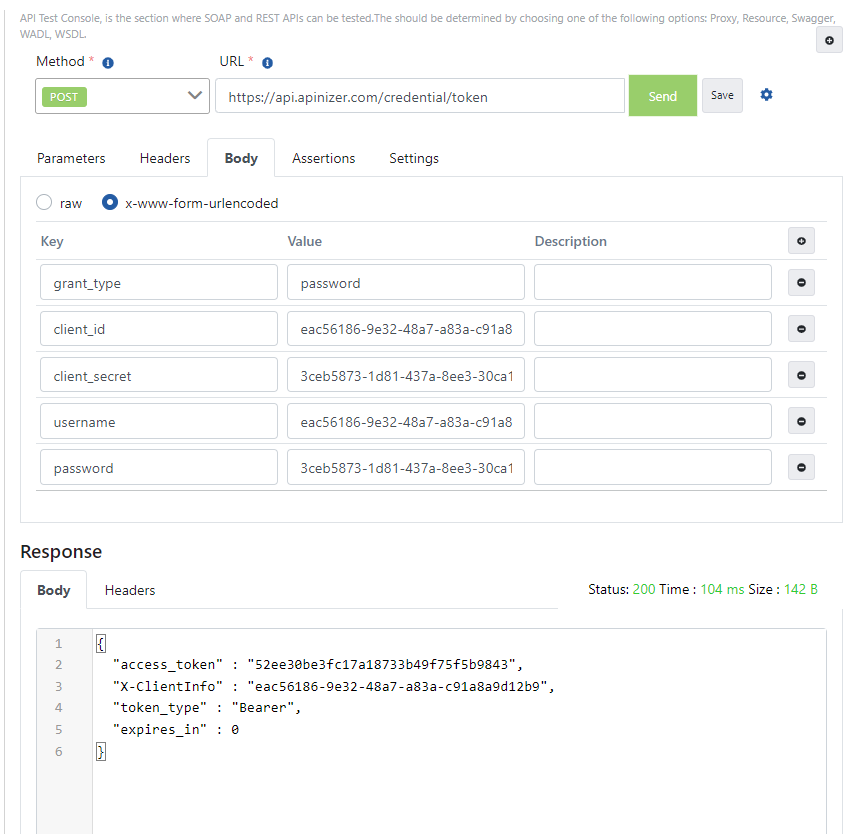
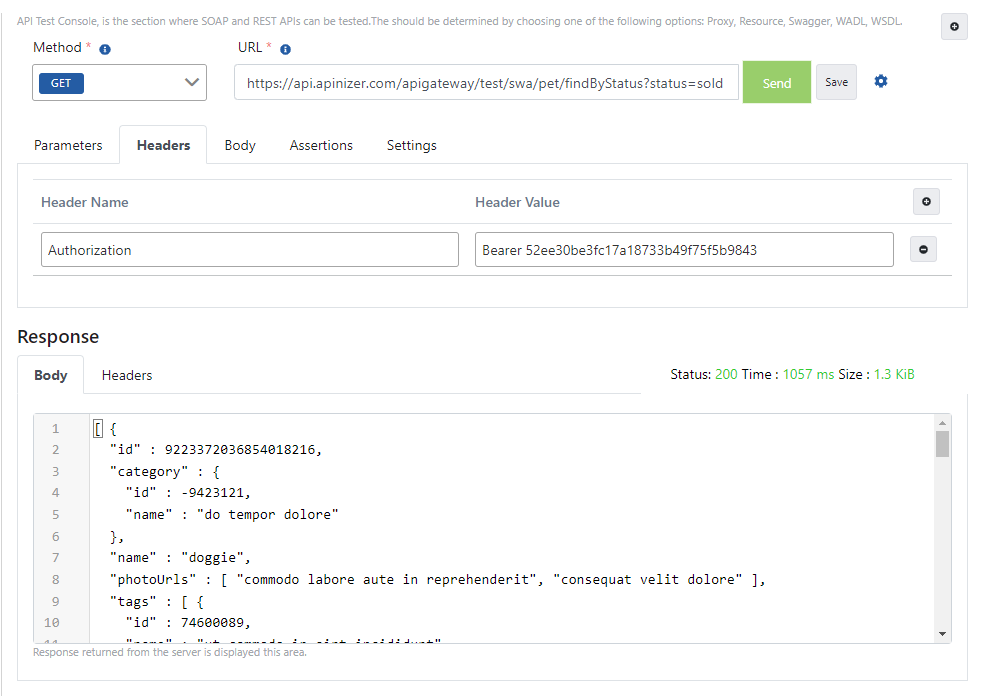
The value in the "access_token" field in the response message is given as a value to the "Authorization" key in all requests to be sent to this API Proxy, providing secure access to the relevant API.
The image containing the process of sending a request with token information via Apinizer Test Console is given below:
Example Usage #3
GrantType: Refresh Token
Add a OAuth2 Authentication policy with the Manage from ACL option. From the Credential screen, go to the Token Settings panel, activate the Refresh Token option and save it.
Send your token request with a message like the example below.
The image containing the settings for sending requests to the Token Service via Apinizer Test Console is given below:
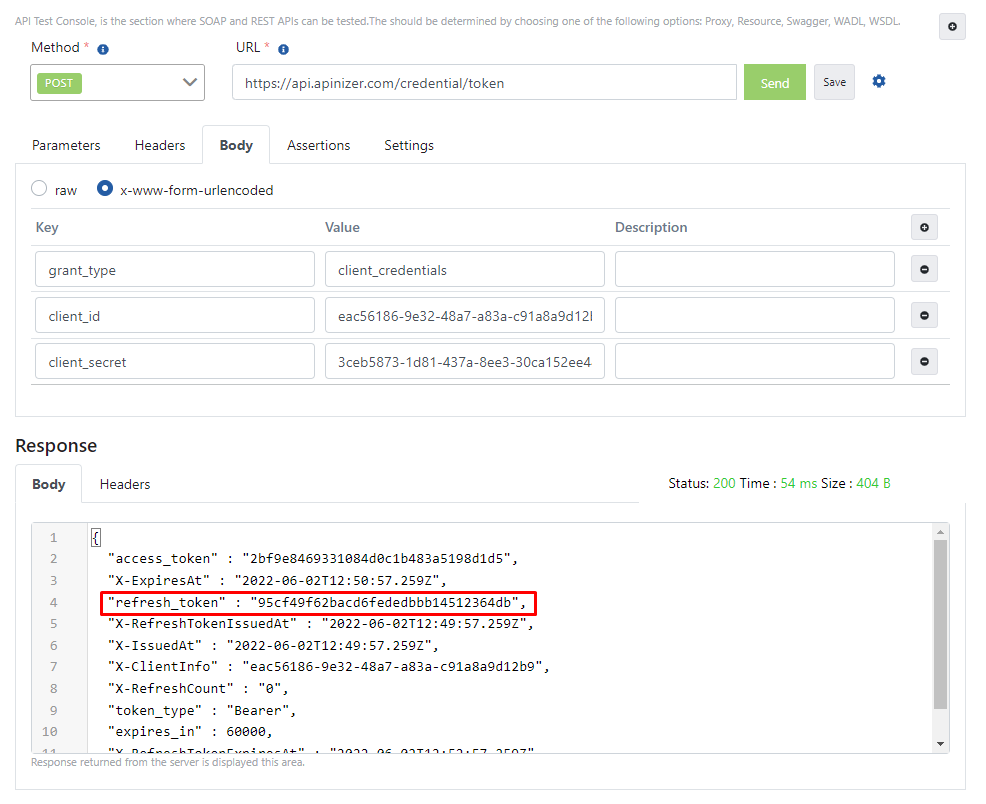
To refresh the token, take the value in the "refresh_token" field in the response from the first request and set the value for the refresh_token key in the message you prepared as below.
The value in the "access_token" field in the next answer will be your renewed token value.
The image of the request sample sent to renew the token via the Apinizer Test Console is given below:
