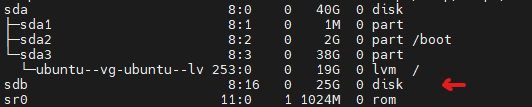
Apinizer Documentation Troubleshooting Possible Issues, Solutions, and Helpful Commands in Linux Current: Disk Expansion on Linux Disk Expansion on Linux Very Important This is a risky operation and is not recommended unless the server has a backup. After a new disk is added to the Linux system, it is explained step by step how to configure this disk using LVM (Logical Volume Manager).Checking the disks lsblk BASH As you can see in the image, the added disk appears as /dev/sdb. The example commands will also proceed on /dev/sdb.Creating a Partition on a New Disk sudo fdisk /dev/sdb BASH Follow the steps below in the fdisk interface:Add New Partition: Press n and create a new partition.Select Type: Press p to create a primary partition.Enter Partition Number: Specify the partition number by typing 1.Use Default Settings: Press Enter to accept all default settings.Use Default Settings: Press Enter to accept all default settings.Write and Exit: Press w to save the changes.Creating Physical Volume sudo pvcreate /dev/sdb1 BASH Listing Volume Groups vgdisplay BASH Include New Disk in Existing Volume GroupYou can use the following command to add /dev/sdb1 disk to the volume group on your system. sudo vgextend <VG-NAME> /dev/sdb1 BASH List Logic Volumes lvdisplay BASH Expanding Logic VolumeYou can run the following command to extend logic volume named ubuntu-lv with 100% free space in volume group named ubuntu-vg: sudo lvextend -l +100%FREE /dev/ubuntu-vg/ubuntu-lv BASH Expand the file system sudo resize2fs /dev/ubuntu-vg/ubuntu-lv BASH ×