Gateway Environments
Environment is a runtime execution context for API Proxies in an organization.
This section describes environment creation and related operations.
When the Manage Kubernetes Namespace and Resources with Apinizer option is enabled in System General Settings screen, it becomes available.
Environment Creation
The picture below shows the Environment Settings:

Fields that contains general information about the environment are shown in the table below.
| Field | Description |
|---|---|
Type | Test or Production should be selected as per usage. |
Communication Protocol Type | One of HTTP, gRPC or HTTP+Websocket communication protocols can be selected. The type selected here determines the environment in which API Proxies can be deployed. REST and SOAP API Proxies can be deployed in HTTP type environments, gRPC API Proxies in gRPC type environments, and Websocket API Proxies in HTTP+Websocket type environments. |
| Name | Name of environment. It corresponds to the definition of namespace in Kubernetes. |
| Key | An environment-specific abbreviated key used for the created environment. |
| Node List | It is selected on which kubernetes nodes the created environment will run. |
| Project | You can choose the projects where the environment can be used, or leave it blank so that it can be used in all projects. If one or more projects are selected, they must also be added to be used in newly created projects. It comes with no selection by default. If a project is selected, it means that only API Proxies included in that project can be deployed to this environment. |
| It is the external access address of API Proxies running in the environment. It has been explained in detail in the previous section. | |
| Description | It can be used for ease of management and important notes. |
| Gateway Server Access URL | The nodeport or ingress type service access address required to deploy the configurations made in the Apinizer API Manager to the Gateway Pods is entered here.Example: http://worker-service.prod.svc.cluster.local:8091 If the HTTPS Enabled option is selected, the address here should also be taken into consideration.Example: https://worker-https-service.prod.svc.cluster.local:8443 |
| Cache Server Access URL | The nodeport or ingress type service access address required for deploying the configurations made in the Apinizer API Manager to the Cache Pods or for the Gateway Pods to access the cache pods is entered here.Example: http://cache-service.prod.svc.cluster.local:8090 |
API Proxy Traffic Log Connectors
Log connectors where all API Proxy Traffic and extensions in the environment will be logged are defined here.
The picture below shows the API Proxy Traffic Log Connector definitions:

Please refer to this page for more information about adding a connector to environment.
Gateway Engine and Cache Server Settings
Gateway engine and Cache server correspond to pods in Kubernetes environment.
Gateway engine's name in Apinizer Platform is apinizer-worker. It is the core module of Apinizer Platform, responsible for routing all API requests to BackendAPI and works as Policy Enforcement Point.
The cache server is called apinizer-cache on the Apinizer Platform. It is the environment where the Cache values required in Apinizer are kept.
The picture below shows the Gateway and Cache server settings:
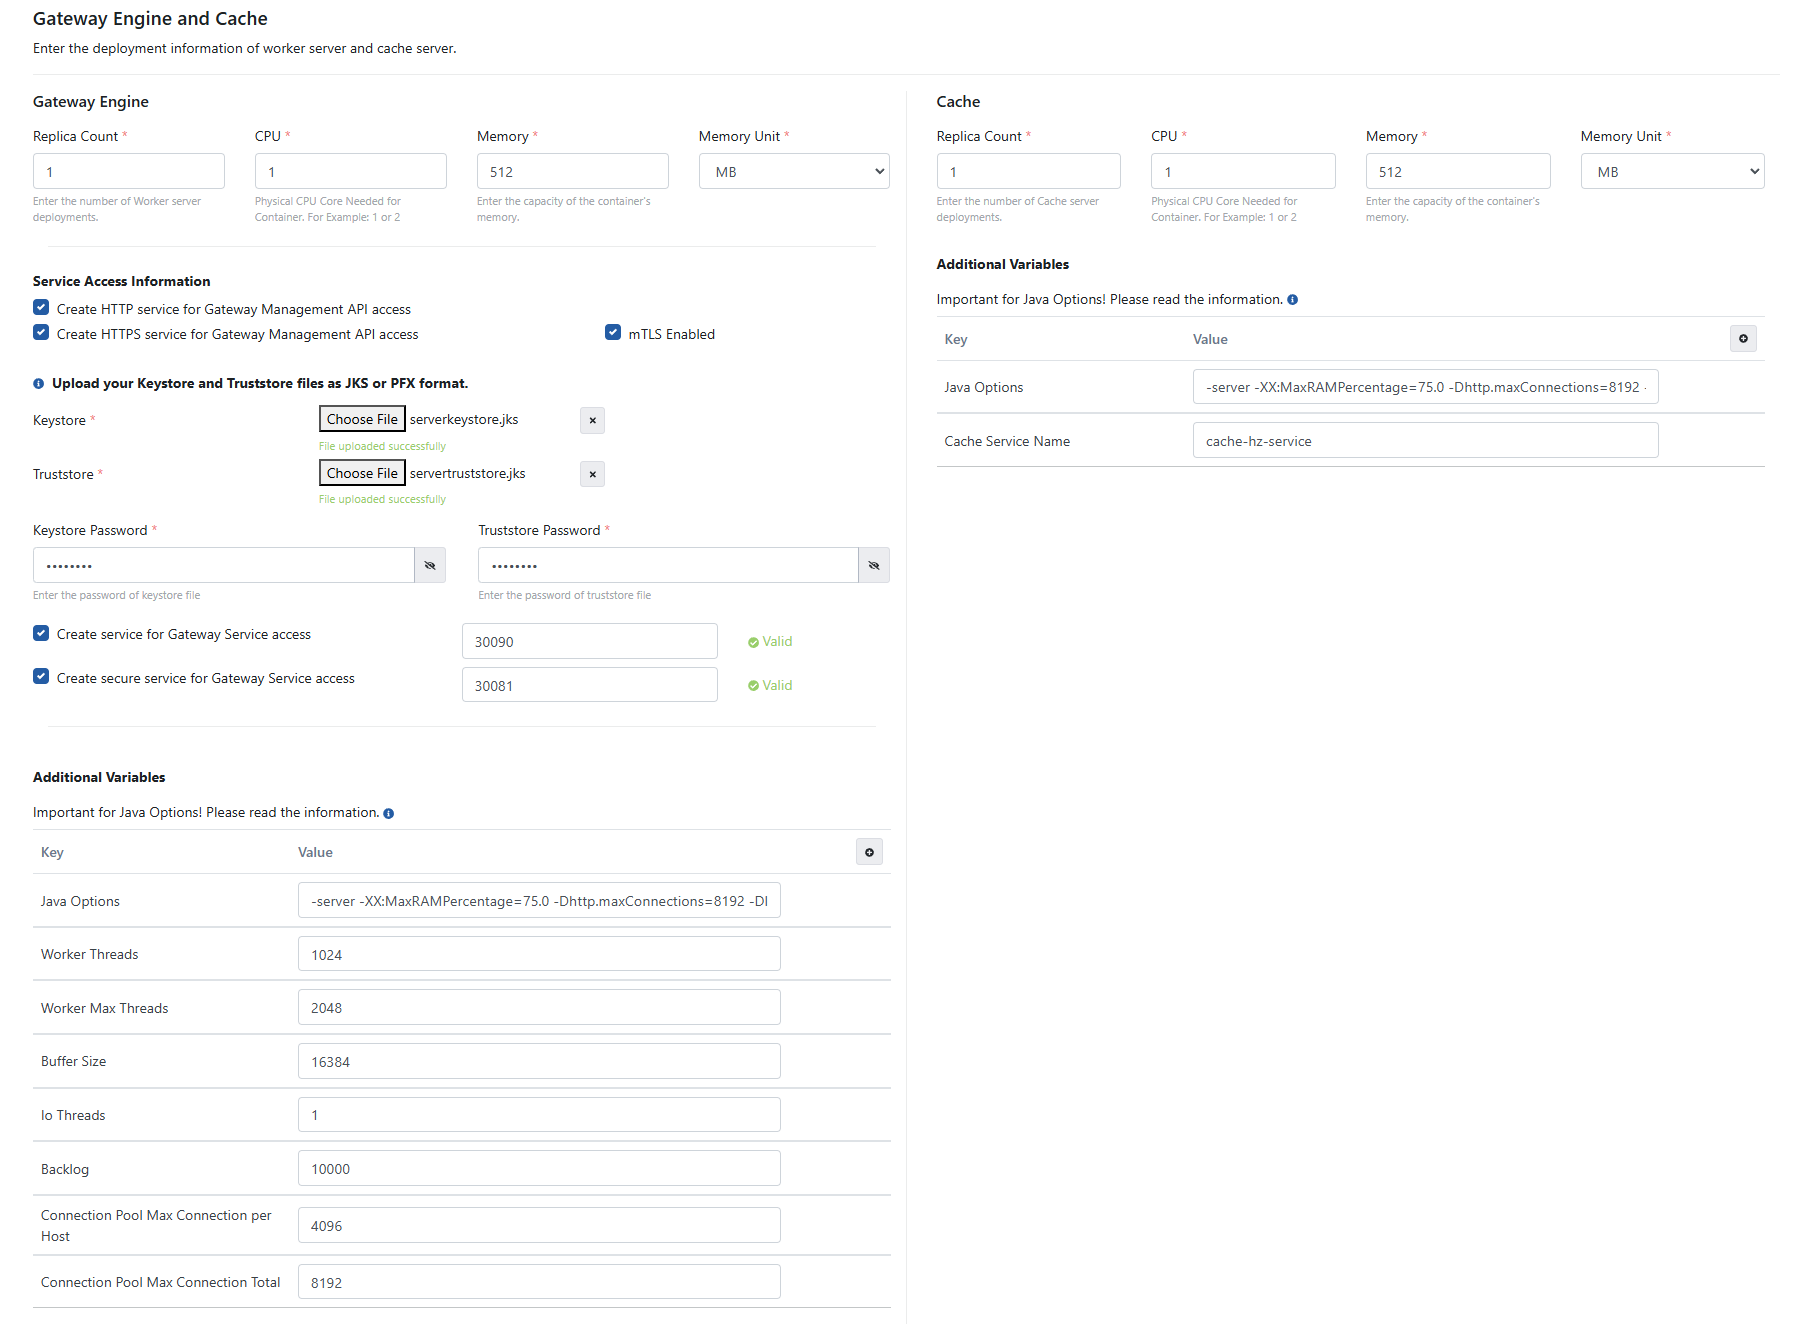
The fields used for configuration in the Gateway Engine section are shown in the table below.
| Field | Description | ||||||||||
|---|---|---|---|---|---|---|---|---|---|---|---|
| Count | The number of gateway engines corresponds to the "replicas" value in Kubernetes deployment. It specifies the number of pods that will be created in the Kubernetes cluster. | ||||||||||
| CPU | The maximum number of CPU cores that the pod will use. | ||||||||||
| Memory | The maximum amount of memory the pod will use. Recommended values are as follows:
| ||||||||||
| Memory Unit | The unit of value required for the memory is selected; MB, GB. | ||||||||||
| Service Access Information | The HTTP Enabled option is selected by default.If HTTPS is desired to be used, the HTTPS Enabled option is also selected. In this case required keystore and truststore files must be uploaded.Since the mTLS setting works over the HTTPS protocol, it can only be selected when the HTTPS setting is on and allows the server to request authentication from the client, but does not enforce this as a strict requirement to establish the connection. If mTLS authorization is required, the mTLS policy should be used. | ||||||||||
| Keystore | When HTTPS protocol is selected, keystore files can be loaded in JKS or PFX format. | ||||||||||
| Truststore | When HTTPS protocol is selected, truststore files can be loaded in JKS or PFX format. | ||||||||||
| Keystore Password | Enter the password of the keystore file. | ||||||||||
| Truststore Password | Enter the password of the truststore file. | ||||||||||
| Create Secure Service For Gateway Service Access | A service port is entered in the range of 30080-32767. The service will be created as a NodePort in Kubernetes. | ||||||||||
| Create Service For Gateway Service Access | A service port is entered in the range of 30080-32767. The service will be created as a NodePort in Kubernetes. |
If gRPC is selected as Communication Protocol
If the Gateway Management API will communicate with Gateway pods over HTTPS, select the Create HTTPS service for Gateway Management API access option. Keystore and truststore files can be uploaded in JKS or PFX format.
To upload the configurations made in the Apinizer Management console to the Gateway pods, enter the service access address (Gateway Management API Access URL) as follows:
Ex: https://worker-http-service.prod.svc.cluster.local:8443
In the Service Port field, specify the port that will expose the service to external communication.If the external communication needs to be secured, select the Create secure service for Gateway Service access option. For security settings, keystore and truststore files can also be uploaded in JKS or PFX format.
Additional Variables
Default and optional variables and their values to be run in the pod are defined in this section.
Default variables cannot be deleted, only their values can be edited or new ones can be added.
| Variable | Target Environment Type | Description | ||||||||||||||||||||
|---|---|---|---|---|---|---|---|---|---|---|---|---|---|---|---|---|---|---|---|---|---|---|
| JAVA_OPTS | All | -XX: MaxRAMPercentage: sets the JVM Heap values to use 75% of the memory allocated to the container because it runs inside the container.http.maxConnections: Max http connection count that can be created from this environment. | ||||||||||||||||||||
| tuneWorkerThreads | Http Worker,Http+Websocket Worker, Management API | Specifies the minimum number of Worker threads the server is running.The recommended values are as follows:
| ||||||||||||||||||||
| tuneWorkerMaxThreads | Http Worker, Http+Websocket Worker, Management API | Specifies the maximum number of Worker threads the server is running.The recommended values are as follows:
| ||||||||||||||||||||
| tuneBufferSize | Http Worker, Http+Websocket Worker, Management API | It is the size of the buffer area in bytes that a thread will use for writing. | ||||||||||||||||||||
| tuneIoThreads | Http Worker, Http+Websocket Worker, Management API | Number of IO Threads. Its recommended values are to be in parallel with the number of processors. | ||||||||||||||||||||
| tuneBacklog | Http Worker, Http+Websocket Worker, Management API | Specifies the maximum pending connection queue size if the server is ready to accept connections. | ||||||||||||||||||||
| tuneRoutingConnectionPoolMaxConnectionPerHost | Http Worker, Http+Websocket Worker, Management API | Specifies the maximum connection pool value that can be used per host in the backend connections of API Proxies. | ||||||||||||||||||||
| tuneRoutingConnectionPoolMaxConnectionTotal | Http Worker, Http+Websocket Worker, Management API | Specifies the maximum connection pool value to be used for backend connections of API Proxies. The recommended values are as follows:
| ||||||||||||||||||||
| tuneApiCallConnectionPoolMaxConnectionPerHost | Http Worker, Http+Websocket Worker, Management API | The maximum connection pool value that can be used per host for all HTTP(s) connections (such as API Call Policy), except calls from API Proxies to the backend API. Example values could be:
| ||||||||||||||||||||
| tuneCacheConnectionPoolMaxConnectionTotal | Http Worker, Http+Websocket Worker, Management API | This is the maximum connection pool value to be used for cache connections made from API Proxies. If features such as Throttling, Quota and Response Cache are used intensively, their values should be given high, taking into account the CPU. Sample values can be as follows:
| ||||||||||||||||||||
| tuneApiCallConnectionPoolMaxConnectionTotal | Http Worker, Http+Websocket Worker, Management API | This is the maximum connection pool value to be used for all HTTP(s) connections except calls from API Proxies to the backend API. Recommended values are as follows:
The total number of connections that will be used for API calls and Cache connections cannot exceed the maximum number of connections that can be used for API calls: tuneApiCallConnectionPoolMaxConnectionPerHost + tuneCacheConnectionPoolMaxConnectionTotal <= tuneApiCallConnectionPoolMaxConnectionTotal | ||||||||||||||||||||
| logLevel | Hepsi | It allows the application logs to be started by default with this parameter when starting the environments. It can take ERROR, WARNING, INFO, DEBUG, TRACE and OFF values. | ||||||||||||||||||||
| defaultCharset | Http Worker, Http+Websocket Worker, Management API | When this field is not added, UTF-8 character set is used by default; this field specifies the character set used in request and response operations | ||||||||||||||||||||
| multi-part / File Upload Parameters | Http Worker, Http+Websocket Worker, Management API | The following key concepts should be used to configure settings for multi-part HTTP requests for file uploads;
The size value of all key concepts is in bytes, so 1024*1024*100 is 100MB. | ||||||||||||||||||||
| Token Service CORS Parameters | Http Worker, Http+Websocket Worker, Management API | When a javascript application connects to receive a JWT or OAuth2 Token via Apinizer, the CORS values need to be returned from the Apinizer token service.If JWT or OAuth2 Token settings will be managed;
| ||||||||||||||||||||
| Token Service X-Forwarded-For Parameters | Http Worker, Http+Websocket Worker, Management API | When a request is made to get a JWT or OAuth2 Token via Apinizer, the client's IP must be obtained.If JWT or OAuth2 Token settings will be managed;
| ||||||||||||||||||||
| tuneGrpcKeepAliveTime | Grpc Worker | The time between ping messages used to keep the connection alive between client and server (in seconds) | ||||||||||||||||||||
| tuneGrpcKeepAliveTimeout | Grpc Worker | Maximum time to wait for a keep-alive ping response (in seconds) | ||||||||||||||||||||
| tuneGrpcMaxMessageSize | Grpc Worker | Maximum message size that can be processed (in bytes) | ||||||||||||||||||||
| tuneGrpcMaxHeaderListSize | Grpc Worker | Maximum allowed HTTP header list size (in bytes) | ||||||||||||||||||||
| tuneGrpcMaxConnectionAge | Grpc Worker | Maximum duration a connection may exist (in seconds) | ||||||||||||||||||||
| tuneGrpcMaxConnectionAgeGrace | Grpc Worker | Additional time given to aged connections before forced closure (in seconds) | ||||||||||||||||||||
| tuneGrpcMaxConnectionIdle | Grpc Worker | Maximum time a connection may be idle (in seconds) | ||||||||||||||||||||
| tuneGrpcMaxInboundMessageSize | Grpc Worker | Maximum size of incoming messages that can be received (in bytes) | ||||||||||||||||||||
| tuneGrpcMaxInboundMetadataSize | Grpc Worker | Maximum size of incoming metadata that can be processed (in bytes) | ||||||||||||||||||||
| tuneGrpcHandshakeTimeout | Grpc Worker | Maximum time to wait for handshake completion (in seconds) | ||||||||||||||||||||
| tuneGrpcPermitKeepAliveTime | Grpc Worker | Minimum allowed keep-alive time interval (in seconds) | ||||||||||||||||||||
| tuneGrpcThreadPoolSize | Grpc Worker | Size of thread pool allocated for the gRPC server | ||||||||||||||||||||
METRICS_ENABLED | Http Worker,HTTP+Websocket Worker, Grpc Worker | Metrik toplama özelliğinin açık olup olmadığı | ||||||||||||||||||||
| tuneWebsocketIdleTimeout | Http+Websocket Worker | Specifies how long a WebSocket connection can remain inactive without exchanging data. | ||||||||||||||||||||
| tuneWebsocketBufferSize | Http+Websocket Worker | Sets the size of the internal buffer used for data sent or received over a WebSocket connection. | ||||||||||||||||||||
| tuneWebsocketTcpNoDelay | Http+Websocket Worker | Checks whether TCP's Nagle algorithm is enabled for WebSocket connections. | ||||||||||||||||||||
| deploymentTimeout | Management API | When a request is received after deployment, it hits a Pod within the environment. This Pod locates other Pods within the environment (namespace) and synchronously sends the same configuration to them. This parameter sets the timeout duration for operations between Pods. The default value is 120 seconds. | ||||||||||||||||||||
http2Enabled | HTTP+Websocket Worker | Whether the metric collection feature is enabled |
Async Executor Thread Pool Configuration Parameters
These parameters, which control the thread pool used by logging, asynchronous operations, etc. throughout the Apinizer Worker module, provide a thread-safe implementation using the ThreadPoolExecutor and CallerRunsPolicy reject handler, while maintaining system stability with a graceful performance degradation under high load.
| Variable | Target Environment Type | Description | Default Value |
|---|---|---|---|
| tuneAsyncExecutorCorePoolSize | Http Worker,HTTP+Websocket Worker, Grpc Worker | Minimum number of threads to keep alive in the thread pool. These threads are always active and ready to execute tasks. | tuneWorkerThreads / 2 (fallback: 128) |
| tuneAsyncExecutorMaxPoolSize | Http Worker,HTTP+Websocket Worker, Grpc Worker | Maximum number of threads that can be created in the thread pool. When queue is full and core threads are busy, new threads are created up to this limit. | tuneWorkerMaxThreads / 2 (fallback: 256) |
| tuneAsyncExecutorQueueCapacity | Http Worker,HTTP+Websocket Worker, Grpc Worker | Maximum number of tasks that can be queued before new threads are created. When queue is full and max threads reached, CallerRunsPolicy is applied. | tuneMaxQueueSize / 2 (if > 0) else 500 (fallback: 1000) |
Security Configuration with Additional Variables
| Variable | Description | Default Value | Possible Values | Target Java Property |
|---|---|---|---|---|
| jdkTLSVersions | Specifies supported TLS protocol versions | TLSv1, TLSv1.1, TLSv1.2, TLSv1.3 | SSLv2Hello, SSLv3, TLSv1, TLSv1.1, TLSv1.2, TLSv1.3 | https.protocols, jdk.tls.client.protocols, jdk.tls.server.protocols |
| jdkTLSDisabledAlgorithms | Specifies TLS algorithms to be disabled for security reasons | RC4, DES, MD5withRSA, DH keySize < 768, EC keySize < 224, 3DES_EDE_CBC, anon, NULL | RC4, DES, MD5withRSA, DH keySize values, EC keySize values, 3DES_EDE_CBC, anon, NULL, SSLv3, TLSv1, TLSv1.1 | jdk.tls.disabledAlgorithms |
| jdkCertPathDisabledAlgorithms | Defines algorithms to be disabled during certificate validation process | Uses JDK default value | MD2, MD5, SHA1, RSA keySize values, DSA keySize values, EC keySize values | jdk.certpath.disabledAlgorithms |
| jdkCipherSuites | Defines the cipher suites to be used | Uses JDK default value | TLS 1.3: TLS_AES_256_GCM_SHA384, TLS_AES_128_GCM_SHA256, TLS_CHACHA20_POLY1305_SHA256; TLS 1.2: TLS_ECDHE_ECDSA_WITH_AES_256_GCM_SHA384, TLS_ECDHE_RSA_WITH_AES_256_GCM_SHA384; Legacy: TLS_ECDHE_ECDSA_WITH_AES_256_CBC_SHA, TLS_RSA_WITH_AES_256_CBC_SHA | https.cipherSuites |
| jdkAllowUnsafeProtocols | Determines whether unsafe protocols are allowed | false | true, false | https.protocols.allow_unsafe, jdk.tls.client.protocols.allow_unsafe |
Important Notes about security configurations:
- When environment variables are not set:
"TLSv1, TLSv1.1, TLSv1.2, TLSv1.3" is used for TLS Versions
"RC4, DES, MD5withRSA, DH keySize < 768, EC keySize < 224, 3DES_EDE_CBC, anon, NULL" is used for TLS Disabled Algorithms
JDK default values are used for other parameters
- Security Recommendations:
- TLSv1.2 and above versions are recommended
- Cipher suites with GCM mode should be preferred
- Weak algorithms (RC4, DES, 3DES) should be disabled
- Key sizes should maintain adequate security levels (minimum 2048 bit for RSA, minimum 224 bit for EC)
- Performance Impact:
- The order of cipher suites can affect performance
- Disabling too many cipher suites may cause compatibility issues with legacy systems
Cache Server configuration
The fields used for Cache Server configuration are shown in the table below.
Field | Description | ||||||||||
|---|---|---|---|---|---|---|---|---|---|---|---|
| Cache Count | The number of cache count corresponds to the "replicas" value in Kubernetes deployment. It specifies the number of pods that will be created in the Kubernetes cluster. | ||||||||||
| CPU | The maximum number of CPU cores that the pod will use. | ||||||||||
Memory | The maximum amount of memory the pod will use. Recommended values are as follows:
You can reduce the memory requirement per thread by using JVM parameters such as -Xss256k or -Xss128k. | ||||||||||
Memory Unit | The unit of value required for the memory is selected; MB, GB. |
Cache Server Additional Variables
Default and optional variables and their values to be run in the pod are defined. These values should be tuned according to used CPUs.
| Variable | Description | Default Value | Possible Values | Recommended Values by CPU | |||
|---|---|---|---|---|---|---|---|
| 1 CPU | 2 CPU | 4 CPU | 8 CPU | ||||
| SERVER_TOMCAT_MAX_THREADS | Maximum number of concurrent requests Tomcat can handle | 1024 | 256 | 1024 | 2048 | 4096 | |
| SERVER_TOMCAT_MIN_SPARE_THREADS | Minimum number of threads Tomcat always keeps ready | 512 | 128 | 256 | 512 | 1024 | |
| SERVER_TOMCAT_ACCEPT_COUNT | Number of connections that can be accepted when all threads are busy | 512 | 128 | 256 | 512 | 1024 | |
| SERVER_TOMCAT_MAX_CONNECTIONS | Maximum number of connections Tomcat can accept simultaneously | 8192 | 2048 | 4096 | 8192 | 16384 | |
| SERVER_TOMCAT_CONNECTION_TIMEOUT | Time before a connection times out (milliseconds) | 20000 | 20000 | 20000 | 20000 | 20000 | |
| SERVER_TOMCAT_KEEPALIVE_TIMEOUT | Duration keep-alive connections remain open (milliseconds) | 60000 | 30000 | 45000 | 60000 | 60000 | |
| SERVER_TOMCAT_MAX_KEEPALIVE_REQUESTS | Maximum number of requests processed over a keep-alive connection | 10000 | 5000 | 7500 | 10000 | 15000 | |
| SERVER_TOMCAT_PROCESSOR_CACHE | Maximum number of processors that can be stored in the processor cache | 512 | 128 | 256 | 512 | 1024 | |
| HAZELCAST_IO_WRITE_THROUGH | Determines whether Hazelcast's write-through mode is enabled | false | false | false | false | false | |
| HAZELCAST_MAP_LOAD_CHUNK_SIZE | Chunk size used for Hazelcast map loading | 10000 | 5000 | 7500 | 10000 | 15000 | |
| HAZELCAST_MAP_LOAD_BATCH_SIZE | Batch size used for Hazelcast map loading | 10000 | 5000 | 7500 | 10000 | 15000 | |
| HAZELCAST_CLIENT_SMART | Whether Hazelcast client uses smart routing | true | true | true | true | true | |
| HAZELCAST_MAPCONFIG_BACKUPCOUNT | Number of backup copies of Hazelcast map data to store | 1 | 1 | 1 | 1 | 1 | |
| HAZELCAST_MAPCONFIG_READBACKUPDATA | Whether to read data from backup copies | true | true | true | true | true | |
| HAZELCAST_MAPCONFIG_ASYNCBACKUPCOUNT | Number of asynchronous backup copies | 0 | 0 | 0 | 0 | 0 | |
| HAZELCAST_OPERATION_RESPONSEQUEUE_IDLESTRATEGY | Idle strategy for Hazelcast response queue HAZELCAT IDLESTRATEGY If you set the HAZELCAST_OPERATION_RESPONSEQUEUE_IDLESTRATEGY parameter to “backoff”: The pod will continuously use 90-100% of its CPU limit. This can provide a 5-10% performance increase, but it will consume the CPU resource limit of the Cache pod. | backoff | block, backoff, busyspin | block | block | backoff | busyspin |
| HAZELCAST_MAP_WRITE_DELAY_SECONDS | Delay for map write-behind feature (seconds) | 5 | 3 | 4 | 5 | 5 | |
| HAZELCAST_MAP_WRITE_BATCH_SIZE | Batch size used for map write-behind feature | 100 | 50 | 75 | 100 | 150 | |
| HAZELCAST_MAP_WRITE_COALESCING | Whether to perform coalescing in write-behind operations | true | true,false | true | true | true | true |
| HAZELCAST_MAP_WRITE_BEHIND_QUEUE_CAPACITY | Maximum capacity of write-behind queue | 100000 | 50000 | 75000 | 100000 | 150000 | |
| HAZELCAST_OPERATION_THREAD_COUNT | Hazelcast operation thread count | CPU core sayısı | 1 | 2 | 4 | 8 | |
| HAZELCAST_OPERATION_GENERIC_THREAD_COUNT | Hazelcast total number of operation threads | CPU core sayısının yarısı | 1 | 1 | 2 | 4 | |
| HAZELCAST_SERIALIZATION_USE_NATIVE_BYTE_ORDER | Using native byte order for Hazelcast serialization | true | true,false | true | true | true | true |
| HAZELCAST_PARTITION_COUNT | Hazelcast partition count | 271 | 271 | 271 | 271 | 271 | |
| HAZELCAST_MAX_NO_HEARTBEAT_SECONDS | Hazelcast maximum heartbeat absence time (seconds) | 60 | 60 | 60 | 60 | 60 | |
| HAZELCAST_HEARTBEAT_INTERVAL_SECONDS | Hazelcast heartbeat transmission interval (seconds) | 5 | 5 | 5 | 5 | 5 | |
| HAZELCAST_MASTER_CONFIRMATION_INTERVAL_SECONDS | Hazelcast master confirmation interval (seconds) | 30 | 30 | 30 | 30 | 30 | |
| HAZELCAST_SOCKET_KEEP_ALIVE | TCP socket keep-alive feature | true | true | true | true | true | |
| HAZELCAST_SOCKET_NO_DELAY | Disabling the Nagle algorithm for TCP sockets | true | true | true | true | true | |
| HAZELCAST_OPERATION_CALL_TIMEOUT_MILLIS | Hazelcast operation call timeout (milliseconds) | 60000 | 60000 | 60000 | 60000 | 60000 | |
| HAZELCAST_OPERATION_BACKUP_TIMEOUT_MILLIS | Hazelcast backup operation timeout (milliseconds) | 5000 | 5000 | 5000 | 5000 | 5000 | |
| HAZELCAST_SPLITBRAIN_PROTECTION_ENABLED | Split-brain protection enabled/disabled status HAZELCAST_SOCKET_KEEP_ALIVE | false | true,false | false | false | false | false |
| HAZELCAST_SPLITBRAIN_QUORUM_SIZE | Minimum quorum size for split-brain protection | 2 | 2 | 2 | 2 | 2 | |
| HAZELCAST_CP_MEMBER_COUNT | CP Subsystem member count (0 = disabled) | 0 | 0 | 0 | 0 | 0 | |
| HAZELCAST_CP_GROUP_SIZE | CP Subsystem group size | 3 | 3 | 3 | 3 | 3 | |
| HAZELCAST_CP_SESSION_TTL_SECONDS | CP Subsystem session TTL (seconds) | 300 | 300 | 300 | 300 | 300 | |
| HAZELCAST_CP_SESSION_HEARTBEAT_SECONDS | CP Subsystem session heartbeat interval (seconds) | 5 | 5 | 5 | 5 | 5 | |
| HAZELCAST_MERGE_BATCH_SIZE | Merge policy batch size | 100 | 100 | 100 | 100 | 100 | |
| CACHE_SERVICE_NAME | The service name required for Cache to access other Cache pods via Kubernetes. | cache-hz-service | |||||
| CACHE_QUOTA_TIMEZONE | Daily quota information is also stored in the cache. Daily quota information is reset according to the UTC time zone. If you want the start time of the daily quota to be reset according to your local time, you can add the CACHE_QUOTA_TIMEZONE value to the additional variables. The value added here must be written as “+03:00”. | 00:00 | +03:00 | ||||
CACHE_LAZY_MODE | If you do not want cache pods to load values from the database all at once when they first start up, you can add the CACHE_LAZY_MODE value as lazy. In this case, priority is given to starting the pod, and values can continue to be loaded after the pod has started. If there are a large number of records in the database, it is recommended that you enter this value. | eager | eager,lazy | ||||
| METRICS_ENABLED | Whether the metric collection feature is enabled | false | true,false | ||||
The following warning should be taken into account when configuring the Java Options setting in the additional variables area;
Please note that the -Xmx and -Xms settings disable automatic heap sizing.
Apinizer sets the JVM Heap values to use 75% of the memory allocated to the container because it runs inside the container.
UseContainerSupport is enabled by default.
Old (and somehow broken) flags -XX: {Min | Max} RAMFraction is now deprecated. There is a new -XX:MaxRAMPercentage flag that takes a value between 0.0 and 100.0 and defaults to 25.0. So if there is a 1GB memory limit, the JVM heap is limited to ~250MB by default.
Setting Host Aliases
What is Host Alias? Why is it needed?
IP addresses in the network can sometimes be put behind host names, if they are not defined in the nameserver or host file, or if Apinizer has not been able to resolve them somehow, HostAlias must be defined for the worker pods to resolve these names.
Republishing is required for the changes made here to take effect. It should be noted that there will be a few minutes of interruption in this process compared to the version update.
On Kubernetes, hostnames or their corresponding IP addresses can be given host alias of hostnames. This setting is defined in the deployment.yaml file.
The picture below shows the Host Alias settings:

Publishing Environment
Click the Unpublished button to publish a environment.
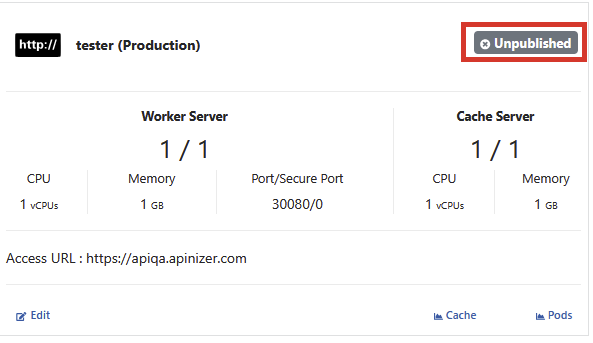
Click the Publish button to confirm the operation from the incoming window and the environment is deployed to the kubernetes server.

Republishing Environment
By hovering over a published environment, the Published button is clicked.

Click the Republish button to confirm the operation from the incoming window.

After the Republishing Environment, the Pods will be created with updated configurations.
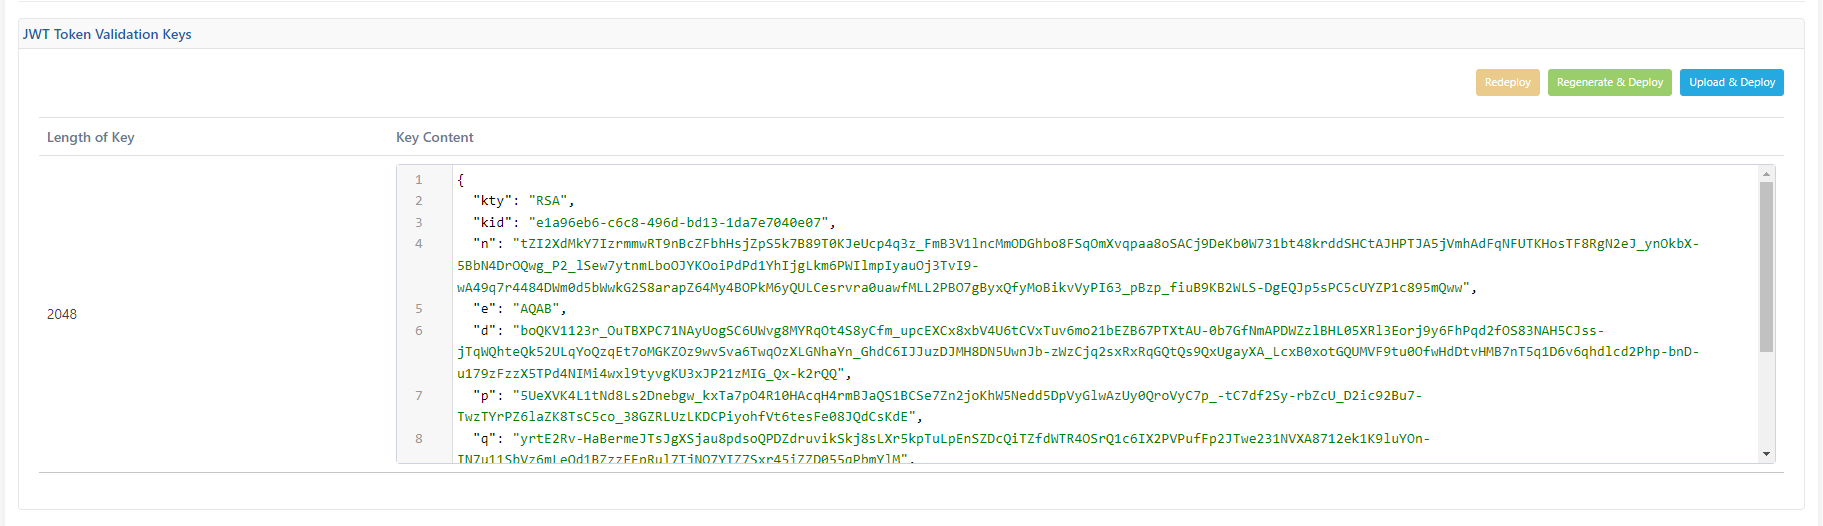
JWT Token Validation Key
If the environment is registered, the JWT Token Authentication Key is generated. This token is the value of the private key involved in generating tokens through the Apinizer Token Service for authentication policies. If the user wants to generate his own token, he should make use of the private key here.
To access this information, go to the JWT Token Validation Keys tab.
By clicking the Redeploy button, the existing key can be redeployed to the servers without making any changes to the key.
By clicking the Regenerate & Deploy button, a new key can be generated and deployed to the servers.
By clicking the Upload & Deploy button, the PEM Encoded Private Key file can be uploaded and a new key can be generated and used according to this key.
Deleting a Environment
By selecting the environment and clicking Remove Environment from the Remove Environment tab at the bottom, information about the environment is deleted from the database.
When the deletion is complete, the installation of all API Proxies registered in this environment is also deleted, and API Proxies that were previously installed in this environment can no longer be accessed through this environment.

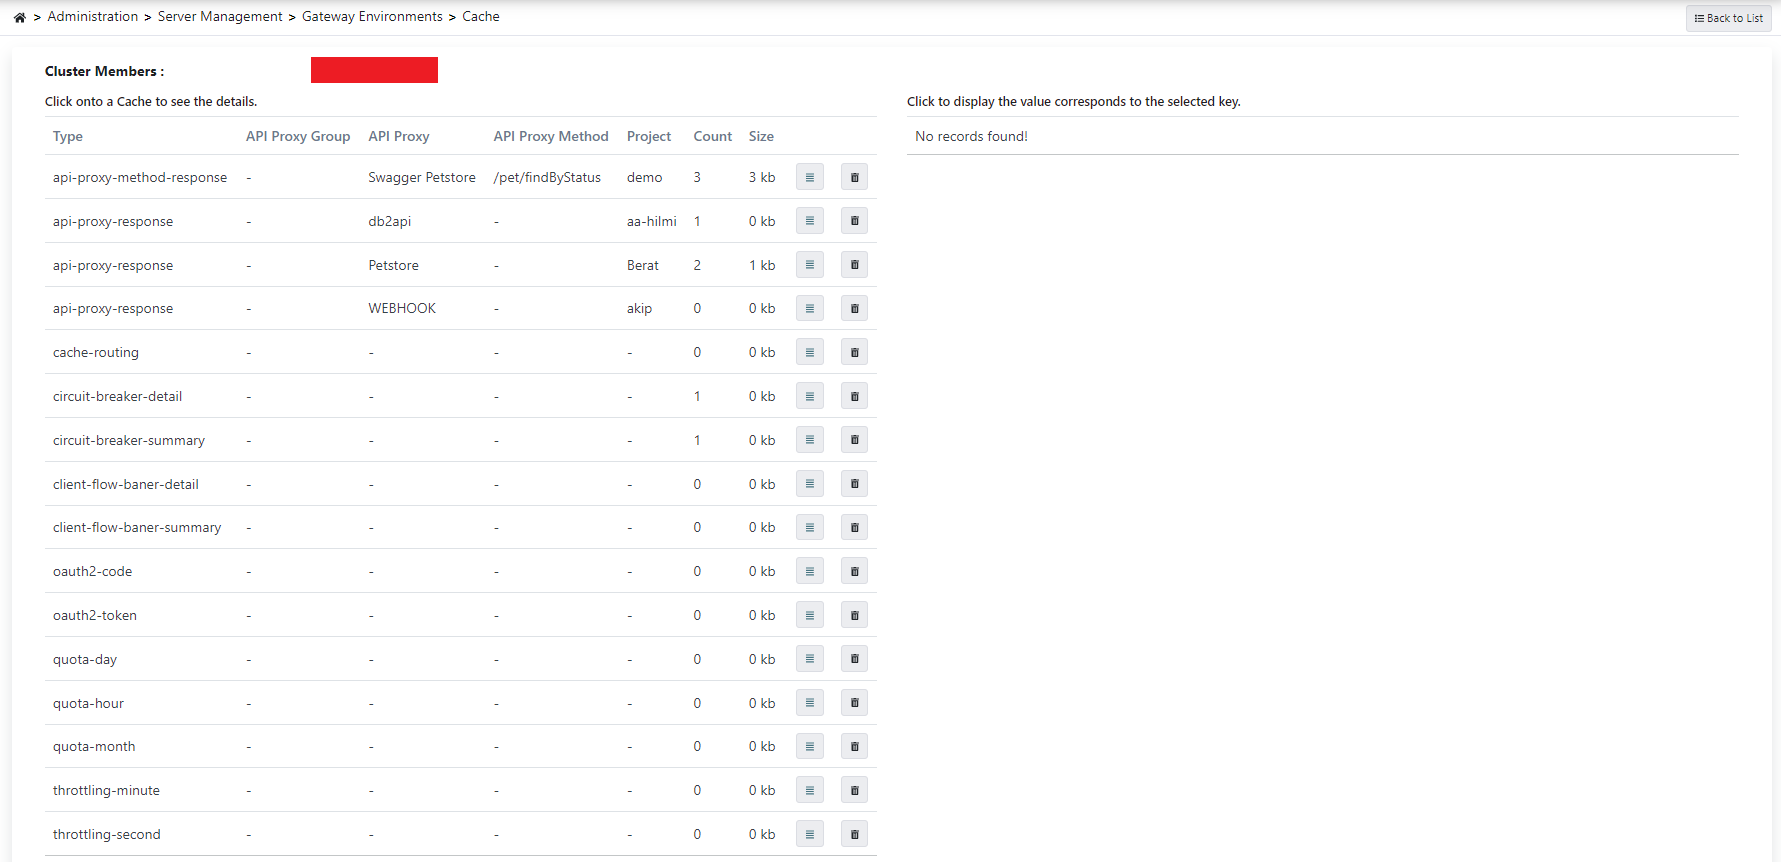
Cache Monitor
With the settings in the Cache section of the Overview tab of the API Proxy screen, the request can be cached and answered without going to the Backend API. At the same time, quota and throttle policies are also managed via the cache pod.
In order to monitor, view and delete the cache operations based on the environment, go to this page from the Cache link of the environment.
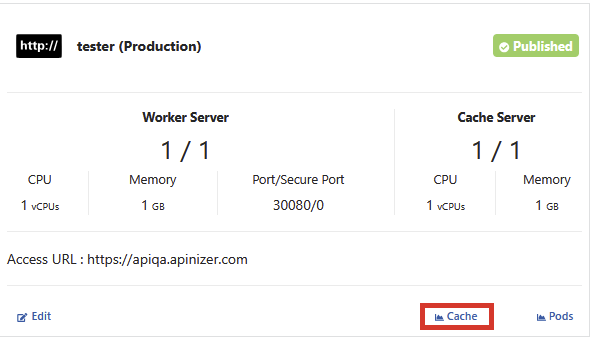
The picture below shows the Cache Monitor:
Metric Monitor
To monitor the status of Worker and Cache pods on Kubernetes, click the Pods link of the relevant environment from the environment list.
The picture below shows the Pods Screen:
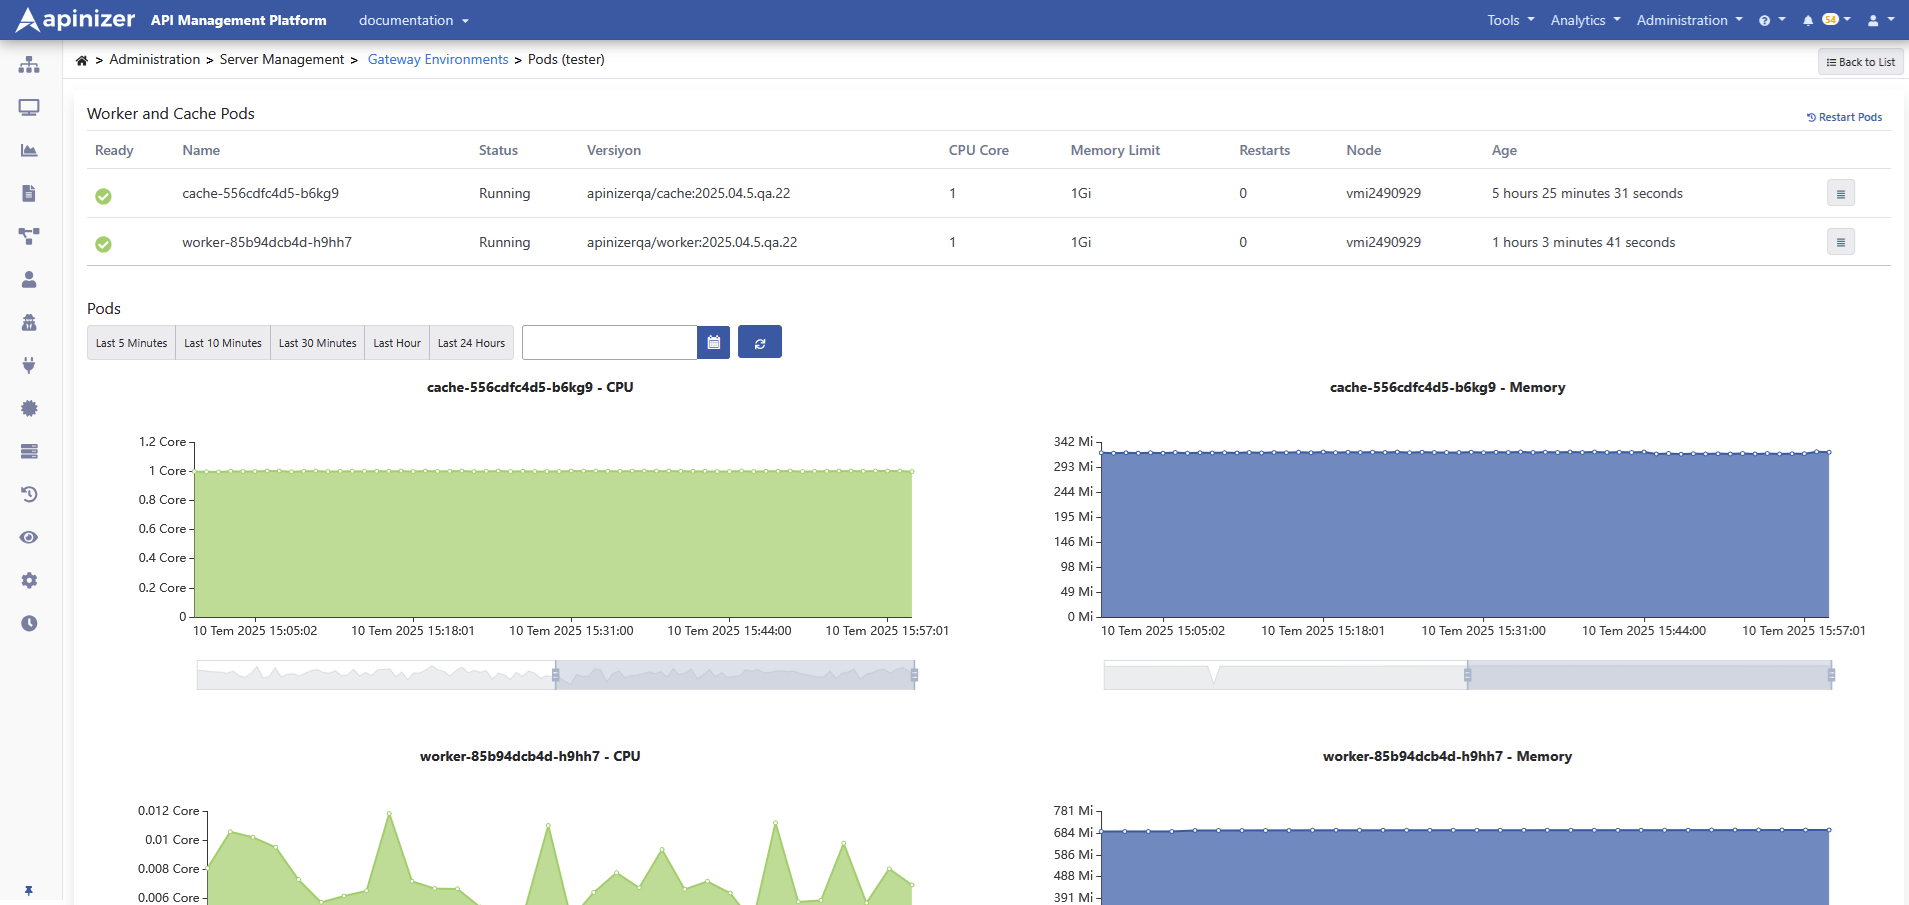
If you want to access metrics for all environments, click here.