OAuth2 Authentication
OAuth2 Authentication policy is used for configuration and validation of messages sent with OAuth2 Token generated in Apinizer token service.
With the settings made on this screen, details of how Apinizer will generate tokens for the API Proxy to which this policy is added are given.
Most of the configuration options on this screen are related to how the JWT token will be generated. For more information about token generation, you can visit the Token Service page.
The picture below shows the policy settings:
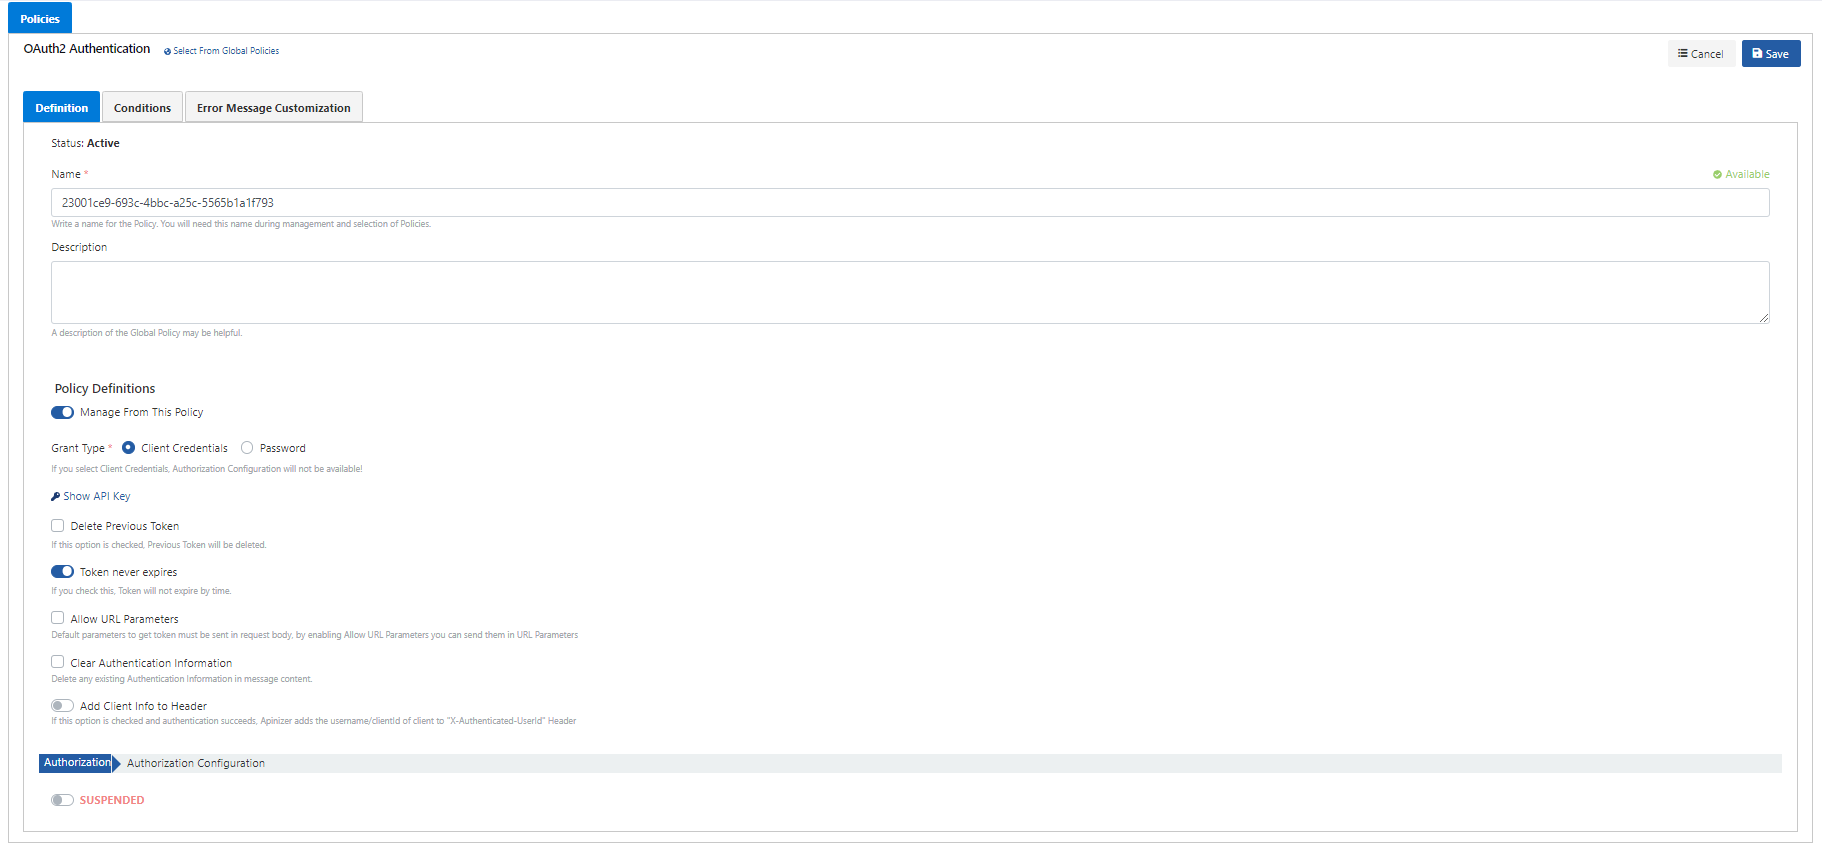
The policy fields are shown in the table below.
Alanlar | Açıklama |
|---|---|
| Name | The name can be written to facilitate the use and management of the policy. You will need this name during the management and selection of policies. |
| Description | An optional description of the policy that may be useful for usage and management activities. |
| Manage From ACL/Manage From This Policy | It is selected where the configuration settings will be managed, either through the policy or over the ACL. When the "Manage From This Policy" option is activated, the following fields appear. If the "Manage From ACL" option is selected, the settings are made via the ACL panel on the Credentials page. For detailed information, see the Credential Management page. |
Grant Type | User information authentication methods. If the Client Credentials value is selected, the Identity/Authorization Service is NOT available.
|
Show API Key | Visible if the API is entered from the Proxy screen or if a global policy has been applied to a API Proxy. For API Proxy Group, this value is located on the API Proxy Group screen. Specifies for which API Proxy the client will receive the token value. It is an important data of the token service. It can be viewed and changed here if desired. |
Identity/Role/Group Service | The Identity Provider Service to authenticate the users. Please visit the Identity Providers page for more information. |
Check Client Address | When this option is activated, the user name and password of the request to the token service, as well as the IP information, if any, are checked for compliance with the IP restriction definition. This setting is made separately for each user on the "Security Manager", thus restricting which IP the user can come from. |
Delete Previous Token | In case of new token generate or refresh, it invalidates the previous token. |
Token Never Expires | If checked, the token does not become invalid over time, it can be used as many times as desired. |
Token Expires in | Specifies the lifetime during which the token will be available. |
Refreshing Token is Allowed | Activates the feature to refresh the token. |
Refresh Token Count | Specifies how many times the token can be refreshed. |
Refresh Token expires in | Specifies how long the token will be available after each refresh. |
Allow URL Parameters | When sending a request for token generation to the Token Service, information is only allowed to be sent in the message body by default. If it is desired to allow this information to be sent as a URL parameter, this feature can be activated with this option. It is recommended not to be used as it will pose a risk in terms of security. |
Clear Authentication Information | It ensures that all existing authentication information, if any, is deleted in the message content. In this case, if there is an Authorization Information in the request from the client, this information is deleted and not sent to the Backend API. |
Add Client Info to Header | If this option is checked, username of the authenticated user will be sent to the Backend API in a header when the authentication is successful. The default name of the header is X-Authenticated-UserId and can be changed if desired. |
| Authentication User Header Name | If the "Add Client Info to Header" option is checked, the username or key is the name to which you will add it. |
Authorization | This option is activated to configure the access control according to the roles of the users. Role or "scope" information is taken from the "scope" field in the JWT token value and sent to the authorization. Please visit the Authorization page for more information. It should be noted that the "Scope" values are case sensitive. |
- The OAuth2 Authentication Policy can only be applied at the API Proxy or API Proxy Group level. It cannot be applied at the method or endpoint level.
- A single API Proxy or API Proxy Group cannot have multiple OAuth2 Authentication Policies. If multiple policies are added, only the first policy will generate a token. Therefore, only one policy should be defined.
Receiving a Token
For token receiving methods and examples, visit the Token Service page.
You can visit the Policies page for the details of the Conditions and Error Message Customization panels.