Kubernetes Installation
Apinizer modules can be installed on Kubernetes using two different methods: with raw Kubernetes Manifest YAML files or with Helm chart. From the top tabs below you can select your preferred deployment method, and from the inner tabs you can select the module you want to install. Each module has its own resource requirements, environment variables and service definitions.
Installation Flow
Follow this sequence to install Apinizer modules on Kubernetes:
Required for Manager metadata, deployed proxy snapshots, and Integration scheduler queue. See MongoDB Installation.
Apinizer Management Console. API Traffic Managers and API administration operate through this application. License key is loaded via this module.
The actual API Gateway. Must be defined as at least one environment through API Manager. Can be deployed as Managed (under Apinizer control) or Remote (external cluster).
Optional Modules
After completing the mandatory steps above, you can optionally deploy the following modules based on your requirements:
Shared Hazelcast cache. Recommended for rate limit, JWT cache, cluster-wide state. Can be deployed as Managed or Remote. Learn more
Quartz-based task scheduler. For scheduled API calls and batch jobs. Learn more
Developer portal for the API catalog. API consumers create tokens and discover APIs. Learn more
Recommended for indexing high-volume API traffic logs. Without it, logs are written to MongoDB. Learn more
HTTPS termination for Manager. Learn more
Pick your preferred deployment method (Manifest YAML or Helm chart) from the tabs below; both follow the same steps.
- Kubernetes Manifest
- Helm
Install Apinizer modules on a cluster step by step using raw Kubernetes Manifest (YAML) files. This method provides full control over the cluster; it applies Deployment, Service, ConfigMap, Secret, RBAC and Ingress definitions for each module as separate files. It does not use a package manager like Helm; it works directly with kubectl apply -f.
API Manager and Gateway installations are mandatory — the actual API Gateway of Apinizer is this Gateway module. Follow the steps below in order: API Manager must be up first, then at least one Gateway must be installed and defined as an environment through the Manager. Cache, Integration and API Portal modules are optional and can be installed from the tabs at the bottom of the page.
API Manager Installation
The Apinizer Management Console (API Manager) is the component through which Apinizer is managed. API Traffic Managers, those who manage APIs, and API consumers can perform their necessary operations through this application.
After Apinizer images are deployed to Kubernetes environment, you need to add the License Key provided to you by Apinizer to the database.
Pre-Installation Steps�
MongoDB installation is mandatory — you must have a running MongoDB instance before bringing up Apinizer. Manager metadata, deployed proxy snapshots, Integration scheduler queue, and audit records all live on MongoDB. This dependency does not change whichever runtime (Kubernetes, Docker, or Virtual Server) you pick.
A replica set is recommended for production; a single node is only suitable for PoC / development. For installation steps → continue at MongoDB Installation.
Elasticsearch is important for API traffic log indexing and search; it is optional. Without Elasticsearch, traffic logs are written to MongoDB — Elasticsearch is recommended for high-traffic environments. For details → see Elasticsearch Installation.
Defining Kubernetes Permissions and Creating Namespaces
Kubernetes API permissions need to be defined for Apinizer to access pods in the created Namespace.
In Kubernetes, ClusterRole and ClusterRoleBinding provide role and role assignment mechanisms at the Kubernetes cluster level. These two resources enable cluster administrators and application developers to manage access and permissions to Kubernetes resources.
If Environment management will be done through API Manager, permissions need to be defined for Apinizer to access Kubernetes APIs and perform create, delete, update and watch operations on Namespace, Deployment, Pod, Service.
If Kubernetes management is done with Apinizer
In the following step, Roles and RoleBindings are created on Kubernetes and permissions are defined. Permission is granted for all environments that will be created in this step.
apinizer-role.yaml — Apinizer namespace + RBAC
apiVersion: v1
kind: Namespace
metadata:
  name: apinizer
---
apiVersion: rbac.authorization.k8s.io/v1
kind: ClusterRoleBinding
metadata:
  name: apinizer-role-binding
roleRef:
  apiGroup: rbac.authorization.k8s.io
  kind: ClusterRole
  name: apinizer-role
subjects:
  - apiGroup: rbac.authorization.k8s.io
    kind: Group
    name: system:serviceaccounts
---
kind: ClusterRole
apiVersion: rbac.authorization.k8s.io/v1
metadata:
  name: apinizer-role
rules:
  - apiGroups:
      - ''
    resources:
      - nodes
      - services
      - namespaces
      - pods
      - endpoints
      - pods/log
      - secrets
      - configmaps
    verbs:
      - get
      - list
      - watch
      - update
      - create
      - patch
      - delete
  - apiGroups:
      - apps
    resources:
      - deployments
      - replicasets
      - statefulsets
      - configmaps
    verbs:
      - get
      - list
      - watch
      - update
      - create
      - patch
      - delete
kubectl apply -f apinizer-role.yaml
If Kubernetes management is not done with Apinizer
Here, permissions are set only for the manager application in the Apinizer namespace.
apinizer-manager-role.yaml — Manager-only namespace + RBAC
apiVersion: v1
kind: Namespace
metadata:
  name: apinizer
---
apiVersion: v1
kind: ServiceAccount
metadata:
  name: manager-serviceaccount
  namespace: apinizer
---
kind: Role
apiVersion: rbac.authorization.k8s.io/v1
metadata:
  name: apinizer-role
  namespace: apinizer
rules:
  - apiGroups:
      - ''
    resources:
      - services
      - namespaces
      - pods
      - endpoints
      - pods/log
      - secrets
    verbs:
      - get
      - list
      - watch
      - update
      - create
      - patch
      - delete
---
apiVersion: rbac.authorization.k8s.io/v1
kind: RoleBinding
metadata:
  name: manager-serviceaccount-apinizer-role-binding
  namespace: apinizer
roleRef:
  apiGroup: rbac.authorization.k8s.io
  kind: Role
  name: apinizer-role
subjects:
  - kind: ServiceAccount
    name: manager-serviceaccount
    namespace: apinizer
kubectl apply -f apinizer-manager-role.yaml
Configuration Parameters
API Manager is a web-based management interface where APIs, Policies, Users, Credentials and configurations are defined, and API Traffic and Analytics data are viewed and analyzed. Configure the following variables according to your environment before deploying API Manager to Kubernetes.
- APINIZER_VERSION - Parameter indicating which Apinizer version you will install. Click here to see current versions. It is recommended to always use the latest version in new installations. Click here to review release notes.
- MONGO_DBNAME - Database URL information to be used for Apinizer configurations. It is recommended to use the name "apinizerdb" by default.
- MONGOX_IP and MONGOX_PORT - IP and port information of MongoDB servers. MongoDB default port is 25080. Apinizer uses port 25080 by default.
- MONGO_USERNAME and MONGO_PASSWORD - Information about the user defined for Apinizer in your MongoDB application, who is authorized on the relevant database or has the authority to create that database.
- YOUR_LICENSE_KEY - License key sent to you by Apinizer.
- K8S_ANY_WORKER_IP - An IP from your Kubernetes Cluster is required for you to access the Apinizer Management Console interface from any web browser after Apinizer installation is completed. This is usually preferred as one of the Kubernetes Worker servers and it is recommended to be placed behind a Load Balancer and DNS later.
Creating secret with MongoDB information
It is recommended that your MongoDB database connection information be stored in an Encoded form in kubernetes deployments. For this, apply the following steps in the terminal of a Linux-based operating system.
DB_URL='mongodb://<MONGO_USERNAME>:<MONGO_PASSWORD>@<MONGO1_IP>:<MONGO1_PORT>,<MONGO2_IP>:<MONGO2_PORT>,<MONGO3_IP>:<MONGO3_PORT>/?authSource=admin&replicaSet=apinizer-replicaset'
DB_NAME=<MONGO_DBNAME>  # Our default recommendation for <MONGO_DBNAME> variable is the name "apinizerdb"
echo -n ${DB_URL} | base64  # We will put the output of this in place of <ENCODED_URL> variable in the next step
echo -n ${DB_NAME} | base64  # We will put the output of this in place of <ENCODED_DB_NAME> variable in the next step
vi secret.yaml
Preparing secret yaml with MongoDB information:
mongo-secret.yaml — MongoDB connection secret
apiVersion: v1
kind: Secret
metadata:
  name: mongo-db-credentials
  namespace: apinizer
type: Opaque
data:
  dbUrl: <ENCODED_URL>
  dbName: <ENCODED_DB_NAME>
kubectl apply -f secret.yaml
API Manager Kubernetes deployment
Modify the following example yaml file according to your systems and load it to your Kubernetes Cluster.
vi apinizer-manager-deployment.yaml
apimanager-deployment.yaml — API Manager Deployment + Service
apiVersion: apps/v1
kind: Deployment
metadata:
  name: apimanager
  namespace: apinizer
spec:
  replicas: 1
  selector:
    matchLabels:
      app: apimanager
      version: v1
  strategy:
    type: Recreate
  template:
    metadata:
      labels:
        app: apimanager
        version: v1
    spec:
      containers:
      - env:
        - name: JAVA_OPTS
          value: '-XX:MaxRAMPercentage=75.0 -Dlog4j.formatMsgNoLookups=true'
        - name: SPRING_PROFILES_ACTIVE
          value: prod
        - name: WORKER_DEPLOYMENT_TIMEOUT
          value: '120'
        - name: SPRING_SERVLET_MULTIPART_MAX_FILE_SIZE
          value: '70MB'
        - name: SPRING_SERVLET_MULTIPART_MAX_REQUEST_SIZE
          value: '70MB'
        - name: SPRING_DATA_MONGODB_URI
          valueFrom:
            secretKeyRef:
              key: dbUrl
              name: mongo-db-credentials
        - name: SPRING_DATA_MONGODB_DATABASE
          valueFrom:
            secretKeyRef:
              key: dbName
              name: mongo-db-credentials
        name: apimanager
        image: apinizercloud/apimanager:<APINIZER_VERSION>
        imagePullPolicy: IfNotPresent
        ports:
        - containerPort: 8080
          protocol: TCP
        resources:
          limits:
            cpu: 1
            memory: 3Gi
        startupProbe:
          failureThreshold: 12
          httpGet:
            path: /apinizer/management/health
            port: 8080
            scheme: HTTP
          initialDelaySeconds: 60
          periodSeconds: 10
          successThreshold: 1
          timeoutSeconds: 10
        readinessProbe:
          failureThreshold: 12
          httpGet:
            path: /apinizer/management/health
            port: 8080
            scheme: HTTP
          initialDelaySeconds: 60
          periodSeconds: 10
          successThreshold: 1
          timeoutSeconds: 10
        livenessProbe:
          failureThreshold: 12
          httpGet:
            path: /apinizer/management/health
            port: 8080
            scheme: HTTP
          initialDelaySeconds: 60
          periodSeconds: 10
          successThreshold: 1
          timeoutSeconds: 10
      dnsPolicy: ClusterFirst
      restartPolicy: Always
      hostAliases:
      - ip: "<IP_ADDRESS>"
        hostnames:
        - "<DNS_ADDRESS_1>"
        - "<DNS_ADDRESS_2>"
If Environments Will Not Be Managed Through Apinizer, Manager's Deployment is Changed
To enable Deployment objects to bind to the required ServiceAccount, the serviceAccountName field is added to the spec field as follows:
spec:
  serviceAccountName: manager-serviceaccount
Environment Variables
Apinizer API Manager runs on Spring Boot infrastructure. In Spring Boot, Environment variables are usually expressed using underscore (_) and uppercase. Therefore, for example, when setting spring.servlet.multipart.max-file-size and spring.servlet.multipart.max-request-size properties as environment variables, you may need to use underscore.
Example: You can define SPRING_SERVLET_MULTIPART_MAX_FILE_SIZE and SPRING_SERVLET_MULTIPART_MAX_REQUEST_SIZE as environment variables.
If you are using a proxy server like NGINX and want to increase the file upload limit, you need to add the following setting to the NGINX configuration file:
http {
  ...
  client_max_body_size 70M; # 70MB file limit
  ...
}
Environment Variables
Deployment operations are performed synchronously to ensure data integrity. The WORKER_DEPLOYMENT_TIMEOUT parameter indicates how many seconds after the deploy operation performed through API Manager or Management API will timeout.
env:
  - name: WORKER_DEPLOYMENT_TIMEOUT
    value: '120'
Create Kubernetes Service for API Manager:
vi apinizer-manager-service.yaml
apimanager-service.yaml — API Manager Service
apiVersion: v1
kind: Service
metadata:
  name: apimanager
  namespace: apinizer
  labels:
    app: apimanager
spec:
  selector:
    app: apimanager
  type: NodePort
  ports:
    - name: http
      port: 8080
      nodePort: 32080
kubectl apply -f apinizer-manager-deployment.yaml
kubectl apply -f apinizer-manager-service.yaml
When API Manager is deployed on Kubernetes, it creates a Kubernetes service named manager and of type NodePort. This service is necessary for accessing API Manager from outside kubernetes. However, you can delete this service and adapt it according to the structure you use for connection method in your organization, such as Ingress.
After this operation, to track the created pod and examine its log, run the first code below to get the pod name and use it in the second code.
kubectl get pods -n apinizer
kubectl logs <POD_NAME> -n apinizer
After Apinizer images are deployed to Kubernetes environment, you need to add the License Key provided to you by Apinizer to the database.
Entering API Manager license key
The License Key provided to you by Apinizer can be updated in a .js file as follows and the license information in the database can be updated.
vi license.js
db.general_settings.updateOne(
  {"_class":"GeneralSettings"},
  { $set: { licenseKey: '<YOUR_LICENSE_KEY>'}}
)
The created license.js is run on the MongoDB server. A result showing Matched = 1 is expected.
mongosh mongodb://<MONGODB_IP>:<MONGO_PORT>/<MONGO_DBNAME> --authenticationDatabase "admin" -u "apinizer" -p '<MONGO_PASSWORD>' < license.js
If the installation process was successful, you can access Apinizer API Manager (Management Console) from the following address.
http://<K8S_ANY_WORKER_IP>:32080
Default Username: admin
Default User Password: Request help from Apinizer support team.
It is recommended that you change your password after your first login to Apinizer Management Console.
To run Apinizer Manager with HTTPS/SSL — for TLS certificate preparation, JKS/PKCS12 conversion, K8s Secret creation, and SSL-enabled Deployment YAML examples, see the Starting API Manager with SSL tab at the bottom of the page. HTTPS is optional; TLS is recommended for production but HTTP works for PoC.
Next Step — Gateway Installation (Mandatory)
Once API Manager installation and License Key definition are complete, you can log in to the Management Console. The next step is Gateway installation and environment definition — this step is mandatory; this module is the actual API Gateway of Apinizer and must be defined as at least one environment through the Manager.
The API Gateway is the most important component of Apinizer. It is the point where client requests are received and acts as a Policy Enforcement Point, processing incoming requests according to defined policies and routing them to the relevant Backend API/Service. Gateway installation is mandatory and at least one Gateway must be defined through the Manager.
A Gateway can be defined in two ways:
- Managed Gateway — Apinizer manages the target Kubernetes cluster; when you create an environment via the Manager UI, Apinizer automatically handles namespace, RBAC, Deployment, Service, and secret copy operations.
- Remote Gateway — The cluster where the Gateway runs is NOT under Apinizer's management. The operator manually deploys YAML manifests via
kubectland registers the connection addresses to Manager as a "Remote Gateway".
- Managed Gateway (Apinizer-managed)
- Remote Gateway (Manual Deploy)
What is Managed Gateway?
The model where Apinizer takes both the Management and Provisioning roles in the Kubernetes cluster. When you create a new Gateway environment from the Manager UI, Apinizer:
- Creates the target namespace
- Applies the required
Role,ServiceAccount, andRoleBindings - Deploys the
Gatewayand (if used)CacheDeployments - Exposes HTTP/HTTPS
Services and optionalNodePorts - Copies the MongoDB secret to the target namespace
- Lets you control pod count, JVM parameters, and resource limits via the UI
This model is recommended as the fastest path from PoC to production. No manual YAML preparation.
Prerequisites
Logged into API Manager with the admin user. If Manager is not installed, continue from the API Manager Installation section above.
In System Settings → General Settings, the "Kubernetes management via Apinizer" option must be enabled. When disabled, Manager can only create Remote Gateways.
For Manager to deploy to the target cluster, the apinizer-role.yaml and apinizer-manager-role.yaml (cluster-wide) from the API Manager Installation step must be applied.
The cluster must be able to pull apinizercloud/worker:<APINIZER_VERSION> and apinizercloud/cache:<APINIZER_VERSION> images (via internet or internal registry).
Creating a New Gateway
In the Manager UI, navigate to Server Management → Gateway Runtimes and click the New button. The form has the following sections.
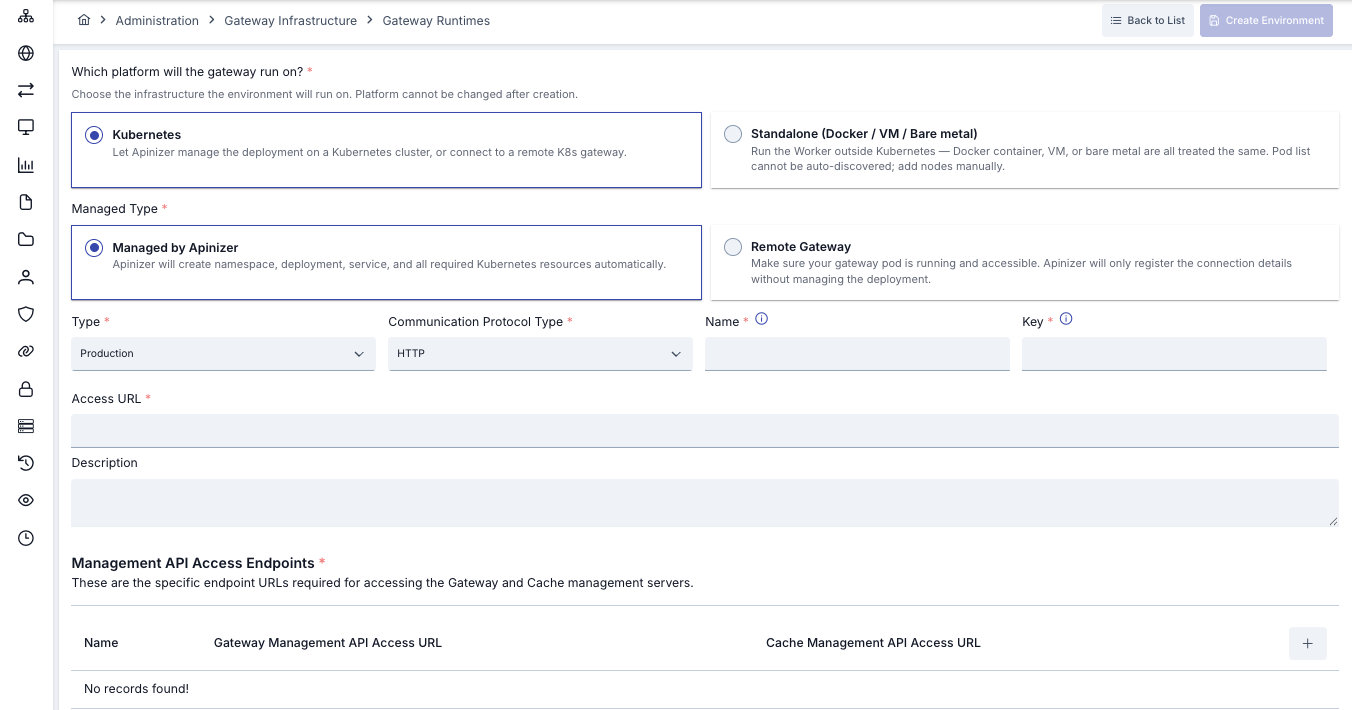
1. Platform Selection
The first step is choosing which platform the Gateway will run on.
| Option | Description |
|---|---|
| Kubernetes | Gateway runs as a pod in a Kubernetes cluster. Can be managed by Apinizer (Managed) or by the operator (Remote). |
| Virtual Server / Docker (Standalone) | Gateway runs as a bare-metal Linux process or Docker container. Always defined as Remote in this case. |
For Managed Gateway, select Kubernetes.
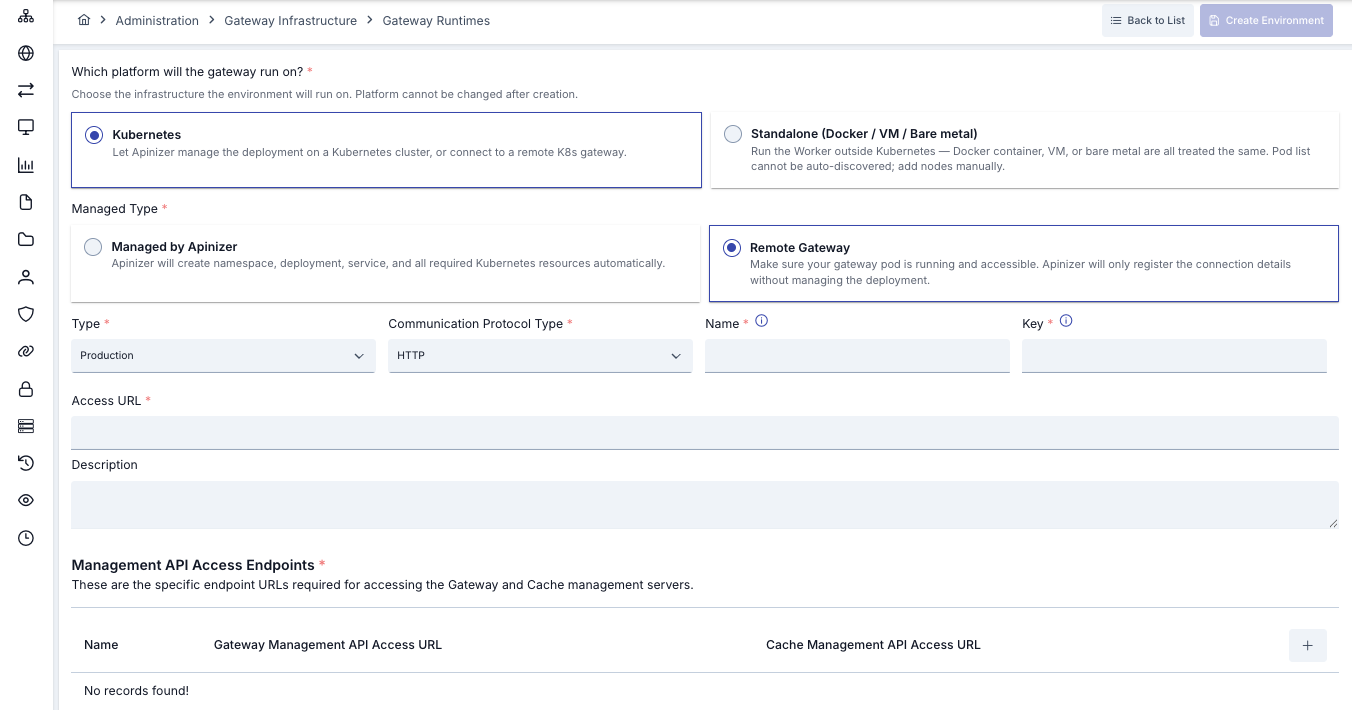
2. Management Type
| Option | Description |
|---|---|
| Managed by Apinizer | The Manager UI auto-creates all Kubernetes objects. |
| Remote Gateway | The operator manually deploys YAML; Manager only stores connection info. |
This tab assumes Managed by Apinizer is selected.
3. Basic Information
| Field | Description | Validation |
|---|---|---|
| Environment Type | Classification such as DEV, TEST, PROD. | Required |
| Communication Protocol Type | HTTP, HTTPS, gRPC, WebSocket. A single environment runs a single protocol; for mixed protocols, create separate environments. | Required |
| Environment Name | Display name of the Gateway environment. Also used as the Kubernetes namespace. | a-z 0-9 and -; 3-64 chars; unique |
| Environment Key | Used as the path prefix in API URLs (e.g., /test/...). | a-zA-Z -; 3-24 chars; unique |
| Access URL | Public URL used to reach this Gateway from outside (Load Balancer / Ingress / NodePort host). | Required |
| Description | Operator notes. | Optional |
4. Node Management (Node List)
To restrict which Kubernetes nodes Gateway pods run on, specify a nodeSelector/nodeAffinity list. If left empty, the Kubernetes scheduler default behavior applies.
In high-traffic environments, running Gateway on dedicated nodes reduces noisy-neighbor effects.
5. Gateway Resource Configuration
| Field | Description | Default |
|---|---|---|
| Replica Count | Number of Gateway pods running concurrently. ≥ 2 recommended for production. | 1 |
| CPU Limit | CPU limit per pod (cores). | 4 |
| Memory Limit | Memory limit per pod. | 4 |
| Memory Unit | Mi / Gi. | Gi |
When the CPU value changes, Apinizer auto-computes JVM tuning parameters (tuneWorkerThreads, tuneIoThreads, etc.) and reflects them in the Additional Variables table.
6. Host Aliases
IP ↔ hostname mappings to add to Gateway pods' /etc/hosts. Define these when the backend runs in a closed environment without DNS resolution, or when hardcoded IP/host mappings are required. This option is only available for Managed Gateway — for Remote Gateway, host aliases are configured directly in the Deployment YAML.
Publishing the Environment
After filling out the form, click Create. Apinizer:
- Creates the target namespace (Environment Name = namespace name)
- Applies RBAC, ServiceAccount, Deployment, Service
- Copies the MongoDB secret to the namespace
- Waits for pods to become
Ready - Marks the environment as
published
After publishing, you can see the environment on the Manager → Gateway Runtimes page and deploy API Proxies to it.
For detailed Gateway Runtime management, JWT token validation key, metric monitor and diagnostics → see the Gateway Runtimes page.
What is Remote Gateway?
The Kubernetes cluster where the Gateway will run is OUTSIDE Apinizer Manager's management. The operator manually deploys Gateway pod/service/RBAC via kubectl. Manager only stores the Management API URL and Cache Management API URL addresses; the deployment lifecycle is managed by the cluster operator.
Remote Gateway is preferred when:
- Apinizer does not have deploy authority on the cluster (RBAC restriction)
- Multi-cluster: Manager is in one cluster, Gateway is in another
- Cluster operator manages deployments via their own CI/CD pipeline
- Air-gapped / regulated environment (deployment operations under audit)
Prerequisites
- API Manager installed and running
kubectlaccess to the target Kubernetes cluster- Access to
apinizercloud/worker:<APINIZER_VERSION>and (if used)apinizercloud/cache:<APINIZER_VERSION>images - Network access from the target cluster to Manager's MongoDB cluster
- Gateway access address determined (NodePort + node IP, or LoadBalancer / Ingress with DNS)
Manual Kubernetes Deploy
1. Creating Role and RoleBindings for Worker and Cache
The names of the environments to be created should be determined in advance and <WORKER_CACHE_NAMESPACE> variables should be set in this way, and the following steps should be applied for each environment to be created.
vi apinizer-worker-cache-role-ns.yaml
worker-cache-role-ns.yaml — Worker/Cache RBAC
apiVersion: v1
kind: Namespace
metadata:
  name: <WORKER_CACHE_NAMESPACE>
---
kind: Role
apiVersion: rbac.authorization.k8s.io/v1
metadata:
  name: worker-cache-role
  namespace: <WORKER_CACHE_NAMESPACE>
rules:
  - apiGroups:
      - ''
    resources:
      - services
      - namespaces
      - pods
      - endpoints
      - pods/log
      - secrets
    verbs:
      - get
      - list
      - watch
      - update
      - create
      - patch
      - delete
---
apiVersion: rbac.authorization.k8s.io/v1
kind: RoleBinding
metadata:
  name: manager-serviceaccount-worker-cache-role-binding
  namespace: <WORKER_CACHE_NAMESPACE>
roleRef:
  apiGroup: rbac.authorization.k8s.io
  kind: Role
  name: worker-cache-role
subjects:
  - kind: ServiceAccount
    name: manager-serviceaccount
    namespace: <WORKER_CACHE_NAMESPACE>
vi apinizer-worker-cache-rolebinding.yaml
worker-cache-rolebinding.yaml — ServiceAccount + RoleBindings
apiVersion: v1
kind: ServiceAccount
metadata:
  name: worker-cache-serviceaccount
  namespace: <WORKER_CACHE_NAMESPACE>
---
apiVersion: rbac.authorization.k8s.io/v1
kind: RoleBinding
metadata:
  name: worker-cache-serviceaccount-apinizer-role-binding
  namespace: apinizer
roleRef:
  apiGroup: rbac.authorization.k8s.io
  kind: Role
  name: apinizer-role
subjects:
  - kind: ServiceAccount
    name: worker-cache-serviceaccount
    namespace: <WORKER_CACHE_NAMESPACE>
---
apiVersion: rbac.authorization.k8s.io/v1
kind: RoleBinding
metadata:
  name: worker-cache-serviceaccount-worker-cache-role-binding
  namespace: <WORKER_CACHE_NAMESPACE>
roleRef:
  apiGroup: rbac.authorization.k8s.io
  kind: Role
  name: worker-cache-role
subjects:
  - kind: ServiceAccount
    name: worker-cache-serviceaccount
    namespace: <WORKER_CACHE_NAMESPACE>
kubectl apply -f apinizer-worker-cache-role-ns.yaml
kubectl apply -f apinizer-worker-cache-rolebinding.yaml
2. Creating Worker Deployment
vi apinizer-worker-deployment.yaml
worker-deployment.yaml — Worker Deployment
apiVersion: apps/v1
kind: Deployment
metadata:
  name: worker
  namespace: <WORKER_CACHE_NAMESPACE>
spec:
  replicas: 1
  selector:
    matchLabels:
      app: worker
  strategy:
    type: "RollingUpdate"
    rollingUpdate:
      maxUnavailable: 75%
      maxSurge: 1
  template:
    metadata:
      labels:
        app: worker
    spec:
      serviceAccountName: worker-cache-serviceaccount
      containers:
        - name: worker
          image: apinizercloud/worker:<APINIZER_VERSION>
          imagePullPolicy: IfNotPresent
          env:
            - name: JAVA_OPTS
              value: -server -XX:MaxRAMPercentage=75.0 -Dhttp.maxConnections=4096 -Dlog4j.formatMsgNoLookups=true
            - name: WORKER_TIMEZONE
              value: "+03:00"
            - name: tuneWorkerThreads
              value: "1024"
            - name: tuneWorkerMaxThreads
              value: "4096"
            - name: tuneBufferSize
              value: "16384"
            - name: tuneIoThreads
              value: "4"
            - name: tuneBacklog
              value: "10000"
            - name: tuneRoutingConnectionPoolMaxConnectionPerHost
              value: "1024"
            - name: tuneRoutingConnectionPoolMaxConnectionTotal
              value: "4096"
            - name: tuneReadTimeout
              value: "30000"
            - name: tuneNoRequestTimeout
              value: "60000"
            - name: SPRING_DATA_MONGODB_DATABASE
              value: null
              valueFrom:
                secretKeyRef:
                  name: mongo-db-credentials
                  key: dbName
            - name: SPRING_DATA_MONGODB_URI
              value: null
              valueFrom:
                secretKeyRef:
                  name: mongo-db-credentials
                  key: dbUrl
            - name: SPRING_PROFILES_ACTIVE
              value: prod
          lifecycle:
            preStop:
              exec:
                command:
                  - /bin/sh
                  - -c
                  - sleep 10
          livenessProbe:
            failureThreshold: 12
            httpGet:
              path: /apinizer/management/health
              port: 8091
              scheme: HTTP
            initialDelaySeconds: 60
            periodSeconds: 10
            successThreshold: 1
            timeoutSeconds: 10
          ports:
            - containerPort: 8091
              protocol: TCP
          readinessProbe:
            failureThreshold: 12
            httpGet:
              path: /apinizer/management/health
              port: 8091
              scheme: HTTP
            initialDelaySeconds: 60
            periodSeconds: 10
            successThreshold: 1
            timeoutSeconds: 10
          resources:
            limits:
              cpu: 4
              memory: 4Gi
          startupProbe:
            failureThreshold: 12
            httpGet:
              path: /apinizer/management/health
              port: 8091
              scheme: HTTP
            initialDelaySeconds: 60
            periodSeconds: 10
            successThreshold: 1
            timeoutSeconds: 10
      restartPolicy: Always
      hostAliases:
        - ip: "<IP_ADDRESS>"
          hostnames:
            - "<DNS_ADDRESS_1>"
            - "<DNS_ADDRESS_2>"
If the Gateway type will be set as HTTP+Websocket, it is recommended to set the http2Enabled parameter to false see.
- name: http2Enabled
  value: "false"
If you want the Gateway application to be served with HTTPS, in the above yaml the port value under livenessProbe, readinessProbe and startupProbe should be 8443 and the scheme value should be HTTPS.
The spec.selector.matchLabels.app and spec.template.metadata.labels.app labels in the Gateway deployment ensure that Apinizer correctly recognizes and controls Gateway pods. Changing these labels may prevent the pods from being selected correctly and may disrupt the system's operation. Therefore, the values of these labels should not be changed.
kubectl apply -f apinizer-worker-deployment.yaml
3. Creating Service for Worker
vi apinizer-worker-service.yaml
worker-service.yaml — Worker Service
apiVersion: v1
kind: Service
metadata:
  name: worker-management-api-http-service
  namespace: <WORKER_CACHE_NAMESPACE>
spec:
  ports:
    - port: 8091
      protocol: TCP
      targetPort: 8091
  selector:
    app: worker
  type: ClusterIP
---
# If your Gateway's Communication Protocol Type is HTTP or websocket, the following
apiVersion: v1
kind: Service
metadata:
  name: worker-http-service
  namespace: <WORKER_CACHE_NAMESPACE>
spec:
  ports:
    - nodePort: 30080
      port: 8091
      protocol: TCP
      targetPort: 8091
  selector:
    app: worker
  type: NodePort
---
# If your Gateway's Communication Protocol Type is gRPC, the following
apiVersion: v1
kind: Service
metadata:
  name: worker-grpc-service
  namespace: <WORKER_CACHE_NAMESPACE>
spec:
  ports:
    - nodePort: 30152
      port: 8094
      protocol: TCP
      targetPort: 8094
  selector:
    app: worker
  type: NodePort
If Gateway is desired to be served with HTTPS, in the above yaml, port and targetPort values should be given as 8443.
kubectl apply -f apinizer-worker-service.yaml
4. Copying the MongoDB Secret to the Target Namespace
Since the Gateway (and Cache Server if used) connects to MongoDB, the secret created for the Manager application is copied to the target namespace. The following example copies a secret in the apinizer namespace to the relevant namespace.
kubectl get secret mongo-db-credentials -n apinizer -o yaml | sed 's/namespace: apinizer/namespace: <WORKER_CACHE_NAMESPACE>/' | kubectl create -f -
Registering Remote Gateway via Manager UI
After Gateway pods are running in the cluster, navigate to Manager UI Server Management → Gateway Runtimes → New.
Form Fields
| Field | Value |
|---|---|
| Platform | Kubernetes |
| Management Type | Remote Gateway |
| Environment Type | DEV / TEST / PROD |
| Communication Protocol Type | Matches the service you exposed (HTTP / HTTPS / gRPC / WebSocket) |
| Environment Name | Same as the Gateway namespace in the target cluster |
| Environment Key | API URL prefix (e.g., prod) |
| Access URL | Gateway external access URL |
Gateway Node List (Manual URL Table)
When Remote Gateway is selected, a Gateway Node List table appears on the form. For each node:
| Field | Description |
|---|---|
| Name | Identifier (e.g., node-1) |
| Gateway Management API URL | http://<NODE_IP>:8091 (Gateway Management API endpoint) |
| Cache Management API URL | http://<CACHE_IP>:8092 (Cache Management API endpoint, if used) |
These URLs must be reachable from Manager. Manager uses these addresses for proxy push, health checks, and diagnostics on the Gateway.
Publishing the Environment
Click Create. For Remote Gateway, Apinizer does NOT perform Kubernetes deployment; it only registers the environment in Manager metadata. Manager attempts to connect to the Gateway — if successful, the environment is marked as published.
After publishing, you can deploy API Proxies to this Remote Gateway. Manager pushes API Proxy YAMLs to the Gateway's Management API endpoint.
Common Settings (For Both Methods)
Independent of the Managed/Remote choice, the following form fields on the Gateway environment form in the Manager UI apply identically to both methods.
Management API Access Endpoints
This section is optional — not enforced on the form for either Managed or Remote Gateway. However, to ensure the Gateway runs correctly (proxy deployment, health checks, diagnostics), defining at least one endpoint is strongly recommended. Without it, the Manager cannot connect to Gateway pods and deployment/monitoring operations will fail.
These endpoints are the addresses that Apinizer Management Console connects to in order to push proxy deployments, run health checks, and perform diagnostics on Gateway and Cache pods. Each endpoint row in the form has three fields:
| Field | Description |
|---|---|
| Name | A human-readable identifier for the endpoint (e.g., Production Cluster, DR Site, Region-EU). |
| Gateway Management API URL | URL where the Manager reaches the Gateway pods' Management API (default port 8091). |
| Cache Management API URL | URL where the Manager reaches the Cache pods' Management API (default port 8090). |
Example values (cross-namespace Kubernetes service discovery):
Gateway Management API URL: http://worker-management-api-http-service.prod.svc.cluster.local:8091
Cache Management API URL:   http://cache-http-service.apinizer-cache.svc.cluster.local:8090
Multi-endpoint scenarios:
- Multi-region / DR: Each region has its own endpoint row; the Manager selects the matching row using the
environmentClusterNameadditional variable. - High Availability: Multiple endpoints sharing the same cluster can be registered; the Manager rotates between them.
- Multi-cluster separation: Gateway pods and Cache pods may live in different clusters or different namespaces — each pair must be listed together.
Every endpoint row must contain both a Gateway Management API URL and a Cache Management API URL. Empty rows or rows with only one URL filled cause the publish step to fail. The Manager must also be able to reach these addresses over the network (firewalls, NetworkPolicy, cross-cluster routing must permit traffic).
Environment Publishing Access
Restricts which Projects can deploy API Proxies, API Proxy Groups, Credentials, and Connections to this Gateway environment. Configured via the Projects multi-select field.
| Selection state | Behavior |
|---|---|
| Empty (no projects selected) | All projects in the system can deploy to this environment (default). |
| One or more projects selected | Only the selected projects can deploy. Future newly-created projects are NOT added automatically; the operator must add them manually. |
Removing a project from this list automatically undeploys all of that project's API Proxies, API Proxy Groups, Credentials, and Connections from this Gateway environment. This is a non-reversible side effect — the undeploy happens immediately on save.
When at least one project is selected, only API Proxies inside the selected projects can be deployed here. Use this for production environments where only audited projects should be allowed to ship.
API Traffic Log Connectors
Defines the connectors where API traffic logs and extension logs of API Proxies running in this Gateway environment are written. Multiple connectors can be added; each has its own enabled/disabled toggle.
To fully benefit from Apinizer's Analytics and Monitoring capabilities, an Elasticsearch connector is recommended so that data management is also handled from Apinizer. If you will manage your API Traffic and API Analytics data with your own log systems, you can choose the connector type best suited to your environment.
Supported connector types:
- Elasticsearch (recommended for searchable traffic log + analytics)
- Kafka
- Database (relational)
- RabbitMQ
- ActiveMQ
- Syslog
- Webhook
If no Elasticsearch connector is assigned to this Gateway environment, the form displays a yellow warning: API Traffic logs are not sent to Elasticsearch, and Apinizer does not provide built-in log management or export. Log persistence and rotation become the operator's responsibility.
Prerequisite: The connector itself must first be defined under System Settings → Connection Management before it can be selected here.
→ For detailed assignment workflow: Adding Log Connectors
Protocol and Security Settings
Define the network protocols (HTTP, HTTPS) and mandatory security mechanisms (mTLS, Keystore/Truststore) that the Gateway will use to accept incoming traffic.
HTTP / HTTPS / mTLS Activation
| Toggle | Description |
|---|---|
HTTP Enabled (httpEnabled) | Gateway's HTTP protocol is enabled. Selected by default. |
HTTPS Enabled (httpsEnabled) | Gateway's SSL/TLS protocol is enabled. When enabled, Keystore and Truststore files must be uploaded. |
mTLS Enabled (mtlsEnabled) | Mutual TLS — performs client certificate validation. Only selectable when HTTPS is enabled and the Communication Protocol is not gRPC. |
Certificate Files (when HTTPS is enabled)
| Field | Format | Description |
|---|---|---|
| Keystore | .jks or .pfx | Gateway TLS server certificate (private key + cert chain). |
| Truststore | .jks or .pfx | Trusted client / CA certificates. Required when mTLS is enabled. |
| Keystore Password | string | Encrypted, masked input. |
| Truststore Password | string | Encrypted, masked input. |
Kubernetes Service Configuration
Controls which Kubernetes Service objects Apinizer creates for the Gateway. The UI calls this section Kubernetes Service Deployment (defineServiceInKubernetes).
This section is only meaningful for Managed Gateway — for Remote Gateway, the operator authors the Service YAMLs manually (apinizer-worker-service.yaml) and these toggles have no effect.
| Option | i18n key | Description |
|---|---|---|
| Create HTTP service for Gateway Management API | createHttpServiceForGatewayManagementAPI | Exposes the Gateway pod's HTTP Management API port (8091) to internal cluster access via a dedicated ClusterIP service. Required for Manager → Gateway configuration push. |
| Create HTTPS service for Gateway Management API | createHttpsServiceForGatewayManagementAPI | Exposes the Gateway pod's HTTPS Management API port (8443) to internal cluster access via a dedicated ClusterIP service. Requires Keystore/Truststore. |
| Create NodePort for External HTTP Access to Gateway Service | createServiceForGatewayServiceAccess | Creates a NodePort for external HTTP traffic to the Gateway service. |
| Create NodePort for External HTTPS Access to Gateway Service | createSecureServiceForGatewayServiceAccess | Creates a NodePort for external HTTPS traffic to the Gateway service. |
NodePort range: 30080-32767 (Kubernetes default range).
For Gateway additional variables (JVM tuning, gRPC, WebSocket, CORS, security, etc.) and all Manager UI configurations (General Settings, Gateway Environments, Log Connectors, Backup, etc.), see Gateway Settings.
Optional Modules
The following modules are optional and can be installed in the desired order. Recommended order: Cache → Integration → API Portal. For running API Manager with HTTPS/SSL, see the SSL tab at the bottom.
- Cache Setup and Configuration
- Integration Setup and Configuration
- API Portal Setup
- Starting API Manager with SSL
Apinizer Cache Installation
API Cache Server manages the data shared by its components by storing it in distributed cache, and also provides performance improvement. It runs as a Hazelcast-based cluster; Workers connect to Cache for shared data such as quota counters, OIDC token cache, circuit breaker states, and so on.
Cache installation is optional — Apinizer can run without a dedicated Cache Server for low-traffic / single-Gateway scenarios. For production deployments with multiple Workers, Quota policies, OIDC, or circuit breakers, installing a Cache Server is strongly recommended.
A Cache can be defined in two ways:
- Managed Cache (Apinizer-managed) — Apinizer provisions the Cache Server on the target Kubernetes cluster with a single click from the Manager UI; namespace, Deployment, Services, and MongoDB secret copy are handled automatically.
- Remote Cache Server (Manual Deploy) — The operator deploys the Cache Server manually (via
kubectlYAML or standalone), then registers its Management API URL to the Manager.
If the Cache Server is installed standalone (Docker, Virtual Server, or bare-metal Linux), you MUST select Remote Cache Server and register it with the Manager. Standalone Caches cannot be deployed by the Manager; only connection details (Cache Management API URL) are stored.
- Managed Cache (Apinizer-managed)
- Remote Cache Server (Manual Deploy)
What is Managed Cache?
The model where Apinizer automatically provisions the Cache Server on a Kubernetes cluster. When you create a new Cache Server via the Manager UI, Apinizer:
- Creates the target namespace (or uses an existing one)
- Applies the Cache Server
Deployment(Hazelcast-based cluster) - Exposes HTTP (8090) and Hazelcast (5701)
Services - Copies the MongoDB secret to the target namespace
- Lets you control pod count, JVM parameters, and resource limits via the UI
Apinizer Workers (Gateway pods) connect to this Cache for shared data such as quota counters, OIDC token cache, circuit breaker states, etc.
Prerequisites
Logged into Manager with the admin user.
"Kubernetes management via Apinizer" enabled under System Settings → General Settings.
apinizer-role.yaml and apinizer-manager-role.yaml (cluster-wide) from the API Manager Installation step must be applied.
Cluster must be able to pull apinizercloud/cache:<APINIZER_VERSION>.
Creating a New Cache Server
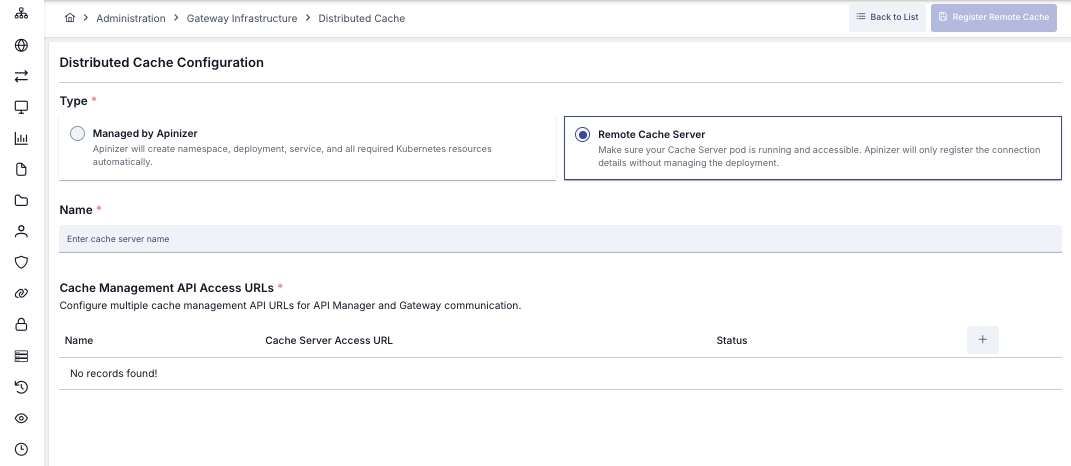
In the Manager UI, navigate to Server Management → Distributed Cache and click the New (+) button.
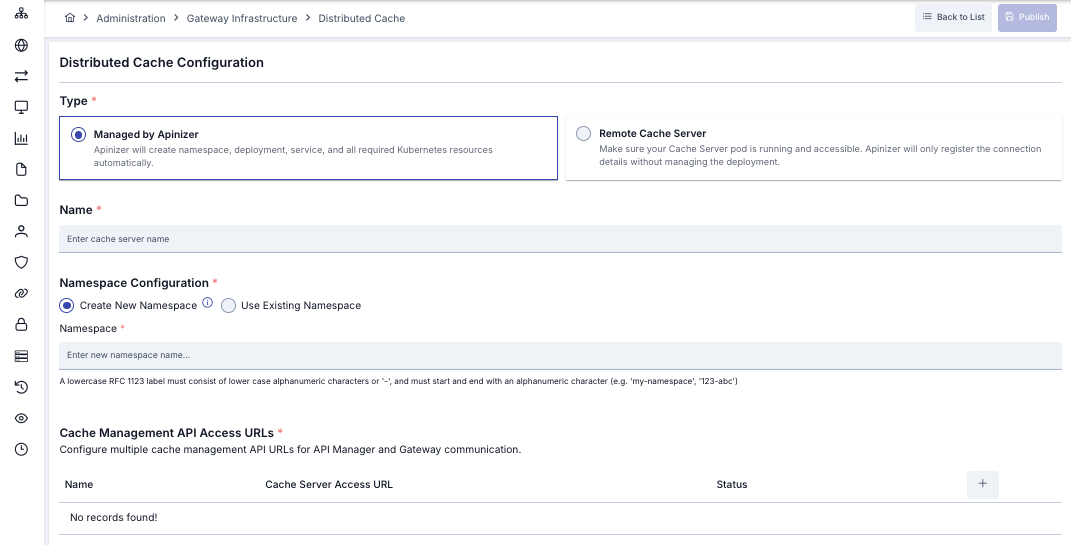
1. Type — Deployment Model
| Option | i18n Key | Description |
|---|---|---|
| Managed by Apinizer | managedByApinizer | Apinizer creates the namespace, deployment, service, and all required K8s resources automatically. |
| Remote Cache Server | remoteCache | Connect to a manually-deployed Cache. (This sub-tab assumes Managed.) |
2. Name
Display name of the Cache Server. Validation: must be unique.
3. Namespace Configuration
| Option | Description |
|---|---|
Create New Namespace (createNewNamespace) | Apinizer creates a new namespace with the given name. Validation: RFC 1123 label (3-63 chars, lowercase alphanumeric + -, must start and end with alphanumeric). Examples: my-cache-ns, prod-cache, 123-abc. |
Use Existing Namespace (useExistingNamespace) | Select an existing namespace from the cluster. |
4. Cache Management API Access URLs
Endpoint(s) the Manager and Gateway use to communicate with this Cache Server. Each table row:
| Field | Description | Example |
|---|---|---|
| Name | Identifier for the endpoint | Production, DR Site |
| Cache Server Access URL | Cache Server health-check and API endpoint | http://cache-http-service.prod.svc.cluster.local:8090 |
| Status | Auto connectivity check — Reachable / Not Reachable / Checking... |
Multiple URLs can be added for multi-cluster / DR scenarios. The form has a Test API Connection button for instant validation.
5. Cache Resource Configuration
| Field | i18n Key | Default | Description |
|---|---|---|---|
| Replica Count | replicaCount | 1 | Number of Cache pods. ≥ 2 recommended for production (Hazelcast cluster). |
| CPU | cpu | 1 | CPU limit per pod (cores). |
| Memory | memory | 1 | Memory limit per pod. |
| Memory Unit | memoryUnit | Gi | Mi / Gi. |
6. Additional Variables
Additional environment variables passed to the Cache pod. Table columns: Key and Value. Important defaults:
Tomcat Settings (for Cache HTTP Management API):
SERVER_TOMCAT_MAX_THREADS(1024)SERVER_TOMCAT_MIN_SPARE_THREADS(512)SERVER_TOMCAT_ACCEPT_COUNT(512)SERVER_TOMCAT_MAX_CONNECTIONS(1024)SERVER_TOMCAT_CONNECTION_TIMEOUT(20000 ms)SERVER_TOMCAT_KEEPALIVE_TIMEOUT(60000 ms)SERVER_TOMCAT_MAX_KEEPALIVE_REQUESTS(10000)SERVER_TOMCAT_PROCESSOR_CACHE(512)
Hazelcast Cluster Settings:
HAZELCAST_IO_WRITE_THROUGH(false)HAZELCAST_MAP_LOAD_CHUNK_SIZE(10000)HAZELCAST_MAP_LOAD_BATCH_SIZE(10000)HAZELCAST_CLIENT_SMART(true)HAZELCAST_MAPCONFIG_BACKUPCOUNT(1)HAZELCAST_MAPCONFIG_READBACKUPDATA(false)HAZELCAST_MAPCONFIG_ASYNCBACKUPCOUNT(0)HAZELCAST_OPERATION_RESPONSEQUEUE_IDLESTRATEGY(block)HAZELCAST_MAP_WRITE_DELAY_SECONDS(5)HAZELCAST_MAP_WRITE_BATCH_SIZE(100)HAZELCAST_MAP_WRITE_COALESCING(true)HAZELCAST_MAP_WRITE_BEHIND_QUEUE_CAPACITY(100000)
Other:
CACHE_QUOTA_TIMEZONE(+03:00) — for Quota policy calculationJAVA_OPTS— JVM heap parametersCACHE_SERVICE_NAME— Hazelcast service discovery (default:cache-hz-service)
Setting HAZELCAST_OPERATION_RESPONSEQUEUE_IDLESTRATEGY to "backoff" causes the Cache pod to constantly use 90-100% of its CPU limit. Provides 5-10% performance gain but is CPU-intensive. Use carefully in production.
7. Define the Service in Kubernetes
Enable via the createK8sService checkbox. Strongly recommended — required for Manager and Gateway pods to reach the Cache Server.
| Field | i18n Key | Description |
|---|---|---|
| Service Name | serviceName | K8s Service object name (e.g., cache-http-service) |
| Service Type | serviceType | Cluster IP (default, in-cluster access) or Node Port (external access) |
| NodePort | nodePort | Required only for NodePort type (30080-32767 range) |
ClusterIP is best for internal communication between Cache and Gateway/Manager. NodePort is usually not needed.
8. Host Alias Configuration
IP ↔ hostname mappings added to the Cache pods' /etc/hosts. Useful when you need to resolve hostnames not in DNS. Table columns: IP Address and Host Names.
9. Node Name List Configuration
Restrict which Kubernetes nodes the Cache pods are scheduled on via nodeSelector / nodeAffinity. If empty, the Kubernetes scheduler's default behavior applies.
Publishing
After filling out the form, click Publish. Apinizer:
- Uses or creates the target namespace
- Copies the MongoDB secret
- Applies the Cache Deployment
- Creates the HTTP + Hazelcast Services
- Waits for pods to become
Ready - Marks the Cache Server as
Published
After publishing, Gateway environments automatically start using this Cache.
For detailed Cache management (monitoring, diagnostics, restart) → see the Distributed Cache page.
What is Remote Cache Server?
The Kubernetes cluster (or standalone Linux/Docker host) where the Cache Server pod runs is OUTSIDE Apinizer Manager's management. The operator manually deploys the Cache; Manager only stores the Cache Management API URL.
Remote Cache is preferred when:
- Cache Server runs standalone (Docker / Virtual Server / Bare-metal Linux) — mandatory in this case
- Apinizer does not have deploy authority on the cluster
- Multi-cluster: Manager and Cache live in different clusters
- Cluster operator manages deployments via their own CI/CD pipeline
Prerequisites
- API Manager installed
kubectlaccess to the target Kubernetes cluster (or standalone Cache running)- Access to the
apinizercloud/cache:<APINIZER_VERSION>image (for Kubernetes) - MongoDB secret (
mongo-db-credentials) accessible from the Cache namespace
The Cache application runs in the same namespace as the Worker, using the same worker-cache-serviceaccount. It is assumed that the permission and namespace steps from the Creating Role and RoleBindings for Worker and Cache section under the Remote Gateway sub-tab of the "Gateway Setup and Configuration" tab have already been applied.
Manual Kubernetes Deploy
Creating the Cache deployment
vi apinizer-cache-deployment.yaml
cache-deployment.yaml — Cache Deployment
apiVersion: apps/v1
kind: Deployment
metadata:
  name: cache
  namespace: <WORKER_CACHE_NAMESPACE>
spec:
  replicas: 1
  selector:
    matchLabels:
      app: cache
  strategy:
    type: "RollingUpdate"
    rollingUpdate:
      maxUnavailable: 75%
      maxSurge: 1
  template:
    metadata:
      labels:
        app: cache
    spec:
      serviceAccountName: worker-cache-serviceaccount
      containers:
        - name: cache
          image: apinizercloud/cache:<APINIZER_VERSION>
          imagePullPolicy: IfNotPresent
          env:
            - name: JAVA_OPTS
              value: -server -XX:MaxRAMPercentage=75.0 -Dhttp.maxConnections=1024 -Dlog4j.formatMsgNoLookups=true
            - name: SPRING_PROFILES_ACTIVE
              value: prod
            - name: SPRING_DATA_MONGODB_DATABASE
              value: null
              valueFrom:
                secretKeyRef:
                  name: mongo-db-credentials
                  key: dbName
            - name: SPRING_DATA_MONGODB_URI
              value: null
              valueFrom:
                secretKeyRef:
                  name: mongo-db-credentials
                  key: dbUrl
            - name: CACHE_SERVICE_NAME
              value: cache-hz-service
            - name: CACHE_QUOTA_TIMEZONE
              value: +03:00
            - name: SERVER_TOMCAT_MAX_THREADS
              value: "1024"
            - name: SERVER_TOMCAT_MIN_SPARE_THREADS
              value: "512"
            - name: SERVER_TOMCAT_ACCEPT_COUNT
              value: "512"
            - name: SERVER_TOMCAT_MAX_CONNECTIONS
              value: "1024"
            - name: SERVER_TOMCAT_CONNECTION_TIMEOUT
              value: "20000"
            - name: SERVER_TOMCAT_KEEPALIVE_TIMEOUT
              value: "60000"
            - name: SERVER_TOMCAT_MAX_KEEPALIVE_REQUESTS
              value: "10000"
            - name: SERVER_TOMCAT_PROCESSOR_CACHE
              value: "512"
            - name: HAZELCAST_IO_WRITE_THROUGH
              value: "false"
            - name: HAZELCAST_MAP_LOAD_CHUNK_SIZE
              value: "10000"
            - name: HAZELCAST_MAP_LOAD_BATCH_SIZE
              value: "10000"
            - name: HAZELCAST_CLIENT_SMART
              value: "true"
            - name: HAZELCAST_MAPCONFIG_BACKUPCOUNT
              value: "1"
            - name: HAZELCAST_MAPCONFIG_READBACKUPDATA
              value: "false"
            - name: HAZELCAST_MAPCONFIG_ASYNCBACKUPCOUNT
              value: "0"
            - name: HAZELCAST_OPERATION_RESPONSEQUEUE_IDLESTRATEGY
              value: "block"
            - name: HAZELCAST_MAP_WRITE_DELAY_SECONDS
              value: "5"
            - name: HAZELCAST_MAP_WRITE_BATCH_SIZE
              value: "100"
            - name: HAZELCAST_MAP_WRITE_COALESCING
              value: "true"
            - name: HAZELCAST_MAP_WRITE_BEHIND_QUEUE_CAPACITY
              value: "100000"
          ports:
            - containerPort: 8090
            - containerPort: 5701
          resources:
            limits:
              cpu: 1
              memory: 1024Mi
          lifecycle:
            preStop:
              exec:
                command:
                  - /bin/sh
                  - -c
                  - sleep 10
          livenessProbe:
            failureThreshold: 12
            httpGet:
              path: /apinizer/management/health
              port: 8090
              scheme: HTTP
            initialDelaySeconds: 120
            periodSeconds: 10
            successThreshold: 1
            timeoutSeconds: 10
          readinessProbe:
            failureThreshold: 12
            httpGet:
              path: /apinizer/management/health
              port: 8090
              scheme: HTTP
            initialDelaySeconds: 120
            periodSeconds: 10
            successThreshold: 1
            timeoutSeconds: 10
          startupProbe:
            failureThreshold: 12
            httpGet:
              path: /apinizer/management/health
              port: 8090
              scheme: HTTP
            initialDelaySeconds: 120
            periodSeconds: 10
            successThreshold: 1
            timeoutSeconds: 10
      restartPolicy: Always
      hostAliases:
        - ip: "<IP_ADDRESS>"
          hostnames:
            - "<DNS_ADDRESS_1>"
            - "<DNS_ADDRESS_2>"
Environment Variables
These environment variables are added to the YAML file to configure Tomcat's thread and connection management and Hazelcast's data loading, backup and write-behind behaviors.
Tomcat Settings:
SERVER_TOMCAT_MAX_THREADS: Maximum number of concurrent threads (threads) that Tomcat can handleSERVER_TOMCAT_MIN_SPARE_THREADS: Minimum number of idle threads that Tomcat keeps readySERVER_TOMCAT_ACCEPT_COUNT: Maximum number of connections that can be queued when all threads are busySERVER_TOMCAT_MAX_CONNECTIONS: Maximum number of connections that Tomcat can accept at the same timeSERVER_TOMCAT_CONNECTION_TIMEOUT: Connection timeout duration (milliseconds)SERVER_TOMCAT_KEEPALIVE_TIMEOUT: Timeout duration for keep-alive connections (milliseconds)SERVER_TOMCAT_MAX_KEEPALIVE_REQUESTS: Maximum number of requests that can be processed over a keep-alive connectionSERVER_TOMCAT_PROCESSOR_CACHE: Maximum number of processors in the processor cache
Hazelcast Settings:
HAZELCAST_IO_WRITE_THROUGH: Whether Hazelcast write-through mode is enabledHAZELCAST_MAP_LOAD_CHUNK_SIZE: Chunk size to be used in map loadingHAZELCAST_MAP_LOAD_BATCH_SIZE: Batch size to be used in map loadingHAZELCAST_CLIENT_SMART: Whether Hazelcast client will use smart routingHAZELCAST_MAPCONFIG_BACKUPCOUNT: How many backup copies of Hazelcast map data will be keptHAZELCAST_MAPCONFIG_READBACKUPDATA: Will reading be done from backup copies?HAZELCAST_MAPCONFIG_ASYNCBACKUPCOUNT: Asynchronous backup copy countHAZELCAST_OPERATION_RESPONSEQUEUE_IDLESTRATEGY: Hazelcast response queue idle strategy (for example: block, busyspin, backoff)HAZELCAST_MAP_WRITE_DELAY_SECONDS: Delay duration for Map write-behind feature (seconds)HAZELCAST_MAP_WRITE_BATCH_SIZE: Batch size for Map write-behind featureHAZELCAST_MAP_WRITE_COALESCING: Will coalescing be done in write-behind operations?HAZELCAST_MAP_WRITE_BEHIND_QUEUE_CAPACITY: Maximum capacity of write-behind queue
If you set the HAZELCAST_OPERATION_RESPONSEQUEUE_IDLESTRATEGY parameter to "backoff": It will continuously use 90-100% of the Pod's CPU limit. This situation can provide 5-10% performance increase but consumes the CPU resource limit of the Cache pod.
kubectl apply -f apinizer-cache-deployment.yaml
Creating service for Cache
vi apinizer-cache-service.yaml
cache-service.yaml — Cache Services
apiVersion: v1
kind: Service
metadata:
  name: cache-http-service
  namespace: <WORKER_CACHE_NAMESPACE>
spec:
  ports:
    - port: 8090
      protocol: TCP
      targetPort: 8090
  selector:
    app: cache
  type: ClusterIP
---
apiVersion: v1
kind: Service
metadata:
  name: cache-hz-service
  namespace: <WORKER_CACHE_NAMESPACE>
spec:
  ports:
    - port: 5701
      protocol: TCP
      targetPort: 5701
  selector:
    app: cache
  type: ClusterIP
kubectl apply -f apinizer-cache-service.yaml
Copying the MongoDB Secret to the Target Namespace
Cache pods need access to the mongo-db-credentials secret to connect to MongoDB.
kubectl get secret mongo-db-credentials -n apinizer -o yaml | sed 's/namespace: apinizer/namespace: <WORKER_CACHE_NAMESPACE>/' | kubectl create -f -
For Cache pods to connect to MongoDB, the mongo-db-credentials secret must be copied to the relevant namespace. The copy command above (or the one in the Copying MongoDB secret from Apinizer namespaces to newly created namespaces section under the "API Manager and Worker" tab) can be used.
Registering Remote Cache via Manager UI
After Cache pods are running, navigate to Manager UI Server Management → Distributed Cache → New.
Form Fields
| Field | Value |
|---|---|
| Type | Remote Cache Server |
| Name | Identifier (e.g., prod-cache) |
| Cache Management API Access URLs | Table — separate URL per node |
Cache Management API URL Table
| Field | Description | Example |
|---|---|---|
| Name | Identifier for the endpoint | node-1, Production |
| Cache Server Access URL | Cache Management API endpoint | http://<CACHE_HOST>:8090 |
| Status | Instant connectivity check |
These URLs must be reachable from Manager. Manager uses these addresses for health checks and quota/cache data queries.
Register
Click Register Remote Cache. Apinizer does NOT deploy anything, it just records the connection details in metadata. Manager attempts to connect to the Cache — if successful, the Remote Cache is marked as Published.
Integration Setup and Configuration
API integration provides the ability to create workflows by seamlessly connecting one or more endpoints.
Pre-Installation Steps
Before starting the installation of Apinizer API Integration, the following should be noted:
API Manager must be installed. Also, API Integration must be present in your license key.
Installation Steps
API Integration Installation is done in two ways.
- If Kubernetes management is done through Apinizer, you can install API Integration through API Manager.
- If Kubernetes management is not done through Apinizer, manual installation can be done to Kubernetes and then connection can be established with API Manager.
If API Integration Installation Will Be Done Through API Manager
For API Integration installation through API Manager, the following section must be active in the General Settings menu.
If Kubernetes management is done through Apinizer, the "Kubernetes Management" option must be active on the General Settings page.

In API Manager, go to Administration → Server Management → Kubernetes Resources page. Enable API Integration from the Deployment & Pods tab. Complete the installation by making the necessary definitions.

In the opened dialog, define the required fields according to your organization.
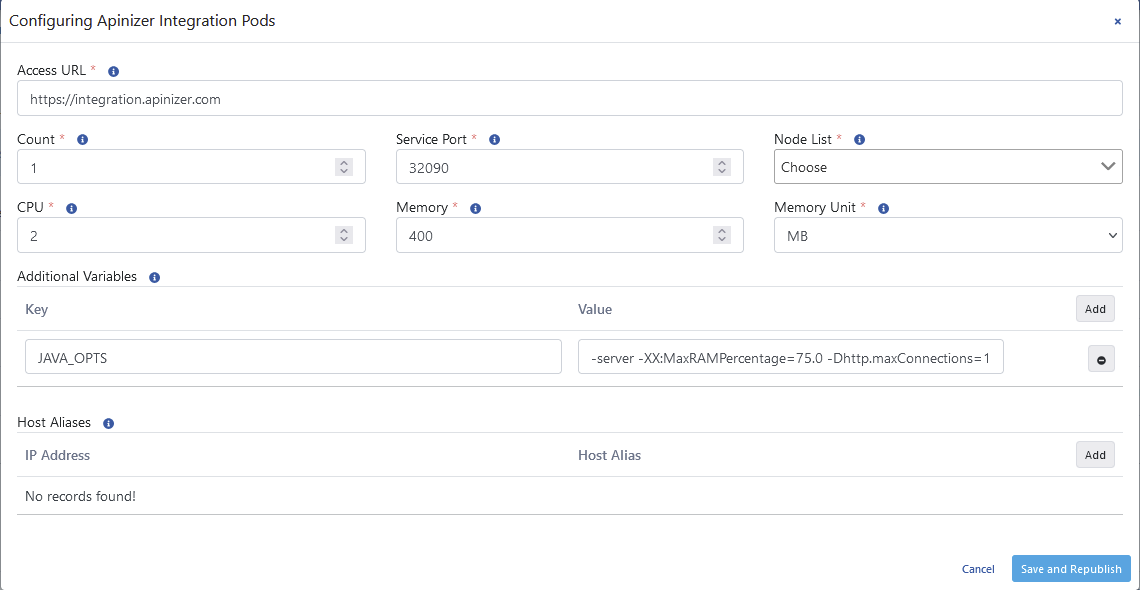
| Field | Description |
|---|---|
| Access URL (Access URL) | API Integration access address. Example address: http://<API_INTEGRATION_ACCESS_URL>:<PORT>. |
| Count (Count) | API Integration application count, adjusts the replicaSet setting in Kubernetes Cluster. |
| Service Port (Service Port) | API Integration access port. |
| Node List (Node List) | Sets which Kubernetes Worker servers the Pods will run on. Adjusts the NodeAffinity setting in Kubernetes. |
| CPU | Information about the maximum CPU core count the Pod will use. |
| Memory (Memory) | Maximum memory value the Pod will use. |
| Memory Unit (Memory Unit) | The unit of the value required for memory is selected; MB, GB. |
| Additional Variables (Additional Variables) | Variables and values to be run in the Pod are defined. |
| Host Aliases (Host Aliases) | IP addresses in the network can sometimes be placed behind host names, if these cannot be resolved through nameserver or are not defined in the host file, Host Alias definition must be made for application pods to resolve these names. Multiple domain names can be entered for each IP address. |
Additional Variables
When configuring the Java Options setting in the Additional Variables field, the following warning should be considered:
- When
-Xmxand-Xmsparameters are used, automatic heap sizing is disabled. - Apinizer sets JVM Heap values to use 75.0% of the memory given to the container since it runs inside the container.
- UseContainerSupport is active by default.
- Old flags
-XX:{Min|Max}RAMFractionare now deprecated. There is a new-XX:MaxRAMPercentageflag that takes a value between 0.0 and 100.0 and defaults to 75.0. Therefore, if there is a 1 GB memory limit, the JVM heap is limited to ~ 750 MB by default.
For detailed information, click here.
After completing the above steps and ensuring that the Pods belonging to API Integration on Kubernetes are in ready state, you can start using from Project → Development → API Integrator → Task Flows menu.
If API Integration Installation Will Not Be Done Through API Manager
A namespace is created for Integration.
kubectl create ns apinizer-integration
The 'mongo-db-credentials' secret in the Apinizer namespace is copied to the apinizer-integration namespace.
kubectl get secret mongo-db-credentials -n apinizer -o yaml | sed 's/namespace: apinizer/namespace: apinizer-integration/' | kubectl create -f -
Deployment yaml is created for Integration.
vi integration-deployment.yaml
apiVersion: apps/v1
kind: Deployment
metadata:
  name: integration
  namespace: apinizer-integration
spec:
  replicas: 1
  selector:
    matchLabels:
      app: integration
      version: v1
  strategy:
    rollingUpdate:
      maxSurge: 1
      maxUnavailable: 75%
    type: RollingUpdate
  template:
    metadata:
      labels:
        app: integration
        version: v1
    spec:
      containers:
        - env:
            - name: JAVA_OPTS
              value: -server -XX:MaxRAMPercentage=75.0 -Dlog4j.formatMsgNoLookups=true
            - name: SPRING_DATA_MONGODB_URI
              valueFrom:
                secretKeyRef:
                  key: dbUrl
                  name: mongo-db-credentials
            - name: SPRING_DATA_MONGODB_DATABASE
              valueFrom:
                secretKeyRef:
                  key: dbName
                  name: mongo-db-credentials
            - name: SPRING_PROFILES_ACTIVE
              value: prod
          image: apinizercloud/integration:<APINIZER_VERSION>
          imagePullPolicy: IfNotPresent
          livenessProbe:
            failureThreshold: 3
            httpGet:
              path: /apinizer/management/health
              port: 8092
              scheme: HTTP
            initialDelaySeconds: 120
            periodSeconds: 30
            successThreshold: 1
            timeoutSeconds: 30
          name: integration
          ports:
            - containerPort: 8092
              protocol: TCP
          readinessProbe:
            failureThreshold: 3
            httpGet:
              path: /apinizer/management/health
              port: 8092
              scheme: HTTP
            initialDelaySeconds: 120
            periodSeconds: 30
            successThreshold: 1
            timeoutSeconds: 30
          resources:
            limits:
              cpu: "1"
              memory: 1024Mi
          startupProbe:
            failureThreshold: 3
            httpGet:
              path: /apinizer/management/health
              port: 8092
              scheme: HTTP
            initialDelaySeconds: 91
            periodSeconds: 30
            successThreshold: 1
            timeoutSeconds: 30
      hostAliases:
        - ip: "<IP_ADDRESS>"
          hostnames:
            - "<DNS_ADDRESS_1>"
            - "<DNS_ADDRESS_2>"
kubectl apply -f integration-deployment.yaml
To see the status of the created Pod, you can use the following Kubectl command:
kubectl get pods -n apinizer-integration
If Ingress will not be used in service creation, the definition is created as NodePort type and external cluster access of the pod is configured.
vi apinizer-integration-service.yaml
apiVersion: v1
kind: Service
metadata:
  name: integration
  namespace: apinizer-integration
  labels:
    app: integration
spec:
  ports:
    - nodePort: 32090
      port: 8092
      protocol: TCP
      targetPort: 8092
  selector:
    app: integration
  type: NodePort
kubectl apply -f apinizer-integration-service.yaml
Connecting the Created API Integration Application to API Management Console
In API Manager, go to System Settings → General Settings page. Enable API Integration from the "Define API Integration (Task Flow) Module information." section. Complete the installation by making the necessary definitions.

API Portal Setup
API Developer Portal is an end-user or developer portal where API Consumers can access documentation related to APIs offered by an organization, test them, use them within certain limitations, and ask and answer questions about these topics.
API Developer Portal, like other Apinizer products, runs on Kubernetes Platform. No database is used for Portal operations, instead interaction is provided directly with APIs provided by API Manager.
Pre-Installation Steps
Before starting the installation of Apinizer API Portal, the following should be noted:
API Manager must be installed. Also, API Developer Portal must be present in your license key.
Installation Steps
API Portal installation is done in two ways. Choose which method to use from the tabs below.
- If Kubernetes management is done through Apinizer, you can install API Developer Portal through API Manager.
- If Kubernetes management is not done through Apinizer, manual installation can be done to Kubernetes and then connection can be established with API Manager.
Creating Token for Personal API Access
Token information can be obtained by creating a new token or using an existing token on the My Profile page. Staff tokens usually start with the apnz_ prefix.
To create a token, you can go to the My Profile page in API Manager and create a new token.

- Through API Manager
- Without API Manager (Manual)
For API Developer Portal installation through API Manager, the following section must be active in the General Settings menu.
If Kubernetes management is done through Apinizer, the "Kubernetes Management" option must be active on the General Settings page.
In API Manager, go to Administration → Server Management → Kubernetes Resources page. Enable API Portal from the Deployment & Pods tab. Complete the installation by making the necessary definitions.

In the opened dialog, define the required fields according to your organization.

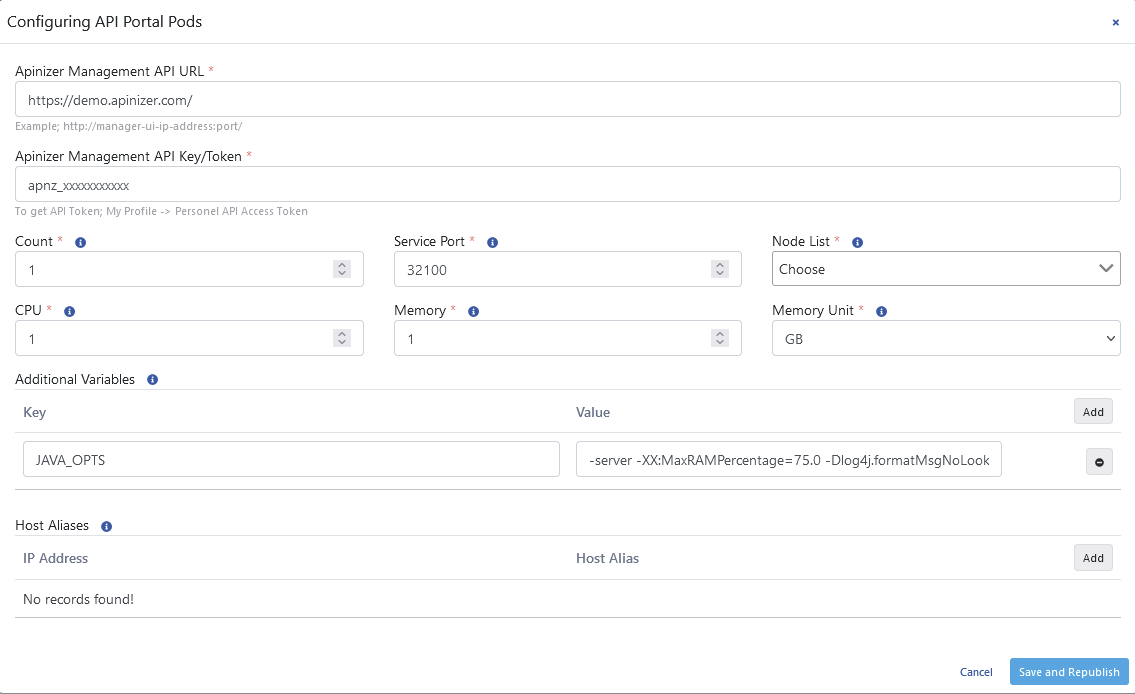
| Field | Description |
|---|---|
| Apinizer Portal Management API URL | Management API address run by API Manager required for API Developer Portal to consume Apinizer Management APIs. Example address: http://<API_MANAGER_ACCESS_URL>:<PORT>/ |
| Apinizer Portal Management API Key/Token | Token information required for API Developer Portal to consume Apinizer Management APIs. |
| Count (Count) | Gateway engine count, adjusts the replicaSet setting in Kubernetes Cluster. |
| Service Port (Service Port) | Gateway engine access port, adjusts the NodePort setting of the service object in Kubernetes Cluster. |
| Node List (Node List) | Sets which Kubernetes Worker servers the Pods will run on. Adjusts the NodeAffinity setting in Kubernetes. |
| CPU | Information about the maximum CPU core count the Pod will use. |
| Memory (Memory) | Maximum memory value the Pod will use. |
| Memory Unit (Memory Unit) | The unit of the value required for memory is selected; MB, GB. |
| Additional Variables (Additional Variables) | Default and optional variables and values to be run in the Pod are defined. Default variables cannot be deleted, only their values can be edited. |
| Host Aliases (Host Aliases) | IP addresses in the network can sometimes be placed behind host names, if these are not defined in nameserver or host file or cannot be resolved by Apinizer in some way, Host Alias definition must be made for worker pods to resolve these names. |
Additional Variables
When configuring the Java Options setting in the Additional Variables field, the following warning should be considered:
- When -Xmx and -Xms parameters are used, automatic heap sizing is disabled.
- Apinizer sets JVM Heap values to use 75.0% of the memory given to the container since it runs inside the container.
- UseContainerSupport is active by default.
- Old flags
-XX: {Min | Max} RAMFractionare now deprecated. There is a new-XX: MaxRAMPercentageflag that takes a value between 0.0 and 100.0 and defaults to 75.0. Therefore, if there is a 1 GB memory limit, the JVM heap is limited to ~ 750 MB by default.
The following steps should be followed for manual installation of API Developer Portal.
Important: Kubernetes Secret containing API Manager API address and API Key/Token information must be created. The following information should be filled according to your organization.
- apinizerManagementApiBaseUrl: Management API address running on API Manager required for API Developer Portal to consume Apinizer Management APIs. An example address:
http://apimanager-ui-ip-address:port - apiKey: Token information required for API Developer Portal to consume Apinizer Management APIs.
API_MANAGER_URL='<APINIZER_MANAGEMENT_API_BASE_URL>'
API_MANAGER_APIKEY='<API_KEY>'
echo -n ${API_MANAGER_URL} | base64  # We will put the output of this in place of <ENCODED_URL> variable in the next step
echo -n ${API_MANAGER_APIKEY} | base64  # We will put the output of this in place of <ENCODED_API_KEY> variable in the next step
vi api-portal-secret.yaml
api-portal-secret.yaml — API Manager connection info Secret
apiVersion: v1
kind: Namespace
metadata:
  name: apinizer-portal
---
apiVersion: v1
kind: Secret
metadata:
  name: apinizer-portal-secret
  namespace: apinizer-portal
type: Opaque
data:
  apinizerManagementApiBaseUrl: <ENCODED_URL>
  apiKey: <ENCODED_API_KEY>
kubectl apply -f api-portal-secret.yaml
vi apinizer-portal-deployment.yaml
apinizer-portal-deployment.yaml — API Developer Portal Deployment + Service
---
apiVersion: apps/v1
kind: Deployment
metadata:
  name: apinizer-portal
  namespace: apinizer-portal
spec:
  replicas: 1
  selector:
    matchLabels:
      app: apinizer-portal
      version: v1
  template:
    metadata:
      labels:
        app: apinizer-portal
        version: v1
    spec:
      containers:
        - name: apinizer-portal-app
          image: apinizercloud/apiportal:<APINIZER_VERSION>
          env:
            - name: SPRING_PROFILES_ACTIVE
              value: prod
            - name: JAVA_OPTS
              value: -XX:MaxRAMPercentage=75.0
            - name: API_PORTAL_MANAGEMENT_API_BASE_URL
              valueFrom:
                secretKeyRef:
                  key: apinizerManagementApiBaseUrl
                  name: apinizer-portal-secret
            - name: API_PORTAL_MANAGEMENT_API_KEY
              valueFrom:
                secretKeyRef:
                  key: apiKey
                  name: apinizer-portal-secret
          livenessProbe:
            failureThreshold: 13
            httpGet:
              path: /apinizer/management/health
              port: 8080
              scheme: HTTP
            initialDelaySeconds: 60
            periodSeconds: 10
            successThreshold: 1
            timeoutSeconds: 30
          ports:
            - containerPort: 8080
              protocol: TCP
          readinessProbe:
            failureThreshold: 13
            httpGet:
              path: /apinizer/management/health
              port: 8080
              scheme: HTTP
            initialDelaySeconds: 30
            periodSeconds: 10
            successThreshold: 1
            timeoutSeconds: 30
          resources:
            limits:
              cpu: "1"
              memory: 1Gi
          startupProbe:
            failureThreshold: 13
            httpGet:
              path: /apinizer/management/health
              port: 8080
              scheme: HTTP
            initialDelaySeconds: 60
            periodSeconds: 10
            successThreshold: 1
            timeoutSeconds: 30
---
apiVersion: v1
kind: Service
metadata:
  name: apinizer-portal-service
  namespace: apinizer-portal
  labels:
    app: apinizer-portal
spec:
  selector:
    app: apinizer-portal
  type: NodePort
  ports:
    - name: http
      port: 8080
      nodePort: <API_DEVELOPER_PORTAL_PORT>
kubectl apply -f apinizer-portal-deployment.yaml
Important
Up to this stage, API Developer Portal interface installation may have been done, but for APIs to be displayed on API Developer Portal, Credentials to be created and other capabilities to be used, integration with API Manager must be done.
API Developer Portal Integration with API Manager
In API Manager, go to Portal → Settings → Portal page and make the definitions according to your organization.
Click here for detailed information.
Starting API Developer Portal with SSL
Certificate file with .p12 extension is transferred to one of Kubernetes Control Plane servers and moved/copied to /etc/ssl/certs directory.
While at the relevant address, the certificate file is loaded to Kubernetes as a secret with the following command.
kubectl create secret generic apinizer-portal-tls --from-file=portal.p12 -n apinizer-portal
If you only have a file with .jks extension, a file with .p12 extension can be created from this file as follows. Then the previous step is applied.
To get the alias definition of the certificate, the following code is run.
keytool -list -v -keystore portal.p12 -storetype PKCS12
A file with .p12 extension is created from the .jks extension file with known alias definition.
keytool -genkeypair -alias <ALIAS> -keyalg RSA -keysize 4096 -storetype PKCS12 -keystore portal.p12 -validity 3650 -storepass <PASSWORD>
Variables to be defined:
| Variable | Description |
|---|---|
| SSL_KEY_STORE | Path of the key store containing SSL certificate. In our example, we want Spring Boot to search for this in classpath. |
| SSL_KEY_STORE_PASSWORD | Password used to access the key store. |
| SSL_KEY_STORE_TYPE | Type of the key store (Usage: PKCS12). |
| SSL_KEY_ALIAS | Alias identifying the key in the key store. |
| SSL_ENABLED | Enables Spring Boot application to use HTTPS protocol. |
| SERVER_PORT | Port the server listens on. 8443 should be used. |
An example deployment yaml file where certificate information is used will be as follows.
apinizer-portal-ssl-deployment.yaml — SSL-enabled API Developer Portal Deployment + Service
apiVersion: apps/v1
kind: Deployment
metadata:
  name: apinizer-portal
  namespace: apinizer-portal
spec:
  replicas: 1
  selector:
    matchLabels:
      app: apinizer-portal
      version: v1
  template:
    metadata:
      labels:
        app: apinizer-portal
        version: v1
    spec:
      volumes:
      - name: apinizer-portal-tls
        secret:
          secretName: apinizer-portal-tls
      containers:
      - name: apinizer-portal
        image: apinizercloud/portal:<APINIZER_VERSION>
        imagePullPolicy: IfNotPresent
        resources:
          limits:
            cpu: 1
            memory: 2Gi
        lifecycle:
          preStop:
            exec:
              command:
              - /bin/sh
              - -c
              - sleep 10
        ports:
        - containerPort: 8443
          protocol: TCP
        env:
        - name: SPRING_PROFILES_ACTIVE
          value: prod
        - name: JAVA_OPTS
          value: "-XX:MaxRAMPercentage=75.0"
        - name: SSL_KEY_STORE
          value: /etc/ssl/certs/portal.p12
        - name: SSL_KEY_STORE_PASSWORD
          value: <PASSWORD>
        - name: SSL_KEY_STORE_TYPE
          value: PKCS12
        - name: SSL_KEY_ALIAS
          value: <ALIAS>
        - name: SSL_ENABLED
          value: "true"
        - name: SERVER_PORT
          value: "8443"
        - name: API_PORTAL_MANAGEMENT_API_BASE_URL
          valueFrom:
            secretKeyRef:
              key: apinizerManagementApiBaseUrl
              name: apinizer-portal-secret
        - name: API_PORTAL_MANAGEMENT_API_KEY
          valueFrom:
            secretKeyRef:
              key: apiKey
              name: apinizer-portal-secret
        volumeMounts:
        - name: apinizer-portal-tls
          mountPath: /etc/ssl/certs
      dnsPolicy: ClusterFirst
      restartPolicy: Always
---
apiVersion: v1
kind: Service
metadata:
  name: apinizer-portal-https-service
  namespace: apinizer-portal
  labels:
    app: apinizer-portal
spec:
  selector:
    app: apinizer-portal
  type: NodePort
  ports:
    - name: http
      port: 8443
      nodePort: 31843
After completing the above steps and ensuring that the Pods belonging to API Portal on Kubernetes are in ready state, you can access the Portal Interface from the following address.
http://<KUBERNETES_WORKER_IP>:<API_PORTAL_PORT>
Starting API Manager with SSL
Steps to run API Manager with HTTPS/SSL: certificate preparation, JKS/PKCS12 conversion, Kubernetes Secret definition, and SSL-enabled Deployment YAML. This configuration is optional but recommended for production environments.
Configuration Steps
Prepare your certificates:
- Create or obtain an SSL/TLS certificate
- Prepare the private key
- Prepare the certificate chain (if necessary)
It is recommended that certificates are valid and signed by a trusted certificate authority.
Convert the certificate format to JKS / PKCS12 if necessary (PFX → JKS, PEM → JKS).
For certificate conversion operations, see PFX JKS Conversion.
Create certificates as a Kubernetes secret:
kubectl create secret generic manager-tls --from-file=manager.p12 -n apinizer
When creating the secret, make sure you specify the correct paths of the certificate and private key files.
Configure SSL environment variables and port 8443 in the Deployment (sample deployment below).
Finding the Certificate Alias
To find the Alias of a certificate:
keytool -list -v -keystore manager.p12 -storetype PKCS12
Creating PKCS12 from JKS
To convert a certificate from JKS to PKCS12:
keytool -genkeypair -alias <ALIAS> -keyalg RSA -keysize 4096 -storetype PKCS12 -keystore manager.p12 -validity 3650 -storepass <PASSWORD>
Add your file with .p12 extension to /etc/ssl/certs directory.
Required Environment Variables
Variables that should be in the deployment yaml definition:
| Variable | Description |
|---|---|
SSL_KEY_STORE | Path of the key store containing the SSL certificate |
SSL_KEY_STORE_PASSWORD | Password used to access the key store |
SSL_KEY_STORE_TYPE | Type of the key store (Usage: PKCS12) |
SSL_KEY_ALIAS | Alias identifying the key in the key store |
SSL_ENABLED | Enables Spring Boot application to use HTTPS protocol |
SERVER_PORT | Port the server listens on (use 8443) |
Example API Manager Deployment (SSL enabled)
apimanager-deployment-ssl.yaml — SSL-enabled API Manager Deployment + Service
apiVersion: apps/v1
kind: Deployment
metadata:
  name: manager
  namespace: apinizer
spec:
  progressDeadlineSeconds: 600
  replicas: 1
  revisionHistoryLimit: 10
  selector:
    matchLabels:
      app: manager
      version: v1
  strategy:
    rollingUpdate:
      maxSurge: 1
      maxUnavailable: 75%
    type: RollingUpdate
  template:
    metadata:
      labels:
        app: manager
        version: v1
    spec:
      automountServiceAccountToken: true
      volumes:
        - name: manager-tls
          secret:
            secretName: manager-tls
      containers:
        - env:
            - name: JAVA_OPTS
              value: ' -XX:MaxRAMPercentage=75.0 -Dlog4j.formatMsgNoLookups=true'
            - name: LOGGING_LEVEL_ROOT
              value: INFO
            - name: LOGGING_LEVEL_com_apinizer_manager
              value: INFO
            - name: SPRING_SERVLET_MULTIPART_MAX_FILE_SIZE
              value: 20MB
            - name: SPRING_SERVLET_MULTIPART_MAX_REQUEST_SIZE
              value: 50MB
            - name: SPRING_PROFILES_ACTIVE
              value: prod
            - name: SSL_KEY_STORE
              value: /etc/ssl/manager.p12
            - name: SSL_KEY_STORE_PASSWORD
              value: <PASSWORD>
            - name: SSL_KEY_STORE_TYPE
              value: PKCS12
            - name: SSL_KEY_ALIAS
              value: <ALIAS>
            - name: SSL_ENABLED
              value: "true"
            - name: SERVER_PORT
              value: "8443"
            - name: SPRING_DATA_MONGODB_URI
              valueFrom:
                secretKeyRef:
                  key: dbUrl
                  name: mongo-db-credentials
            - name: SPRING_DATA_MONGODB_DATABASE
              valueFrom:
                secretKeyRef:
                  key: dbName
                  name: mongo-db-credentials
          volumeMounts:
            - name: manager-tls
              mountPath: /etc/ssl/
          image: apinizercloud/manager:<APINIZER_VERSION>
          imagePullPolicy: IfNotPresent
          lifecycle:
            preStop:
              exec:
                command:
                  - /bin/sh
                  - -c
                  - sleep 10
          livenessProbe:
            failureThreshold: 3
            httpGet:
              path: /apinizer/management/health
              port: 8443
              scheme: HTTPS
            initialDelaySeconds: 120
            periodSeconds: 30
            successThreshold: 1
            timeoutSeconds: 30
          name: manager
          ports:
            - containerPort: 8443
              protocol: TCP
          readinessProbe:
            failureThreshold: 3
            httpGet:
              path: /apinizer/management/health
              port: 8443
              scheme: HTTPS
            initialDelaySeconds: 120
            periodSeconds: 30
            successThreshold: 1
            timeoutSeconds: 30
          resources:
            limits:
              cpu: 1
              memory: 3Gi
          securityContext:
            allowPrivilegeEscalation: true
            readOnlyRootFilesystem: false
            runAsGroup: 0
            runAsNonRoot: false
            runAsUser: 0
          startupProbe:
            failureThreshold: 3
            httpGet:
              path: /apinizer/management/health
              port: 8443
              scheme: HTTPS
            initialDelaySeconds: 90
            periodSeconds: 30
            successThreshold: 1
            timeoutSeconds: 30
          terminationMessagePath: /dev/termination-log
          terminationMessagePolicy: File
      dnsPolicy: ClusterFirst
      restartPolicy: Always
      schedulerName: default-scheduler
---
apiVersion: v1
kind: Service
metadata:
  name: manager
  namespace: apinizer
  labels:
    app: manager
spec:
  selector:
    app: manager
  type: NodePort
  ports:
    - name: http
      port: 8443
      targetPort: 8443
      nodePort: 32843
Certificate Creation (Your Own Certificate)
Steps to create your own certificate:
openssl genrsa -out server.key 2048
openssl req -new -key server.key -out server.csr
openssl x509 -req -days 365 -in server.csr -signkey server.key -out server.crt
openssl pkcs12 -export -out manager.p12 -inkey server.key -in server.crt
Install Apinizer modules with Helm charts. Helm parameterizes manifests, provides version management (helm upgrade, helm rollback) and tracks installed releases on the cluster (helm list). For production, Helm is recommended over raw Manifests.
Apinizer is now distributed as independent per-module charts; each module is installed separately with its own chart. Charts are pulled from the Docker Hub OCI registry (oci://registry-1.docker.io/apinizercloud).
| Module | OCI Chart | Namespace | Default Service Name | Suggested NodePort |
|---|---|---|---|---|
| API Manager | apinizer-apimanager | apinizer | apimanager | 32080 |
| Worker | apinizer-worker | apinizer | worker-http-service | 30080 |
| Cache | apinizer-cache | apinizer | cache-http-service | 30090 |
| Integration | apinizer-integration | apinizer | integration | 32090 |
| API Portal | apinizer-apiportal | apinizer-portal | apinizer-portal-service | 31843 |
Apinizer requires MongoDB during installation (API Manager, Worker, Cache and Integration modules). If a MongoDB is not installed, it must be installed first.
Prerequisites
- Kubernetes cluster is ready and accessible
- Helm 3.8+ (for OCI registry support) is installed
- MongoDB is installed and reachable from the cluster
If Helm is not installed, see the official Helm installation document.
Common Preparation — Namespace and Secret
As of version 1.0.0 the charts do not create the Secret; they only reference it by name. Therefore the target namespace and Secret must already exist in the cluster before helm install.
The modules that connect to MongoDB (API Manager, Worker, Cache, Integration) use a shared Secret holding the dbUrl and dbName keys. kubectl create secret base64-encodes the values automatically — pass plain text (do not encode manually):
kubectl create namespace <NAMESPACE>

kubectl create secret generic mongo-db-credentials \
  -n <NAMESPACE> \
  --from-literal=dbUrl="mongodb://<MONGO_USERNAME>:<MONGO_PASSWORD>@<MONGO_IP>:25080/?authSource=admin&replicaSet=apinizer-replicaset" \
  --from-literal=dbName="<MONGO_DBNAME>"
- The Secret name (
mongo-db-credentials) must match the module'smongo.secretName; the key namesdbUrlanddbNameare fixed. - The Secret must live in the same namespace as the module you install. Modules sharing a namespace (API Manager, Worker, Cache, Integration) need the Secret created only once.
- API Portal does not connect to MongoDB; it uses its own Secret (see the API Portal tab).
Service Type (NodePort / ClusterIP)
Each module's service type is selected with a single toggle:
service.nodePort.enabled=false(default) →ClusterIP; the service is reachable only from inside the cluster viaservice.name.service.nodePort.enabled=true→NodePort; the service is exposed externally viaservice.nodePort.port(Ingress can also be used).
The Cache Hazelcast service (cache-hz-service, 5701) and the Worker management service (worker-management-api-http-service, 8091) are not affected by this toggle; they always stay ClusterIP.
Module Installation
Pick the module you want to install from the tabs below.
Replace <APINIZER_IMAGE_TAG> in the commands with the Apinizer version you want to install (e.g. 2026.04.4). All released versions are listed on Docker Hub.
- API Manager
- Worker
- Cache
- Integration
- API Portal
API Manager provides the management UI and REST API; it connects to MongoDB.
helm install apimanager oci://registry-1.docker.io/apinizercloud/apinizer-apimanager \
  --version 1.0.0 \
  -n <API-Manager-Namespace> \
  --set apinizer.kubernetesManagementEnabled=true \
  --set image.tag="<APINIZER_IMAGE_TAG>" \
  --set mongo.secretName=mongo-db-credentials \
  --set service.name=apimanager \
  --set resources.limits.cpu="1" \
  --set resources.limits.memory="3Gi"
kubernetesManagementEnabled=true lets Apinizer manage Worker deployments on the cluster. If Workers are managed externally, pass --set apinizer.kubernetesManagementEnabled=false.
To expose it via NodePort, add to the command:
  --set service.nodePort.enabled=true \
  --set service.nodePort.port=32080
Verify:
kubectl -n <API-Manager-Namespace> rollout status deploy/apimanager
kubectl -n <API-Manager-Namespace> get pods,svc
Configurable values (--set):
| Parameter | Default | Description |
|---|---|---|
image.repository | apinizercloud/apimanager | Image repository |
image.tag | <APINIZER_IMAGE_TAG> | Image version |
image.pullPolicy | IfNotPresent | Image pull policy |
replicaCount | 1 | Number of pod replicas |
apinizer.kubernetesManagementEnabled | true | Let Apinizer manage Workers on Kubernetes |
service.name | apimanager | Service name (in-cluster access name in ClusterIP mode) |
service.port | 8080 | Service port |
service.nodePort.enabled | false | If true, the service is exposed externally as NodePort |
service.nodePort.port | 32080 | NodePort port (when enabled=true) |
resources.limits.cpu | 1 | CPU limit |
resources.limits.memory | 3Gi | Memory limit |
mongo.secretName | mongo-db-credentials | MongoDB Secret name (created outside Helm, beforehand) |
env.JAVA_OPTS | -XX:MaxRAMPercentage=75.0 -Dlog4j.formatMsgNoLookups=true | JVM options |
env.SPRING_PROFILES_ACTIVE | prod | Spring profile |
env.WORKER_DEPLOYMENT_TIMEOUT | 120 | Worker deployment timeout (s) |
Installation with values.yaml:
Instead of --set, you can install with the module's values.yaml file. This suits GitOps: keep values.yaml under version control (e.g. GitLab); when a parameter changes, apply the update by running helm upgrade -f ... with the same file.
apinizer-apimanager/values.yaml
apinizer:
  kubernetesManagementEnabled: true

image:
  repository: apinizercloud/apimanager
  tag: "<APINIZER_IMAGE_TAG>"
  pullPolicy: IfNotPresent

replicaCount: 1

service:
  nodePort:
    enabled: false
    port: 32080
  name: apimanager
  port: 8080

resources:
  limits:
    cpu: "1"
    memory: "3Gi"

mongo:
  secretName: mongo-db-credentials

env:
  JAVA_OPTS: "-XX:MaxRAMPercentage=75.0 -Dlog4j.formatMsgNoLookups=true"
  SPRING_PROFILES_ACTIVE: "prod"
  WORKER_DEPLOYMENT_TIMEOUT: "120"
helm install apimanager oci://registry-1.docker.io/apinizercloud/apinizer-apimanager \
  --version 1.0.0 \
  -n <API-Manager-Namespace> \
  -f apinizer-apimanager/values.yaml
Entering API Manager License Key
After API Manager is installed, you need to add the License Key provided to you by Apinizer to the database. The License Key can be updated in a .js file as follows and the license information in the database can be updated.
vi license.js
db.general_settings.updateOne(
  {"_class":"GeneralSettings"},
  { $set: { licenseKey: '<YOUR_LICENSE_KEY>'}}
)
The created license.js is run on the MongoDB server. A result showing Matched = 1 is expected.
mongosh mongodb://<MONGODB_IP>:<MONGO_PORT>/<MONGO_DBNAME> --authenticationDatabase "admin" -u "apinizer" -p '<MONGO_PASSWORD>' < license.js
If the installation process was successful, you can access Apinizer API Manager (Management Console) from the following address.
http://<K8S_ANY_WORKER_IP>:32080
Default Username: admin
Default User Password: Request help from Apinizer support team.
It is recommended that you change your password after your first login to Apinizer Management Console.
Worker is the runtime (data-plane) component that processes API traffic; it connects to MongoDB.
helm install worker oci://registry-1.docker.io/apinizercloud/apinizer-worker \
  --version 1.0.0 \
  -n <Worker-Namespace> \
  --set image.tag="<APINIZER_IMAGE_TAG>" \
  --set mongo.secretName=mongo-db-credentials \
  --set service.name=worker-http-service \
  --set resources.limits.cpu="4" \
  --set resources.limits.memory="4Gi"
To expose it via NodePort, add to the command:
  --set service.nodePort.enabled=true \
  --set service.nodePort.port=30080
Verify:
kubectl -n <Worker-Namespace> rollout status deploy/worker
kubectl -n <Worker-Namespace> logs -l app=worker --tail=100
Configurable values (--set):
| Parameter | Default | Description |
|---|---|---|
image.repository | apinizercloud/worker | Image repository |
image.tag | <APINIZER_IMAGE_TAG> | Image version |
image.pullPolicy | IfNotPresent | Image pull policy |
replicaCount | 1 | Number of pod replicas |
service.name | worker-http-service | API-traffic service name |
service.port | 8091 | Service port |
service.nodePort.enabled | false | If true, the service is exposed externally as NodePort |
service.nodePort.port | 30080 | NodePort port (when enabled=true) |
resources.limits.cpu | 4 | CPU limit |
resources.limits.memory | 4Gi | Memory limit |
mongo.secretName | mongo-db-credentials | MongoDB Secret name (created outside Helm, beforehand) |
env.JAVA_OPTS | -server -XX:MaxRAMPercentage=75.0 -Dhttp.maxConnections=4096 -Dlog4j.formatMsgNoLookups=true | JVM options |
env.tuneWorkerThreads | 1024 | Worker thread count |
env.tuneWorkerMaxThreads | 4096 | Maximum worker thread count |
env.tuneRoutingConnectionPoolMaxConnectionPerHost | 1024 | Max connections per host |
env.tuneRoutingConnectionPoolMaxConnectionTotal | 4096 | Max total connections |
Installation with values.yaml:
Instead of --set, you can install with the module's values.yaml file. This suits GitOps: keep values.yaml under version control (e.g. GitLab); when a parameter changes, apply the update by running helm upgrade -f ... with the same file.
apinizer-worker/values.yaml
image:
  repository: apinizercloud/worker
  tag: "<APINIZER_IMAGE_TAG>"
  pullPolicy: IfNotPresent

replicaCount: 1

service:
  nodePort:
    enabled: false
    port: 30080
  name: worker-http-service
  port: 8091

resources:
  limits:
    cpu: "4"
    memory: "4Gi"

mongo:
  secretName: mongo-db-credentials

env:
  JAVA_OPTS: "-server -XX:MaxRAMPercentage=75.0 -Dhttp.maxConnections=4096 -Dlog4j.formatMsgNoLookups=true"
  tuneWorkerThreads: "1024"
  tuneWorkerMaxThreads: "4096"
  tuneRoutingConnectionPoolMaxConnectionPerHost: "1024"
  tuneRoutingConnectionPoolMaxConnectionTotal: "4096"
helm install worker oci://registry-1.docker.io/apinizercloud/apinizer-worker \
  --version 1.0.0 \
  -n <Worker-Namespace> \
  -f apinizer-worker/values.yaml
Cache is a Hazelcast-based distributed cache cluster; it connects to MongoDB for configuration.
helm install cache oci://registry-1.docker.io/apinizercloud/apinizer-cache \
  --version 1.0.0 \
  -n <Cache-Namespace> \
  --set image.tag="<APINIZER_IMAGE_TAG>" \
  --set mongo.secretName=mongo-db-credentials \
  --set service.name=cache-http-service \
  --set resources.limits.cpu="1" \
  --set resources.limits.memory="1Gi"
If Cache is installed in the same namespace as Worker, add the following parameter to the installation command to avoid a ServiceAccount conflict:
--set serviceAccount.name=cache-serviceaccount
Since the Secret is no longer created by Helm in 1.0.0, Cache and Worker can safely share the same mongo-db-credentials Secret; you do not need to use a separate Secret name.
Verify:
kubectl -n <Cache-Namespace> rollout status deploy/cache
kubectl -n <Cache-Namespace> get pods -l app=cache
Configurable values (--set):
| Parameter | Default | Description |
|---|---|---|
image.repository | apinizercloud/cache | Image repository |
image.tag | <APINIZER_IMAGE_TAG> | Image version |
image.pullPolicy | IfNotPresent | Image pull policy |
replicaCount | 1 | Number of pod replicas |
serviceAccount.create | true | If true, the chart creates its own ServiceAccount + Role + RoleBinding; if false, an existing ServiceAccount is used and no RBAC resources are created |
serviceAccount.name | worker-cache-serviceaccount | ServiceAccount name. Role/RoleBinding names are derived from it (<name>-role, <name>-role-binding) |
service.name | cache-http-service | HTTP service name |
service.port | 8090 | Service port |
service.nodePort.enabled | false | If true, the service is exposed externally as NodePort |
service.nodePort.port | 30090 | NodePort port (when enabled=true) |
resources.limits.cpu | 1 | CPU limit |
resources.limits.memory | 1Gi | Memory limit |
mongo.secretName | mongo-db-credentials | MongoDB Secret name (created outside Helm, beforehand) |
env.JAVA_OPTS | -server -XX:MaxRAMPercentage=75.0 -Dhttp.maxConnections=1024 -Dlog4j.formatMsgNoLookups=true | JVM options |
env.SERVER_TOMCAT_MAX_THREADS | 256 | Tomcat max threads |
env.SERVER_TOMCAT_MIN_SPARE_THREADS | 128 | Tomcat min spare threads |
env.SERVER_TOMCAT_ACCEPT_COUNT | 256 | Tomcat accept queue |
env.SERVER_TOMCAT_MAX_CONNECTIONS | 2048 | Tomcat max connections |
Installation with values.yaml:
Instead of --set, you can install with the module's values.yaml file. This suits GitOps: keep values.yaml under version control (e.g. GitLab); when a parameter changes, apply the update by running helm upgrade -f ... with the same file.
apinizer-cache/values.yaml
image:
  repository: apinizercloud/cache
  tag: "<APINIZER_IMAGE_TAG>"
  pullPolicy: IfNotPresent

replicaCount: 1

serviceAccount:
  create: true
  name: worker-cache-serviceaccount

service:
  nodePort:
    enabled: false
    port: 30090
  name: cache-http-service
  port: 8090

resources:
  limits:
    cpu: "1"
    memory: "1Gi"

mongo:
  secretName: mongo-db-credentials

env:
  JAVA_OPTS: "-server -XX:MaxRAMPercentage=75.0 -Dhttp.maxConnections=1024 -Dlog4j.formatMsgNoLookups=true"
  SERVER_TOMCAT_MAX_THREADS: "256"
  SERVER_TOMCAT_MIN_SPARE_THREADS: "128"
  SERVER_TOMCAT_ACCEPT_COUNT: "256"
  SERVER_TOMCAT_MAX_CONNECTIONS: "2048"
helm install cache oci://registry-1.docker.io/apinizercloud/apinizer-cache \
  --version 1.0.0 \
  -n <Cache-Namespace> \
  -f apinizer-cache/values.yaml
Integration is a Quartz-based task flow module; it connects to MongoDB.
helm install integration oci://registry-1.docker.io/apinizercloud/apinizer-integration \
  --version 1.0.0 \
  -n <Integration-Namespace> \
  --set image.tag="<APINIZER_IMAGE_TAG>" \
  --set mongo.secretName=mongo-db-credentials \
  --set service.name=integration \
  --set resources.limits.cpu="1" \
  --set resources.limits.memory="1Gi"
To expose it via NodePort, add to the command:
  --set service.nodePort.enabled=true \
  --set service.nodePort.port=32090
Configurable values (--set):
| Parameter | Default | Description |
|---|---|---|
image.repository | apinizercloud/integration | Image repository |
image.tag | <APINIZER_IMAGE_TAG> | Image version |
image.pullPolicy | IfNotPresent | Image pull policy |
replicaCount | 1 | Number of pod replicas |
service.name | integration | Service name |
service.port | 8092 | Service port |
service.nodePort.enabled | false | If true, the service is exposed externally as NodePort |
service.nodePort.port | 32090 | NodePort port (when enabled=true) |
resources.limits.cpu | 1 | CPU limit |
resources.limits.memory | 1Gi | Memory limit |
mongo.secretName | mongo-db-credentials | MongoDB Secret name (created outside Helm, beforehand) |
env.JAVA_OPTS | -server -XX:MaxRAMPercentage=75.0 -Dlog4j.formatMsgNoLookups=true | JVM options |
env.SPRING_PROFILES_ACTIVE | prod | Spring profile |
Installation with values.yaml:
Instead of --set, you can install with the module's values.yaml file. This suits GitOps: keep values.yaml under version control (e.g. GitLab); when a parameter changes, apply the update by running helm upgrade -f ... with the same file.
apinizer-integration/values.yaml
image:
  repository: apinizercloud/integration
  tag: "<APINIZER_IMAGE_TAG>"
  pullPolicy: IfNotPresent

replicaCount: 1

service:
  nodePort:
    enabled: false
    port: 32090
  name: integration
  port: 8092

resources:
  limits:
    cpu: "1"
    memory: "1Gi"

mongo:
  secretName: mongo-db-credentials

env:
  JAVA_OPTS: "-server -XX:MaxRAMPercentage=75.0 -Dlog4j.formatMsgNoLookups=true"
  SPRING_PROFILES_ACTIVE: "prod"
helm install integration oci://registry-1.docker.io/apinizercloud/apinizer-integration \
  --version 1.0.0 \
  -n <Integration-Namespace> \
  -f apinizer-integration/values.yaml
API Portal is where developers access published APIs. It does not connect to MongoDB directly; it is fed through the API Manager Management API.
API Portal uses its own Secret (apinizer-portal), which is also not created by Helm. Create the namespace and Secret before installation. The apiKey and apiPortalId values are generated after the portal is registered in the API Manager UI. kubectl create secret base64-encodes the values automatically — pass plain text:
kubectl create namespace <API-Portal-Namespace>

kubectl create secret generic apinizer-portal \
  -n <API-Portal-Namespace> \
  --from-literal=apinizerManagementApiBaseUrl="<APINIZER_APIMANAGER_ACCESS_URL>" \
  --from-literal=apiKey="<APINIZER_API_KEY>" \
  --from-literal=apiPortalId="<API_PORTAL_ID>"
helm install portal oci://registry-1.docker.io/apinizercloud/apinizer-apiportal \
  --version 1.0.0 \
  -n <API-Portal-Namespace> \
  --set image.tag="<APINIZER_IMAGE_TAG>" \
  --set portalSecret.secretName=apinizer-portal \
  --set service.name=apinizer-portal-service \
  --set resources.limits.cpu="1" \
  --set resources.limits.memory="1Gi"
To expose it via NodePort, add to the command:
  --set service.nodePort.enabled=true \
  --set service.nodePort.port=31843
Configurable values (--set):
| Parameter | Default | Description |
|---|---|---|
image.repository | apinizercloud/apiportal | Image repository |
image.tag | <APINIZER_IMAGE_TAG> | Image version |
replicaCount | 1 | Number of pod replicas |
service.name | apinizer-portal-service | Service name |
service.port | 8080 | Service port |
service.nodePort.enabled | false | If true, the service is exposed externally as NodePort |
service.nodePort.port | 31843 | NodePort port (when enabled=true) |
resources.limits.cpu | 1 | CPU limit |
resources.limits.memory | 1Gi | Memory limit |
portalSecret.secretName | apinizer-portal | Portal Secret name (created outside Helm, beforehand) |
env.JAVA_OPTS | -XX:MaxRAMPercentage=75.0 | JVM options |
env.SPRING_PROFILES_ACTIVE | prod | Spring profile |
Installation with values.yaml:
Instead of --set, you can install with the module's values.yaml file. This suits GitOps: keep values.yaml under version control (e.g. GitLab); when a parameter changes, apply the update by running helm upgrade -f ... with the same file.
apinizer-portal/values.yaml
image:
  repository: apinizercloud/apiportal
  tag: "<APINIZER_IMAGE_TAG>"

replicaCount: 1

service:
  nodePort:
    enabled: false
    port: 31843
  name: apinizer-portal-service
  port: 8080

resources:
  limits:
    cpu: "1"
    memory: "1Gi"

portalSecret:
  secretName: apinizer-portal

env:
  JAVA_OPTS: "-XX:MaxRAMPercentage=75.0"
  SPRING_PROFILES_ACTIVE: "prod"
helm install portal oci://registry-1.docker.io/apinizercloud/apinizer-apiportal \
  --version 1.0.0 \
  -n <API-Portal-Namespace> \
  -f apinizer-portal/values.yaml
Upgrade and Rollback
To upgrade the Helm-installed modules to a new version (helm upgrade --reuse-values --set image.tag=...) and to roll back (helm rollback), see the Apinizer Version Upgrade → Helm page.