Distributed Cache
Distributed Cache is Apinizer's cache infrastructure that stores shared data such as throttling, quota, OAuth2 tokens, and load balancing information. Cache Servers can now run in separate Kubernetes namespaces from Gateway pods, allowing for more flexible infrastructure management.
Cache Server Overview
Cache Server (apinizer-cache) is the environment where cache values required in Apinizer are stored. It uses Hazelcast technology for distributed caching and can be managed by Apinizer or connected to an existing remote Cache Server deployment.
Namespace Independence:
Cache Server pods can now run in a different Kubernetes namespace than Gateway pods. This provides more flexible infrastructure management and allows you to separate Gateway and Cache workloads. Gateway pods can access Cache Servers in other namespaces using Kubernetes service discovery (e.g., http://cache-http-service.apinizer-cache.svc.cluster.local:8090).
Cache Server Configuration
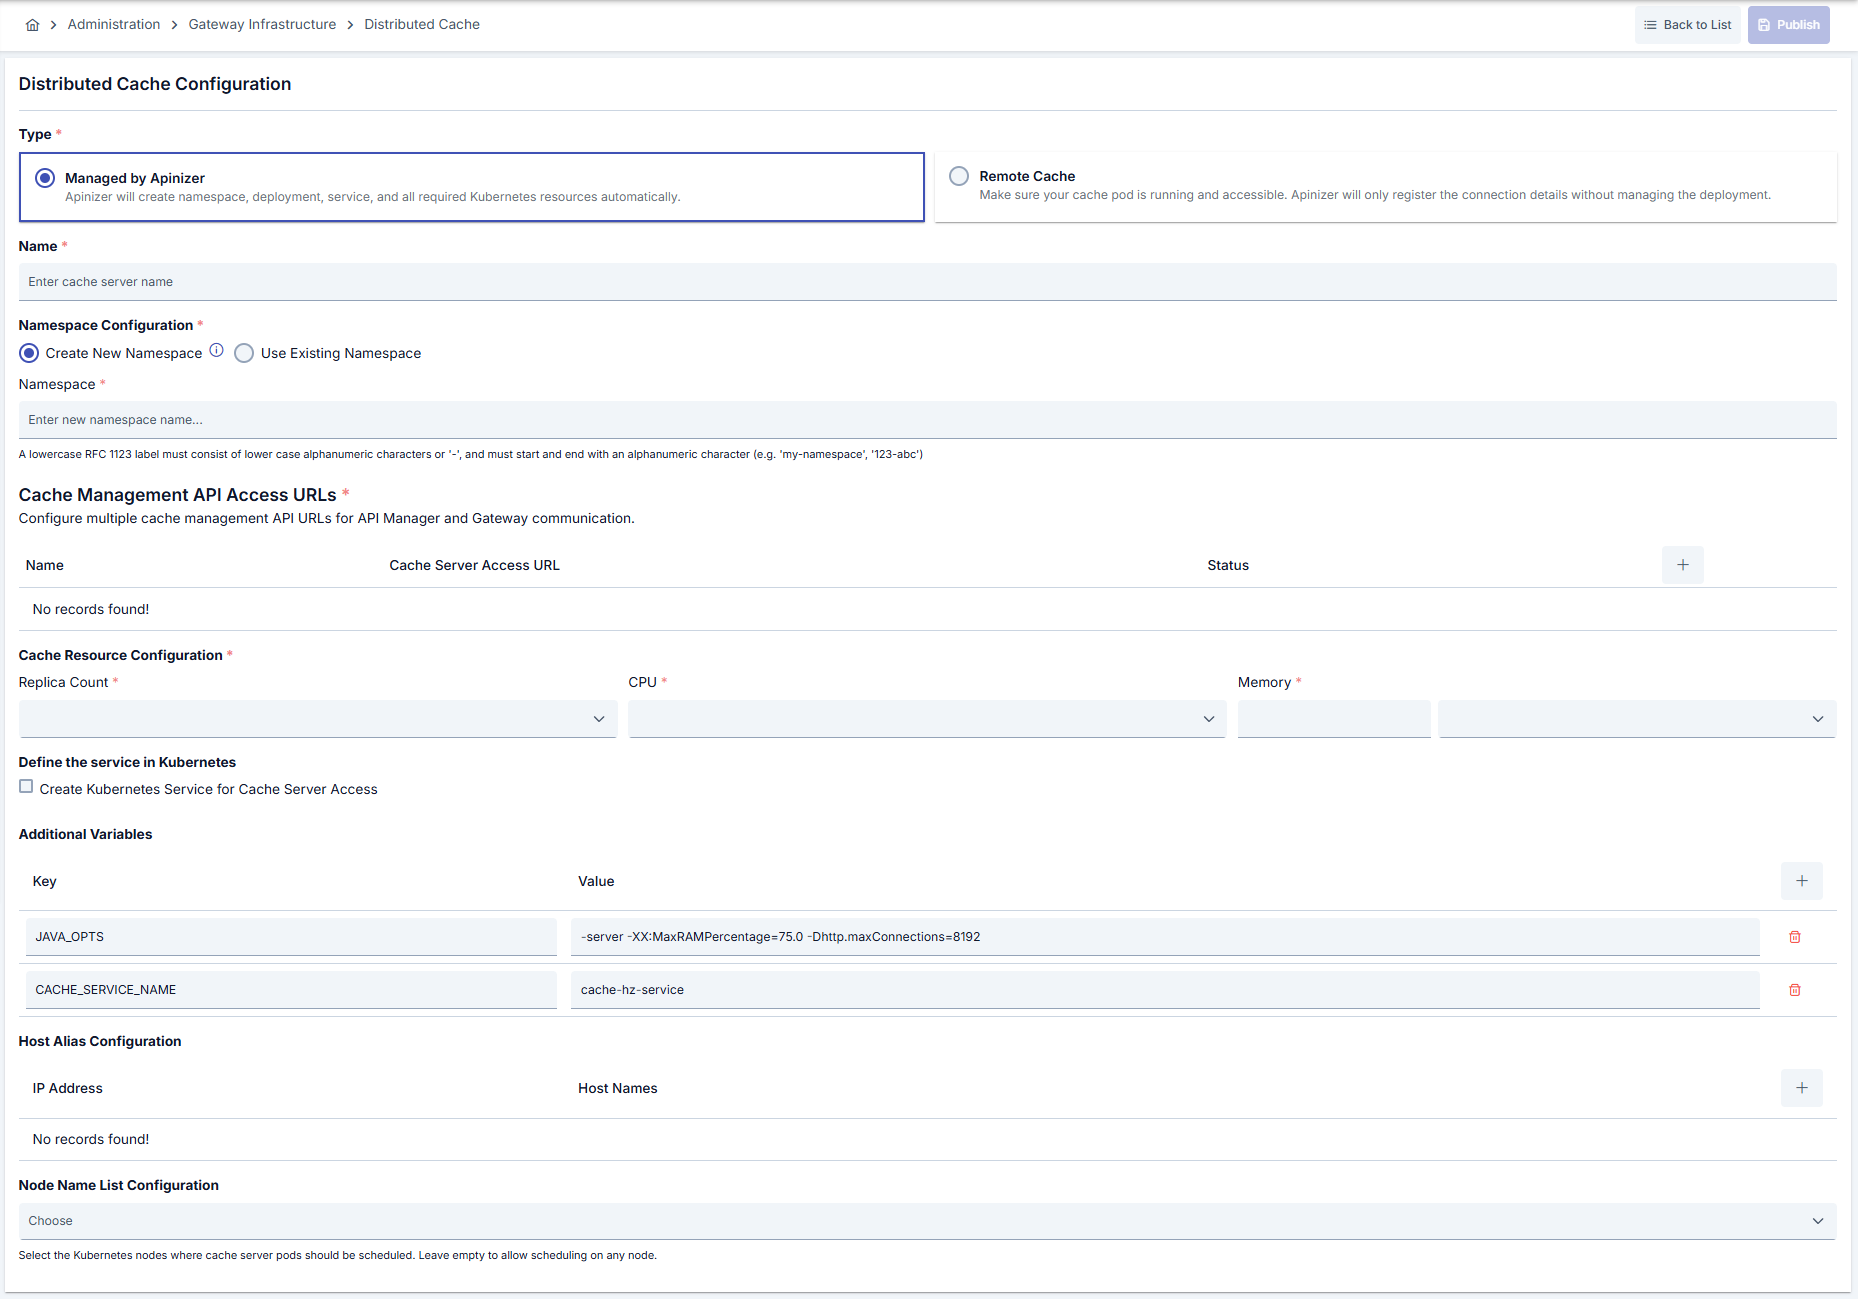
Deployment Type Selection
When creating a Cache Server, you need to select the deployment type:
Managed by Apinizer
Apinizer will automatically create and manage the cache deployment using Kubernetes API. Apinizer will create namespace, deployment, service, and all required Kubernetes resources automatically.
Use this option when:
- You want Apinizer to manage the entire cache lifecycle
- You need automatic resource provisioning and management
- You want simplified cache server management
Remote Cache Server
Connect to an existing Cache Server pod that was deployed manually via YAML. Apinizer will only register the connection details without managing the deployment.
Use this option when:
- You have an existing Cache Server deployment managed outside Apinizer
- You need custom cache configurations not supported by Apinizer
- You want to use a Cache Server deployed by another system
Remote Cache Server Requirements:
Make sure your Cache Server pod is running and accessible. Apinizer will only register the connection details without managing the deployment. You are responsible for maintaining the remote Cache Server deployment.
Namespace Configuration
Important: The namespace configuration cannot be changed after the Cache Server is created. Make sure to select the correct namespace during creation.
Create New Namespace
When creating a new namespace, you can specify a custom namespace name. The namespace must comply with RFC 1123 DNS label standards:
- Must be between 3 and 63 characters
- Only lower case alphanumeric characters (a-z, 0-9) or hyphens (-) are allowed
- Must start and end with a lower case alphanumeric character
- Examples:
my-namespace,prod-env,123-abc
Use Existing Namespace
You can select an existing Kubernetes namespace where the Cache Server will be deployed. This is useful when:
- You want to reuse an existing namespace
- You have namespace management policies that require specific namespaces
- You want to deploy Cache Servers in a namespace managed by another system
Namespace Independence:
Cache Servers can run in namespaces different from Gateway pods. This allows you to:
- Separate Gateway and Cache workloads for better resource management
- Apply different security policies to Gateway and Cache namespaces
- Scale Gateway and Cache independently
- Use dedicated namespaces for cache infrastructure
Gateway pods can access Cache Servers in other namespaces using Kubernetes service discovery format: http://service-name.namespace.svc.cluster.local:port
Cache Management API Configuration
Cache Management API URLs define how API Manager and Gateway will communicate with the Cache Server application. You can configure multiple API URLs for high availability scenarios.
Single API URL Configuration
For basic setups, configure a single Cache Management API URL:
Format: http://cache-http-service.namespace.svc.cluster.local:8090
Example:
http://cache-http-service.apinizer-cache.svc.cluster.local:8090http://cache-http-service.prod.svc.cluster.local:8090
Multiple API URL Configuration
You can configure multiple Cache Management API URLs for high availability. Each URL can have:
- Name: A descriptive name for the API URL
- Health Check Address: The address used for health checks
Use cases:
- High availability deployments across multiple namespaces
- Load balancing between multiple cache clusters
- Disaster recovery scenarios
Cross-Namespace Communication:
When Gateway pods and Cache Server pods are in different namespaces, use the Kubernetes service discovery format:
http://service-name.namespace.svc.cluster.local:port
This allows Gateway pods to access Cache Servers regardless of their namespace location.
Managed Mode Configuration
When Managed by Apinizer is selected, Apinizer will create and manage all Kubernetes resources for the Cache Server.
Resource Configuration
| Field | Description |
|---|---|
| Replica Count | The number of Cache Server pods. Equivalent to the replicaSet in the Kubernetes Cluster. |
| CPU | The maximum number of CPU cores the pod will use. |
| Memory | The maximum memory value the pod will use. |
| Memory Unit | The unit of the value required for memory is selected; MB, GB. |
Memory Sizing Guide:
Cache Server uses ZGC (for containers above 1 GB) with a heap ratio of 50-55%. The remaining memory is used by ZGC, JVM internals, and Hazelcast native structures. Approximately 40% of the total container memory is available for cache data storage.
| Container Memory | GC | Heap | Available for Cache Data | Approximate Entry Count (500 B/entry) |
|---|---|---|---|---|
| 2 GB | ZGC | ~1.024 MB | ~700 MB | ~1.4 million |
| 4 GB | ZGC | ~2.250 MB | ~1.800 MB | ~3.7 million |
| 8 GB | ZGC | ~4.500 MB | ~4.000 MB | ~8 million |
Sizing formula:
Recommended Container Memory = (Expected Cache Data Size / 0.4) + 1 GB
For example, to store 2 GB of cache data: (2000 MB / 0.4) + 1000 MB = 6 GB container
Entry count estimates assume an average entry size of 500 bytes (including key, response body, headers, and Hazelcast metadata). Actual entry sizes vary based on cached response body size. You can monitor real entry counts and memory usage from the Cache Dashboard.
GC and Memory Profile: Apinizer automatically selects the appropriate GC algorithm based on the Cache Server's container memory. For containers with more than 1 GB memory, ZGC is selected with a heap ratio of 50-55%. For containers with 1 GB or less, G1GC is used with a 50% heap ratio. ZGC provides sub-millisecond GC pauses, reducing the risk of Hazelcast cluster partition timeouts that can occur with G1GC at large heap sizes. You can override the automatic GC selection via JAVA_OPTS. For details, see JVM Garbage Collector Tuning.
Kubernetes Service Configuration
You can configure Kubernetes services to expose the Cache Server application:
Service Options:
- Create Kubernetes Service: Enable to create a Kubernetes Service for Cache Server access
- Service Name: The name of the Kubernetes Service (default:
cache-server-service) - Service Type:
- ClusterIP: Default type. Service is only accessible within the cluster. Best for internal communication between API Manager/Gateway and Cache Server.
- NodePort: Service is accessible via a specific port on each node (30000-32767 range)
Service Deletion:
If you disable Kubernetes Service creation, the previously created Kubernetes Service will be deleted from Kubernetes. Make sure this is what you want before disabling.
Additional Variables
Default and optional variables and their values to be run in the pod are defined.
Tomcat Settings:
| Variable | Description | Default | Recommended Values by CPU |
|---|---|---|---|
SERVER_TOMCAT_MAX_THREADS | Maximum concurrent requests Tomcat can handle | 1024 | 1 CPU: 256, 2 CPU: 1024, 4 CPU: 2048, 8 CPU: 4096 |
SERVER_TOMCAT_MIN_SPARE_THREADS | Minimum thread count Tomcat will always keep ready | 512 | 1 CPU: 128, 2 CPU: 256, 4 CPU: 512, 8 CPU: 1024 |
SERVER_TOMCAT_ACCEPT_COUNT | Maximum number of connections that can wait in queue when all threads are busy | 512 | 1 CPU: 256, 2 CPU: 512, 4 CPU: 1024, 8 CPU: 2048 |
SERVER_TOMCAT_MAX_CONNECTIONS | Maximum connection count Tomcat can accept simultaneously | 8192 | 1 CPU: 2048, 2 CPU: 4096, 4 CPU: 8192, 8 CPU: 16384 |
SERVER_TOMCAT_CONNECTION_TIMEOUT | Connection timeout in milliseconds | 20000 (20 seconds) | - |
SERVER_TOMCAT_KEEPALIVE_TIMEOUT | Keep-alive connection timeout in milliseconds | 60000 (60 seconds) | - |
SERVER_TOMCAT_MAX_KEEPALIVE_REQUESTS | Maximum number of requests that can be processed on a keep-alive connection | 10000 | - |
SERVER_TOMCAT_PROCESSOR_CACHE | Maximum number of processors cached in processor cache | 512 | - |
Hazelcast Settings:
| Variable | Description | Default |
|---|---|---|
HAZELCAST_CLIENT_SMART | Whether the Hazelcast client will use smart routing | true |
HAZELCAST_IO_WRITE_THROUGH | Hazelcast write-through mode enabled/disabled | false |
HAZELCAST_MAP_LOAD_CHUNK_SIZE | Chunk size used when loading Hazelcast map | 10000 |
HAZELCAST_MAP_LOAD_BATCH_SIZE | Batch size used when loading Hazelcast map | 10000 |
HAZELCAST_MAPCONFIG_BACKUPCOUNT | How many backup copies of Hazelcast map data will be stored | 1 |
HAZELCAST_MAPCONFIG_READBACKUPDATA | Whether to read from backup copies | false |
HAZELCAST_MAPCONFIG_ASYNCBACKUPCOUNT | Number of asynchronous backup copies | 0 |
HAZELCAST_PARTITION_COUNT | Hazelcast partition count | 271 |
HAZELCAST_OPERATION_RESPONSEQUEUE_IDLESTRATEGY | Hazelcast operation response queue idle strategy (block/backoff) | block |
HAZELCAST_OPERATION_THREAD_COUNT | Hazelcast operation thread count for EntryProcessor performance | 8 (CPU core count) |
HAZELCAST_OPERATION_GENERIC_THREAD_COUNT | Hazelcast generic operation thread count for background tasks | 4 (CPU core count / 2) |
HAZELCAST_SERIALIZATION_USE_NATIVE_BYTE_ORDER | Use native byte order for serialization (performance optimization) | true |
HAZELCAST_MAX_NO_HEARTBEAT_SECONDS | Maximum heartbeat absence duration before marking member as dead (seconds) | 300 |
HAZELCAST_HEARTBEAT_INTERVAL_SECONDS | Heartbeat interval between cluster members (seconds) | 5 |
HAZELCAST_MASTER_CONFIRMATION_INTERVAL_SECONDS | Master confirmation interval (seconds) | 30 |
HAZELCAST_SOCKET_KEEP_ALIVE | TCP socket keep-alive enabled | true |
HAZELCAST_SOCKET_NO_DELAY | TCP_NODELAY enabled (low latency for small packets) | true |
HAZELCAST_OPERATION_CALL_TIMEOUT_MILLIS | Operation call timeout in milliseconds | 60000 (60 seconds) |
HAZELCAST_OPERATION_BACKUP_TIMEOUT_MILLIS | Backup operation timeout in milliseconds | 5000 (5 seconds) |
HAZELCAST_MAP_WRITE_DELAY_SECONDS | Write-behind delay in seconds | 5 |
HAZELCAST_MAP_WRITE_BATCH_SIZE | Write-behind batch size | 100 |
HAZELCAST_MAP_WRITE_COALESCING | Write-behind coalescing enabled | true |
HAZELCAST_MAP_WRITE_BEHIND_QUEUE_CAPACITY | Write-behind queue capacity | 100000 |
HAZELCAST_MAP_MAX_SIZE | Maximum number of entries per Hazelcast map (per node). When exceeded, LRU eviction removes the least recently used entries. | 10000 |
HAZELCAST_SPLITBRAIN_PROTECTION_ENABLED | Split-brain protection enabled (for 3+ node clusters) | false |
HAZELCAST_SPLITBRAIN_QUORUM_SIZE | Minimum quorum size for split-brain protection | 2 |
HAZELCAST_CP_MEMBER_COUNT | CP Subsystem member count (0 = disabled) | 0 |
HAZELCAST_CP_GROUP_SIZE | CP Subsystem group size | 3 |
HAZELCAST_CP_SESSION_TTL_SECONDS | CP Subsystem session TTL (seconds) | 300 |
HAZELCAST_CP_SESSION_HEARTBEAT_SECONDS | CP Subsystem session heartbeat interval (seconds) | 5 |
HAZELCAST_MERGE_BATCH_SIZE | Merge policy batch size | 100 |
CACHE_SERVICE_NAME | Service name required for Cache to access other cache pods via kubernetes | cache-hz-service |
CACHE_QUOTA_TIMEZONE | Timezone for resetting daily quota information in cache (e.g., +03:00) | 00:00 |
CACHE_LAZY_MODE | If cache pods should not try to load database values at once on first startup, set to "lazy" | eager |
METRICS_ENABLED | Whether metric collection feature is enabled | false |
HAZELCAST_OPERATION_RESPONSEQUEUE_IDLESTRATEGY
If you set this parameter to "backoff": The pod will continuously use 90-100% of the CPU limit. This may provide 5-10% performance increase but consumes the CPU resource limit of the Cache pod.
CACHE_QUOTA_TIMEZONE:
Daily quota information is also stored in cache. Daily quota information is reset according to UTC timezone. If you want the start time of the daily changing quota to be reset according to your local time, you can add the CACHE_QUOTA_TIMEZONE value to additional variables. The value added here must be written in the format "+03:00".
CACHE_LAZY_MODE:
If you do not want cache pods to try to load database values at once on first startup, the CACHE_LAZY_MODE value can be set to "lazy". In this case, priority is given to opening the pod, and values can continue to be loaded after the pod is opened. It is recommended to enter this value if there are a large number of records in the database.
Host Alias Configuration
Configure host aliases for the Cache Server. Host aliases allow you to map IP addresses to hostnames.
Use cases:
- Resolve hostnames that are not in DNS
- Map internal IP addresses to friendly hostnames
- Configure custom hostname resolution
Example Usage:
| IP Address | Host Names |
|---|---|
| 10.10.10.10 | alias_name, other_alias_name |
Node Name List Configuration
Configure which Kubernetes nodes the Cache Server pods should be scheduled on. If no nodes are selected, pods can be scheduled on any node.
Use cases:
- Schedule Cache Server pods on specific high-memory nodes
- Isolate cache workloads to dedicated nodes
- Ensure Cache Server pods run on nodes with SSD storage
Remote Mode Configuration
When Remote Cache Server is selected, you need to configure the connection details for the existing Cache Server deployment.
Basic Information
| Field | Description |
|---|---|
| Name | A descriptive name for the Cache Server configuration |
| Description | Optional description for the Cache Server |
| Cache Management API URL | The health check address of your Cache Server. Example: http://cache-http-service.prod.svc.cluster.local:8090 |
Connection Testing
You can test the connection to the remote Cache Server before saving the configuration. The test will verify:
- Network connectivity to the Cache Server
- Health check endpoint accessibility
- API response validation
Remote Cache Server Requirements:
Make sure your Cache Server pod is running and accessible before registering it as a remote Cache Server. Apinizer will only register the connection details without managing the deployment.
Cache Server Operations
Creating a Cache Server
Choose between Managed by Apinizer or Remote Cache Server based on your requirements.
Select an existing namespace or create a new one. Remember that namespace cannot be changed after creation.
Configure one or more Cache Management API URLs for API Manager and Gateway communication.
If using Managed mode, configure replica count, CPU, memory, and additional variables.
Save the Cache Server configuration. For Managed mode, Apinizer will create the necessary Kubernetes resources.
Updating Cache Server
You can update various aspects of the Cache Server configuration:
- Basic Information: Name and description
- Resource Configuration: Replica count, CPU, memory (Managed mode only)
- Additional Variables: Environment variables and Java options
- Kubernetes Service Configuration: Service type and settings (Managed mode only)
- Host Aliases: Host alias mappings
- Node Name List: Pod scheduling preferences
- Cache Management API Settings: API URL configurations
Namespace Change:
The namespace cannot be changed after the Cache Server is created. If you need to change the namespace, you must delete and recreate the Cache Server configuration.
Deleting a Cache Server
When you delete a Cache Server:
- All configurations related to this Cache Server will be deleted
- For Managed mode, Kubernetes resources (deployments, services) will be removed
- The deleted Cache Server cannot be restored
Warning: When the deletion operation is completed, Gateway pods using this Cache Server will lose access to the cache. Make sure to update Gateway configurations before deleting the Cache Server.
Cache Dashboard
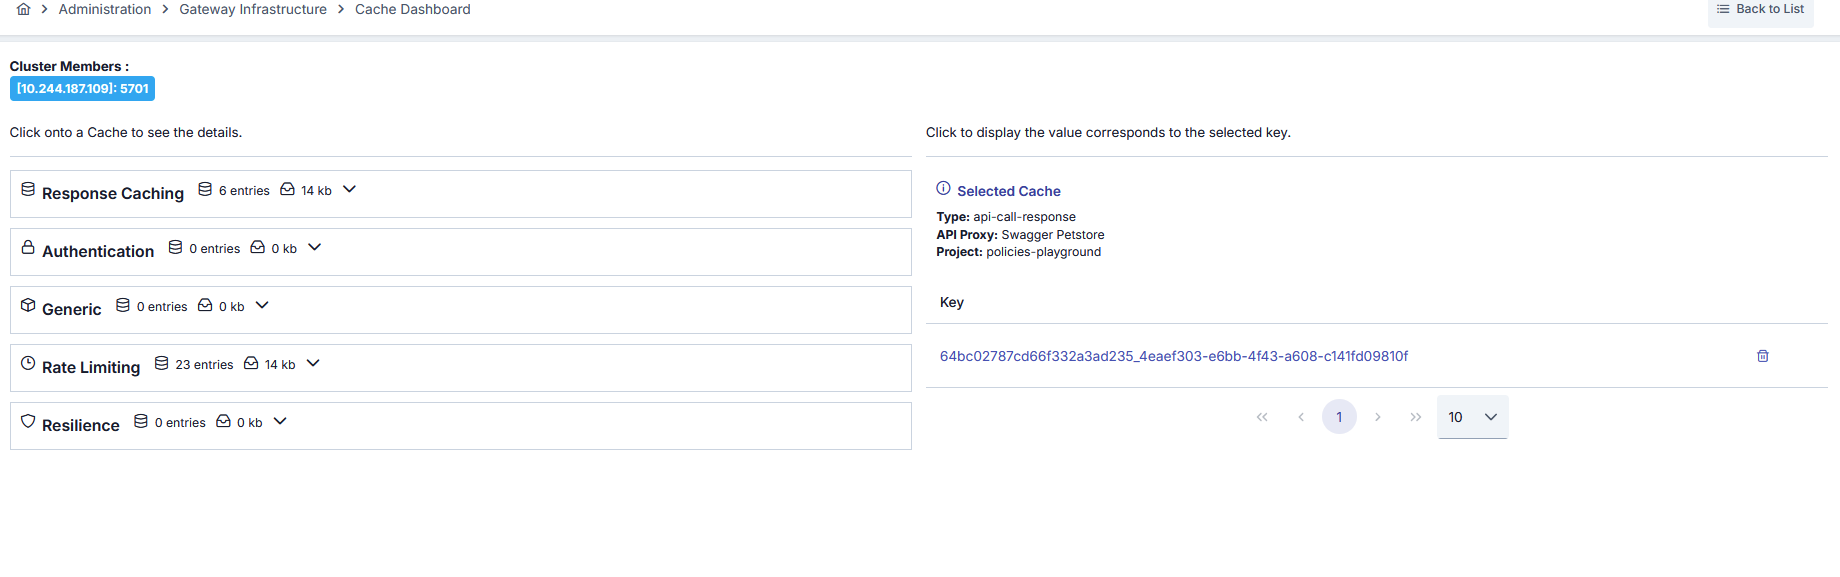
You can view, manage, and perform deletion operations on cache contents from the Cache Dashboard page. You can access the Cache Dashboard page by clicking the Cache Monitor button of the relevant Cache Server from the Cache Server list.
Cluster Members
Information about Hazelcast cluster members is displayed at the top of the Cache Dashboard page. Host and port information is shown for each cluster member.
Categorized Cache List
Caches are grouped by category:
- Response Caching: API Proxy response caches (detailed table with API Proxy Group, API Proxy, Method, Project information)
- Rate Limiting: Rate limiting caches
- Authentication: Authentication caches
- Resilience: Resilience caches (Circuit Breaker, Retry, etc.)
- Generic: Other general caches
For each category:
- Type: Cache type
- Description: Cache description
- Count: Number of records in the cache
- Size: Memory usage of the cache (KB)
Response Caching Details
Additional information is displayed for caches in the Response Caching category:
- API Proxy Group: API Proxy Group name
- API Proxy: API Proxy name
- Method: HTTP method
- Project: Project name
Cache Keys Viewing
You can view the keys of a cache by clicking on it:
- Key List: All keys in the cache are listed
- Pagination: Keys are displayed with pagination (10, 20, 30 record options)
- Key Details: You can view the cache content in JSON format by clicking on a key
Cache Operations
You can perform the following operations from the Cache Dashboard:
- View Keys: View cache keys
- View Data: View cache content in JSON format for a key
- Delete Key: Delete a single key
- Delete All: Delete all cache content
Cache Deletion Operations:
Cache deletion operations cannot be undone. Be careful when performing cache deletion operations in production environments. Especially deleting Rate Limiting and Authentication caches may affect system behavior.
Diagnostics
You can access detailed system metrics, JVM information, thread states, and Hazelcast cluster information for Cache Servers. You can access the Diagnostics page by clicking the Diagnostics button of the relevant Cache Server from the Cache Server list.
For Diagnostics features, usage, and detailed information, see the Environment Diagnostics page.
Best Practices
Namespace Management
- Use dedicated namespaces for cache infrastructure when possible
- Follow naming conventions for namespaces (lowercase, alphanumeric, hyphens)
- Consider namespace resource quotas for Cache Server pods
High Availability
- Configure multiple Cache Management API URLs for redundancy
- Use multiple Cache Server pod replicas for fault tolerance
- Distribute Cache Server pods across different Kubernetes nodes
Performance Optimization
- Configure appropriate CPU and memory based on cache size requirements
- Use
CACHE_LAZY_MODE=lazyfor large databases - Tune Hazelcast parameters based on your workload
- Monitor cache metrics to optimize resource allocation
Security
- Use ClusterIP services for internal communication
- Configure proper network policies for cross-namespace access
- Use TLS/HTTPS for cache management API when possible
- Regularly update Cache Server images
For more information about cache architecture and usage, see the Cache Component page.