RabbitMQ Queue Connections
Overview
What is its Purpose?
Enables Integration Flow steps within Apinizer to reliably publish messages over AMQP
Provides high availability among brokers in the cluster by defining multiple host/port
Transmits log messages, telemetry, or business data to the target queue in appropriate format with virtual host and basic properties fields
Guarantees secure messaging with optional Authentication and SSL/TLS support
Working Principle
When a RabbitMQ Connection is requested from within an Integration Flow or Connector, the system reads the configured connection parameters
Broker is selected with round-robin strategy according to defined hostPortList, if there is no existing open connection, a new AMQP connection is created in the pool
If Authentication toggle is activated, authentication is performed to the target system with username/password, or if SSL/TLS is enabled, by verifying the certificate chain
Channel is opened over AMQP protocol, message is published with channelExchange and channelRoutingKey parameters; basic properties fields carry message metadata
After the operation is completed, the connection returns to the pool; it is automatically closed when idle time is exceeded
In case of connection error, timeout, or authentication error, retry and fallback host attempt, warning logs, and detailed error message are sent to the user
Usage Areas
Sending log, audit, and monitoring events to RabbitMQ-based central queue
AMQP topic/queue integrations to trigger commands or events to external systems
Messaging between distributed microservices in high-volume data processing pipelines
Secure connection to third-party Message Queue infrastructures (e.g., managed RabbitMQ)
Technical Features and Capabilities
Basic Features
Automatic failover is provided by adding multiple broker addresses.
Tenant-based isolation is supported with connectionFactoryVirtualHost field.
Fields such as AppId, ContentType, Priority are predefined to standardize message format.
Ability to define separate connection parameters for each environment (Development, Test, Production).
Activating or deactivating the Connection (enable/disable toggle). In passive state, the connection cannot be used but its configuration is preserved.
Advanced Features
Can be disabled for brokers that do not require authentication, username/password becomes mandatory when needed.
TLS version can be freely written, self-signed certificates can be tested in development environment.
Broker capacity is adapted with RequestedChannelMax, RequestedFrameMax, and RequestedHeartbeat values.
Ability to validate connection parameters before saving with the "Test Connection" button.
Exporting Connection configuration as a ZIP file. Importing to different environments (Development, Test, Production). Version control and backup capability.
Monitoring connection health, pool status, and performance metrics.
Connection Parameters
Mandatory Parameters
Description: Connection name (must be unique)
Example Value: Production_RabbitMQ
Notes: Should not start with space, special characters should not be used
Description: Host and port pair for each broker
Example Value: mq1.internal.local:5672
Notes: At least one row is mandatory; host and port must be filled in all rows
Description: AMQP virtual host name
Example Value: /apinizer
Notes: Must match the vhost name in RabbitMQ management console
Description: Time to wait until AMQP connection is established
Example Value: 60000
Notes: In ms; value 0 means unlimited wait
Description: Maximum number of channels per connection
Example Value: 2047
Notes: Should not exceed broker limit
Description: AMQP frame size limit
Example Value: 0
Notes: Value 0 uses broker default
Description: Heartbeat interval with broker
Example Value: 60
Notes: In seconds; 0 -> heartbeat disabled
Description: Queue or topic key to route the message
Example Value: apinizer.audit.queue
Notes: Recommended to keep same as queue name
Description: Application ID that created the message
Example Value: apinizer
Notes: Can be tracked in API logs
Description: Message body format
Example Value: application/json
Notes: Values such as application/xml are supported
Description: Content character set
Example Value: UTF-8
Notes: Broker and consumer must use the same encoding
Description: Delivery mode 1 (transient) or 2 (persistent)
Example Value: 2
Notes: Must select 2 for persistence
Description: Message priority (0-9)
Example Value: 5
Notes: Queue priority must be enabled
Description: Queue to return the response
Example Value: apinizer.reply
Notes: Mandatory in Request/Reply patterns
Description: TTL value of the message (ms)
Example Value: 60000
Notes: Should not exceed queue policy
Description: Defines message type
Example Value: apinizer-log-type
Notes: Used for filtering in consumer
Description: RabbitMQ user ID
Example Value: guest
Notes: Broker verifies if Authentication is enabled
Description: Broker cluster ID
Example Value: cluster-eu-central
Notes: Used in cluster observability reports
Optional Parameters
Description: Description about Connection purpose
Default Value: -
Recommended Value: Specify process or project name
Description: Exchange name to publish the message
Default Value: ""
Recommended Value: apinizer.audit.exchange
Description: Authentication requirement toggle
Default Value: false
Recommended Value: true in Production environment
Description: Username if Authentication is enabled
Default Value: guest
Recommended Value: Use a separate service account
Description: Password for the user
Default Value: guest
Recommended Value: Strong password managed through Secret Manager
Description: SSL/TLS usage status
Default Value: false
Recommended Value: true in Production
Description: TLS version to use
Default Value: TLSv1.2
Recommended Value: TLSv1.3 according to broker support
Description: Note about relationship between exchange and routing key
Default Value: -
Recommended Value: Keep environment-based table
Timeout and Connection Pool Parameters
Description: Maximum wait time for connection establishment
Default: 60000 ms
Min: 1000 ms | Max: 300000 ms
Description: Response wait time for message sending
Default: 30000 ms
Min: 5000 ms | Max: 120000 ms
Description: Maximum number of connections in Connection pool
Default: 10
Min: 1 | Max: 100
Description: Heartbeat time with broker
Default: 60 seconds
Min: 0 | Max: 300 seconds
Usage Scenarios
Situation: Transferring Gateway logs to central queue
Solution: channelRoutingKey=apinizer.logs, deliveryMode=2
Expected Result: All log messages are collected in persistent queue
Situation: Monitoring authorized operations
Solution: basicPropertiesType=audit, SSL enabled
Expected Result: Secure audit messages reach consumer service
Situation: Publishing to multiple consumers
Solution: channelExchange=apinizer.events, topic exchange
Expected Result: All subscribers receive messages according to routing key pattern
Situation: Continuity when a broker goes down
Solution: Adding at least 3 nodes to hostPortList
Expected Result: Connection automatically switches to another node
Situation: Time-sensitive tasks
Solution: basicPropertiesExpiration=120000, lowering priority
Expected Result: Messages are automatically deleted after 2 minutes
Situation: Fast command transmission
Solution: connectionFactoryRequestedHeartbeat=30, pool size=20
Expected Result: Latency decreases, throughput increases
Connection Configuration
Creating New RabbitMQ Connection
Go to Connection → RabbitMQ Connection section from the left menu.
Click the [+ Create] button in the top right.
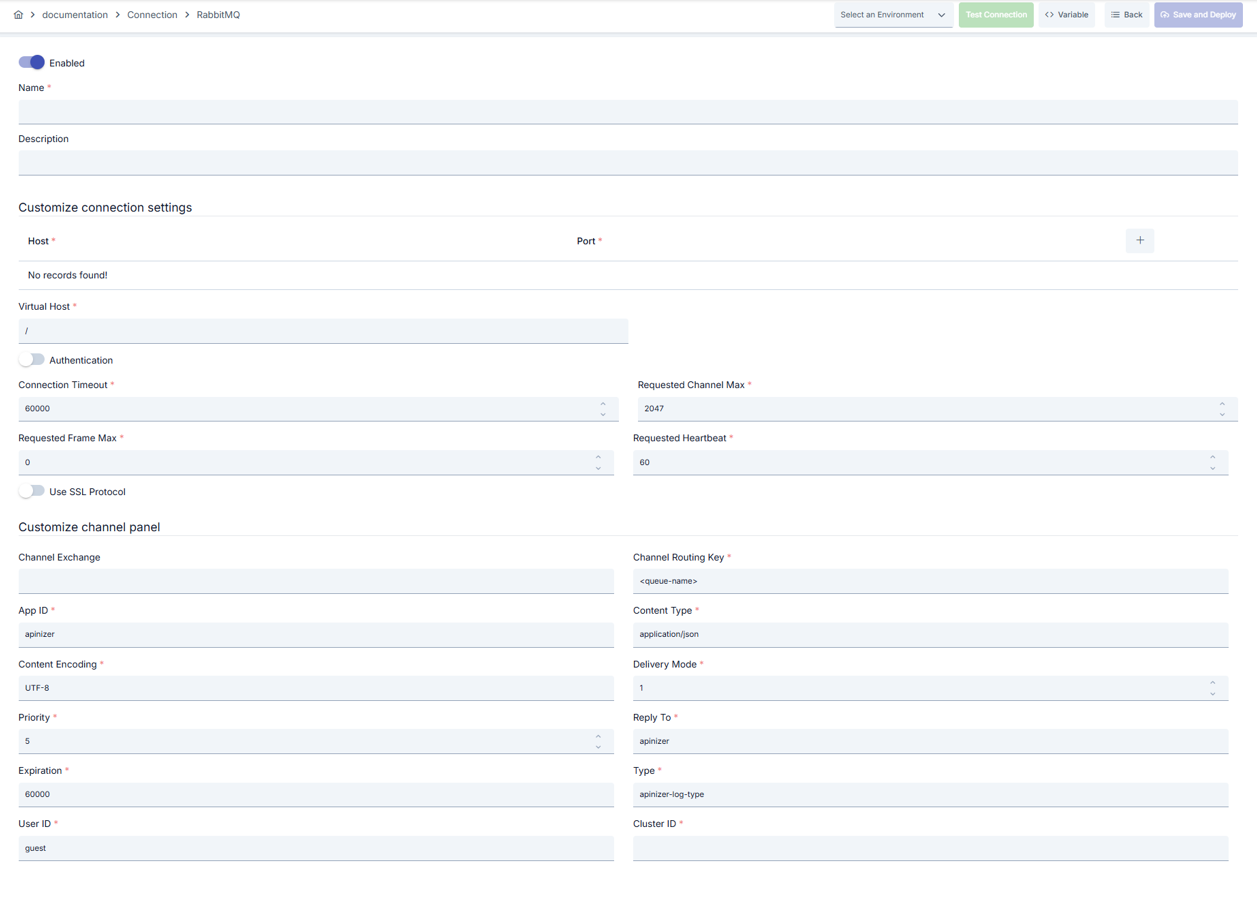
Enable Status (Active Status): Set active/passive status with toggle. New connections are active by default.
Name - Mandatory:
Example: Production_RabbitMQ
- Enter a unique name, should not start with space.
- System automatically checks. Green checkmark: available. Red cross: existing name.
Description:
Example: "RabbitMQ log publishing connection"
- Max. 1000 characters.
- Describe the purpose of the Connection.
In the action button area at the top of the page, you can use the [<> Variable] button to select dynamic values, and with global variables, you can manage connection parameters with variable-based values instead of fixed values. For detailed information, review the Dynamic Variables page.
Select environment from dropdown menu: Development, Test, or Production.
Different connection parameters can be defined for each environment.
Add broker addresses with Add Host button.
Host and port fields must be filled in each row.
Write the vhost value on the broker in the Connection Factory Virtual Host field.
Enter Channel Exchange value (if any).
Fill Channel Routing Key, Basic Properties fields according to RabbitMQ consumer requirements.
Determine delivery mode (1/2) and priority.
Adjust Connection Timeout, Requested Frame/Channel Max, Requested Heartbeat fields according to traffic volume.
Pool Size is updated from management screen according to corporate standards.
Activate Authentication Enabled toggle.
Fill Username/Password fields.
If SSL is required, turn on Use SSL Protocol toggle and specify TLS version.
Click the [Test Connection] button.
Test whether connection parameters are correct.
Success: Green confirmation message, Failed: Error details are shown.
Click the [Save and Deploy] button in the top right.
Checklist: Unique name. Mandatory fields filled. Test connection successful (recommended)
Result:
-
Connection is added to the list.
-
Becomes available for use in Integration Flow and Connector steps.
-
Becomes active according to environment.
ipucu
Connection created successfully! You can now use it in Integration Flow and Connector steps.
:::
Deleting Connection
Select Delete from the ⋮ menu at the end of the row or click the [Delete] button on the connection detail page
Check Before Deleting: It may be used in Integration Flow or Connector steps. If necessary, assign an alternative connection. Back up with Export before deleting
Use the Disable option instead of deleting. Connection becomes passive but is not deleted. Can be reactivated when needed
Exporting/Importing Connection
In this step, users can export existing connections for backup, transfer to different environments, or sharing purposes, or import a previously exported connection again. This process is used to maintain data integrity in version management, transitions between test and production environments, or inter-team sharing processes.
Export
Select ⋮ → Export from the action menu. ZIP file is automatically downloaded.
Click the [Export] button on the connection detail page. ZIP file is downloaded.
Format: Date-connection-ConnectionName-export.zip
Example: 13 Nov 2025-connection-Production_RabbitMQ-export.zip
- Connection JSON file
- Metadata information
- Dependency information (e.g., certificates, key store)
- Backup
- Transfer between environments (Test → Prod)
- Versioning
- Team or project-based sharing
Import
- Click the [Import RabbitMQ Connection] button on the main list.
- Select the downloaded ZIP file.
- System checks: Is format valid? Is there a name conflict? Are dependencies present?
- Then click the [Import] button.
Scenario 1: Name Conflict → Overwrite the old connection or create with a new name.
Scenario 2: Missing Dependencies → Create missing certificates or key stores first or exclude them during import.
Usage Areas of Connection
Steps:
- Create the Connection
- Validate the connection with Test Connection
- Save and activate with Save and Deploy
- Ensure the Connection is in Enabled status
Connection is selected in steps that require communication with external systems such as message queue (queue), topic, email, FTP/SFTP, LDAP, or similar. Example: Steps such as "Send Message", "Consume Message", "Upload File", "Read Directory". Connection selection is made from the Connection field in the configuration of these steps
In scheduled tasks (e.g., sending messages at certain intervals, file processing, etc.), access to external systems is provided by selecting the connection. When the connection changes, the job execution behavior is updated accordingly
The correctness of the connection can be checked independently of the Integration Flow with the Connection Test feature. This test is critical in the debugging process
Best Practices
Things to Do and Best Practices
Bad: Defining a single host
Good: Adding two hosts
Best: Adding all broker nodes to hostPortList and ordering according to health check results
Bad: Using random routing keys
Good: Using queue name as routing key
Best: Naming in domain.context.event format to provide maintenance ease
Bad: Leaving Expiration field empty
Good: Defining default 60 seconds
Best: Creating environment-based TTL sets according to business requirements
Bad: Using guest/guest credentials in all environments
Good: Creating different user for Production
Best: Applying service accounts with only necessary permissions and secret rotation policy
Bad: Using the same connection parameters in all environments
Good: Creating separate connections for each environment
Best: Managing all environments in a single connection using the Environment option, only changing environment when transitioning between environments
Bad: Saving and deploying the connection without testing
Good: Validating with Test Connection before saving
Best: Testing after every parameter change, performing full integration test in test environment before going to production
Security Best Practices
Grant user only necessary vhost and queue permissions; manage configure/write/read permissions separately
If SSL/TLS is enabled, add broker certificates to keystore, track expiration dates, plan renewal in advance
Send authentication errors and SSL negotiation logs to central log pool, generate alarms through SIEM
Store sensitive information such as usernames and passwords using environment variables or secret manager. Do not hardcode credentials in code or configuration files. Update passwords periodically
Always enable SSL/TLS in Production environment. Use self-signed certificates only in development environment. Track certificate expiration dates and renew them on time
Allow only authorized users to change Connection configuration. Store connection change logs. Apply change approval process for critical connections
Things to Avoid
Why to avoid: Single routing key routes all messages to the same queue, bottleneck occurs
Alternative: Define different routing keys according to message type
Why to avoid: Broker cannot detect connection drops
Alternative: Use at least 30-second heartbeat
Why to avoid: Copying certificate creates security vulnerability
Alternative: Use separate certificate/credential for each environment
Why to avoid: Test data may be written to production system, real users may be affected, security risk occurs
Alternative: Create separate connections for each environment, use environment parameter, separate connection names by adding prefix according to environment (Test_, Prod_)
Why to avoid: Connection constantly times out in network delays, Integration steps fail
Alternative: Adjust timeout values according to real usage scenarios, measure network latency and determine timeouts accordingly
Why to avoid: New connection is opened for each request, performance decreases, resource consumption increases, target system load increases
Alternative: Enable connection pool, adjust pool size according to traffic volume, set up pool monitoring
Performance Tips
Recommendation: Fragment messages above 128 KB or use gzip
Effect: Risk of hitting FrameMax limit decreases, throughput increases
Recommendation: Use service.region.event pattern
Effect: Consumers easily filter with pattern, subscription count decreases
Recommendation: Use 60 sec heartbeat in WAN connections, 30 sec in LAN
Effect: Drops are quickly detected, unnecessary reconnect is prevented
Recommendation: Adjust pool size according to peak traffic (recommended: concurrent request count × 1.5), set idle connection timeouts, perform pool health check
Effect: Connection opening cost decreases by 80%, response times decrease, resource usage is optimized
Recommendation: Measure real network latency, adjust timeout values accordingly, avoid very low or very high timeouts
Effect: Unnecessary waits are prevented, fast fail-over is provided, user experience improves
Recommendation: Monitor connection pool usage, track timeout rates, perform connection health check, set up alerting
Effect: Problems are detected proactively, performance bottlenecks are identified early, downtime decreases
Troubleshooting
Message Rejected by Broker
Wrong routing key, exchange binding missing, or user may not have write permission.
Check exchange/queue bindings.
Test routing key from broker.
Update user permissions.
SSL Handshake Failure
Wrong TLS version, certificate chain missing, or self-signed certificate may be used in Production.
Verify TLS version supported by broker.
Reload certificate to keystore.
Use CA-signed certificate in Production.
Connection Timeout
Network delay, target system responding slowly, or timeout value may be too low.
Check network connectivity.
Check target system health.
Increase timeout values.
Review connection logs.
Authentication Failed
Wrong username/password, expired credentials, or permission problem may exist.
Verify credentials.
Check that the user is active in the target system.
Check that necessary permissions are granted.
Check SSL/TLS certificates.
Pool Exhausted
Pool size may be too low, connection leak exists, or traffic may be too high.
Increase pool size.
Check that connections are properly closed.
Set idle connection timeouts.
Monitor connection usage metrics.
Connection Test Successful But Integration Flow Gives Error
A different connection may be selected in Integration/Connector step, the step may be misconfigured, or Flow/Job may not be redeployed.
Check that the Connection's enable toggle is active.
Verify that the correct connection is selected in Integration Flow.
Redeploy the Connection.
Redeploy Integration Flow or Job.
Check Gateway logs.
Frequently Asked Questions (FAQ)
Can I send both log and business data with the same RabbitMQ Connection?
Yes, but routing key and basic properties fields need to be customized in different Integration Flow steps.
Do I have to use DNS instead of IP in host list?
No, IP can also be used but using DNS reduces maintenance cost in node changes.
How should I select Heartbeat value?
Recommended 60 sec in WAN environments, 30 sec in LAN; broker and client must use the same value.
Is TLSv1.3 supported?
If your broker and JVM version support it, you can write TLSv1.3 in connectionFactorySslProtocol field.
Can I differentiate message TTL by environment?
Yes, you can update basicPropertiesExpiration value for the environment after Environment selection.
Can I use the same connection in multiple Integration Flows?
Yes, the same connection can be used in multiple Integration Flow or Connector steps. This provides centralized management and guarantees configuration consistency. However, changes made to the connection will affect all usage locations, so care should be taken.
Is using Connection pool mandatory?
Using Connection pool is not mandatory but strongly recommended in high-traffic systems. Reusing existing connections instead of opening a new connection for each request significantly increases performance.
Should I create different connections for Test and Production?
Yes, it is recommended to create separate connections for each environment. Alternatively, you can manage all environments in a single connection using the environment parameter. This approach provides easier management and less error risk.
Test Connection is successful but not working in Integration Flow, why?
Several reasons may exist:
- Connection enable toggle may be passive
- A different connection may be selected in Integration step
- Connection may not be deployed
- Integration Flow may not have been redeployed yet