Portal Overview
The Portal Overview page is the starting point for API Portal management. From this page, you can view the portal's general status, quickly access basic settings, and follow the necessary steps to complete the portal setup.
Overview
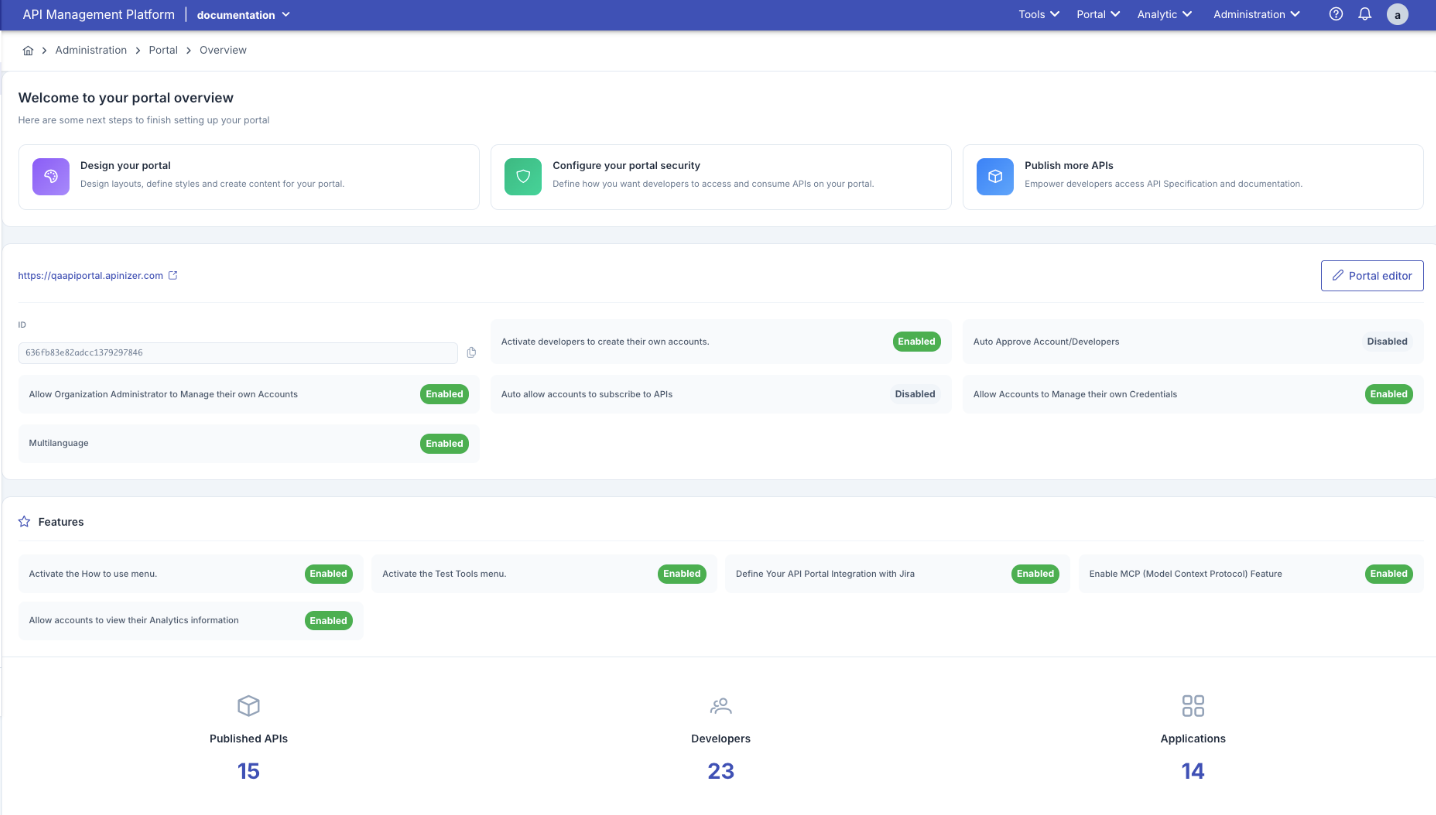
The Portal Overview page is the main page of the API Portal management screen. This page provides portal administrators with the portal's current status, key statistics, and quick access options.
1. Welcome Section
The main content area of the Portal Overview page displays recommended steps to complete the portal setup.
Title: "Welcome to your portal overview"
Subtitle: "Here are some next steps to finish setting up your portal"
Quick Action Cards:
Customize your portal design, define layouts, and create content. Configure logo, colors, fonts, and theme settings.
Define how developers will access your portal and consume APIs. Configure security settings.
Empower developers to access API specifications and documentation. Publish more APIs.
Card Details:
| Card | Icon | Description | Navigation |
|---|---|---|---|
| Design your portal | Purple design icon | Customize portal appearance, define layouts, and create content | Redirects to Portal Appearance page |
| Configure your portal security | Green shield icon | Configure developer access and API consumption settings | Redirects to Portal Settings → Security tab |
| Publish more APIs | Blue cube icon | Publish API specifications and documentation | Redirects to API Product management page |
2. Portal URL and Editor
Portal information and quick access buttons are located in this section.
Portal URL:
- The portal's access address is displayed
- Example:
https://qaapiportal.apinizer.com - External link icon appears next to the URL
- Click the URL to open the portal in a new tab
Portal Editor Button:
- Blue "Portal editor" button is located on the right side
- Click this button to access the portal appearance editor
- Allows you to edit the portal appearance in real-time
Portal ID:
- The portal's unique identifier is displayed
- Example:
636fb83e82adcc1379297846 - Copy icon appears next to the ID
- Copy the ID to use in technical references
3. Configuration Settings
The portal's basic security and feature settings are displayed in this section. Active/inactive status is shown for each setting.
Security Settings
Security settings are displayed in two columns:
Left Column:
| Setting | Status | Description |
|---|---|---|
| Allow Organization Administrator to Manage their own Accounts | ✅ Enabled | Allows organization administrators to manage their own accounts |
| Multilanguage | ✅ Enabled | Activates multi-language support |
Right Column:
| Setting | Status | Description |
|---|---|---|
| Activate developers to create their own accounts. | ✅ Enabled | Allows developers to create their own accounts (Self-service registration) |
| Auto Approve Account/Developers | ❌ Disabled | Automates account approval (manual approval required if disabled) |
| Auto allow accounts to subscribe to APIs | ❌ Disabled | Automatically approves API subscriptions (manual approval required if disabled) |
| Allow Accounts to Manage their own Credentials | ✅ Enabled | Allows users to manage their own API keys |
For detailed explanations of security settings, see the Portal Settings - Security section.
Features
Portal features are displayed in a section marked with a star icon:
Left Column:
| Feature | Status | Description |
|---|---|---|
| Activate the How to use menu. | ✅ Enabled | Activates the "How It Works" menu |
| Allow accounts to view their Analytics information | ✅ Enabled | Allows users to view their own analytics information |
Right Column:
| Feature | Status | Description |
|---|---|---|
| Activate the Test Tools menu. | ✅ Enabled | Activates the Test Tools menu |
| Define Your API Portal Integration with Jira | ✅ Enabled | Defines Jira integration |
| Enable MCP (Model Context Protocol) Feature | ✅ Enabled | Activates MCP feature |
For detailed explanations of features, see the Portal Settings - Features section.
4. Summary Statistics
At the bottom of the page, the portal's key metrics are displayed with large numbers and icons.
Statistics:
15 published API products are available.
23 registered developers are available.
14 registered applications are available.
Metric Details:
| Metric | Icon | Description | Usage |
|---|---|---|---|
| Published APIs | Cube icon | Number of published API products in the portal | Shows the size of the API catalog |
| Developers | People icon | Number of registered developers in the portal | Shows the portal user base |
| Applications | Grid/application icon | Number of registered applications in the portal | Shows API usage |
These statistics are updated in real-time and reflect the portal's current status.
Page Usage Scenarios
Scenario 1: Completing Portal Setup
Status: A new portal has been created and setup steps need to be completed.
Steps:
Review the recommended steps in the "Welcome to your portal overview" section on the Overview page.
Click the "Design your portal" card to go to the Portal Appearance page. Configure logo, colors, and theme settings.
Click the "Configure your portal security" card to configure security settings. Set up self-service registration, automatic approval, and other settings.
Click the "Publish more APIs" card to create and publish API products.
Verify that the setup is complete by checking the statistics at the bottom of the page.
Scenario 2: Checking Portal Status
Status: You want to check the portal's current status and active features.
Steps:
Review the summary statistics at the bottom of the page:
- How many APIs are published?
- How many developers are registered?
- How many applications have been created?
Check which features are active from the Features section.
Review the security configuration from the Security Settings section.
Verify that the portal is accessible by clicking the Portal URL.
Scenario 3: Quick Access
Status: You want to quickly access a specific settings page.
Quick Access Options:
| Target Page | Access Method |
|---|---|
| Portal Appearance Editor | Click the "Portal editor" button |
| Security Settings | Click the "Configure your portal security" card |
| Theme Settings | Click the "Design your portal" card |
| API Management | Click the "Publish more APIs" card |
| Portal Access | Click the Portal URL |
Important Notes
- The Overview page is the central starting point for portal management
- All basic information and quick access options are gathered on this page
- Statistics are updated in real-time
- Evaluate the effects before changing security settings
- Activating/deactivating features affects portal behavior
- Store the Portal ID in a secure location
- Follow the recommended steps in order to complete the portal setup
- Regularly check statistics to monitor portal growth
- Preview visual changes in real-time with the portal editor
Related Documentation
- Portal Settings - Portal configuration settings
- Appearance and Theme - Portal visual customization
- API Product - API product management
- Accounts and Developers - User management
- Application Management - Application and API key management