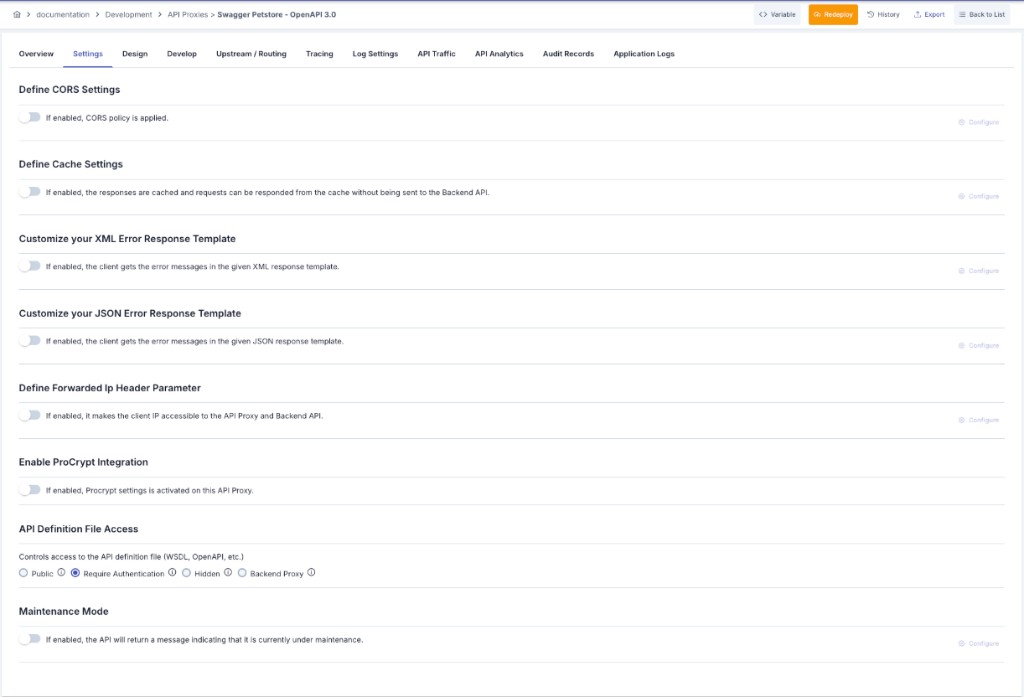
API Proxy General Settings
Settings Tab
This is the section where CORS, Cache, XML Error Message Templates, Forwarded IP Header Parameters, ProCrypt Integration, API Specification File Access Control, and Maintenance Mode settings are made for the API Proxy. These settings are used in the message processing and policy application process.
Note: API traffic log fields are not managed on this tab; use the Log Settings tab on the API Proxy screen.
If a warning appears above the settings indicating that global settings are active, the API Proxy is bound to a Global Settings record and the options in this panel are managed from that Global Settings entry. Clicking the warning navigates to the related setting.
CORS Settings
This is the section where CORS (Cross-Origin Resource Sharing) settings are made.
When this field is activated, the Configure button becomes active and opens the screen containing the related settings.
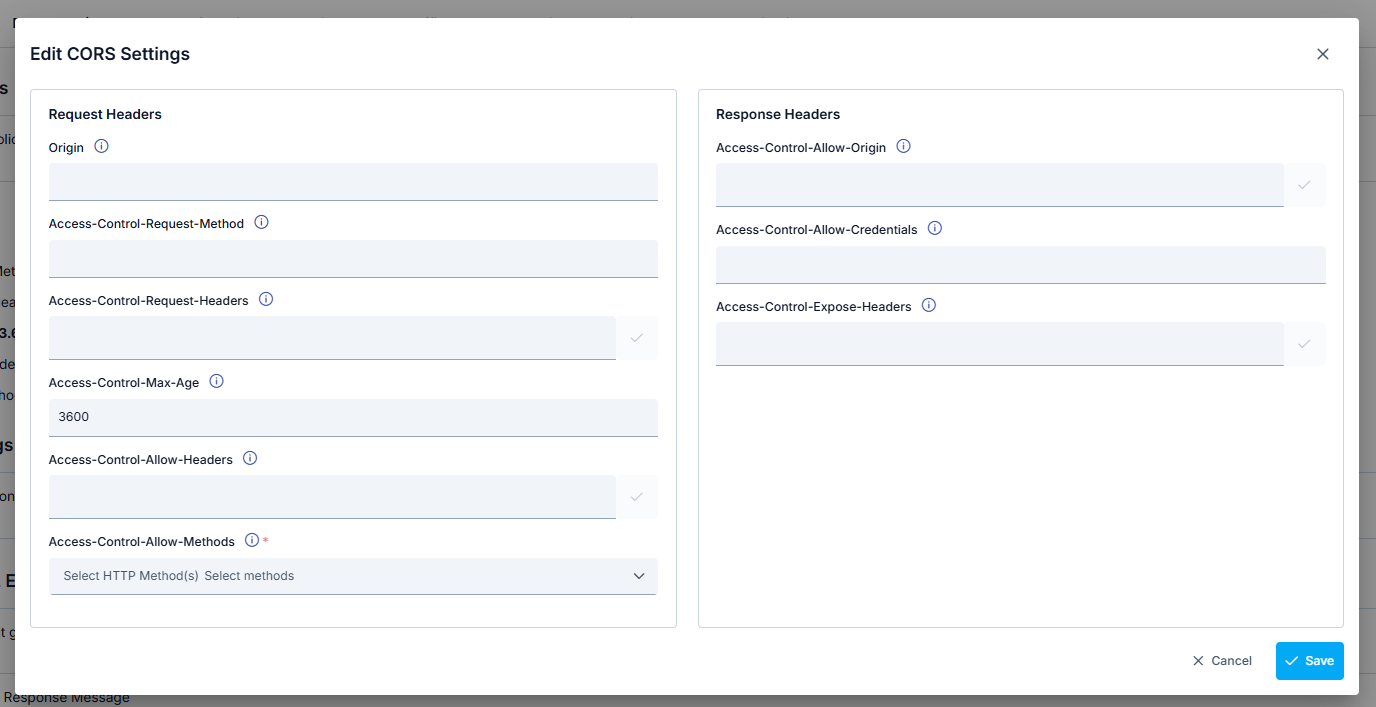
CORS Settings Fields
| Field | Description |
|---|---|
| Request Headers | |
| Origin | Contains the origin (domain, protocol, port) information from which the preflight request is sent. |
| Access-Control-Request-Method | Specifies the HTTP method that will be sent in the actual request with the preflight request. |
| Access-Control-Request-Headers | Specifies the HTTP headers that will be sent in the actual request with the preflight request. |
| Access-Control-Max-Age | Given in seconds, how long the response to the preflight request will remain in cache before sending another preflight request. |
| Access-Control-Allow-Headers | The header values that the API Proxy allows for access are entered. If Access-Control-Request-Headers is specified in the preflight request, this header is included in the response. Contains information about which HTTP headers can be used in the actual request. |
| Access-Control-Allow-Methods | Contains the HTTP method or methods allowed when accessing the server. The methods that the API Proxy allows for access are selected by marking them from the list: GET, POST, PUT, HEAD, OPTIONS, DELETE, PATCH, TRACE, ALL |
| Response Headers | |
| Access-Control-Allow-Origin | The origin values that the API Proxy allows are entered. If the value * is entered in this field, all origins can send requests. |
| Access-Control-Allow-Credentials | The value indicating whether there are credentials in the actual request is entered. |
| Access-Control-Expose-Headers | Other headers that clients can access are entered. |
To add new values to the existing predefined Origin and Header values, you can visit the CORS Origin Values and CORS Headers pages.
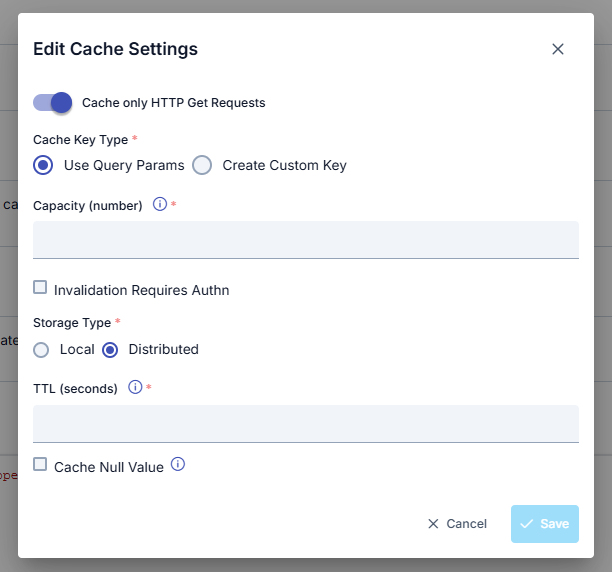
Cache Settings
Responses returned from the API Proxy can be cached, and requests from clients can be responded from cache without sending to the Backend API. This is the section where settings related to this are managed. Variable can be used when creating cache keys.
Only successful responses are cached: error responses with a status code of 400 and above (4xx/5xx) are never cached and are produced fresh from the Backend API on every request.
Cache Settings Fields
| Field | Description |
|---|---|
| Cache only HTTP Get Requests | If this option is activated, only responses to HTTP Get requests are cached. |
| Cache Key Type | There are two options for Cache Key Type: • Use Query Params: Used to determine the key to be created for caching based on HTTP Query parameters in the request. For example, when the query parameter is /methodName?param1=value1¶m2=value2, the key to be kept in cache consists of the value param1=value1¶m2=value2, and when a request comes in this way again, the result in cache is returned.• Create Custom Key: Used to create the key to be created for caching with the fields to be selected in the request. When this value is selected, the key is created with the fields specified in the "Variable List" table. |
| Capacity | The maximum number of responses that can be stored in cache. This field is required. |
| Invalidation Requires Authn | If authorization is required to invalidate the cache, this field is selected. The existing cache can be invalidated by sending one of the values no-cache, no-store, or max-age=0 to the Cache-Control key in the header. |
| Handling Action | If authorization is required to invalidate the cache, the action to be taken for unauthorized requests is selected: • Continue: If this option is selected, when one of the values no-cache, no-store, or max-age=0 is sent in the Cache-Control header information, if the sender is not authorized, it continues to work as if this value was not sent.• Stop: If this option is selected, when one of the values no-cache, no-store, or max-age=0 is sent in the Cache-Control header information, if the sender is not authorized, it stops the flow and returns an error message.This field becomes active when the "Invalidation Requires Authn" option is marked. |
| Storage Type | Determines how cache data is stored: • Local: Cache data is stored only on the related Gateway node. • Distributed: Cache data is shared and synchronized among all Gateway nodes. This field is required. |
| TTL (seconds) | The duration for which the cached response will be valid is entered in seconds. This field is required. |
| Cache Null Value | Marked if empty values are also desired to be cached. |
Customizing XML Error Response Template
For information on where error response templates fit within the multi-layered configuration system, priority order and scenario examples, see the Error Message Configuration Guide page.
Used to prepare response templates that will be used when any error is returned from the API Proxy to the client.
When any template is activated, the default template is displayed and can be customized if desired.
When this field is activated, the Configure button becomes active and opens the screen containing the related settings.
XML Error Response Template Settings
| Field | Description |
|---|---|
| Permit Special Chars in Response Message | Special characters that may be present in the error message of the response can break the XML message structure. Determines whether these are allowed. |
| XML | The error template of XML type can be edited in this field. |
| Content Type | The content type of the response to be returned. |
Customizing JSON Error Response Template
When activated, the client displays the returned error in the given JSON response template.
When this field is activated, the Configure button becomes active and opens the screen containing the related settings.
JSON Error Response Template Settings
| Field | Description |
|---|---|
| Permit Special Chars in Response Message | Special characters that may be present in the error message of the response can break the JSON message structure. Determines whether these are allowed. |
| JSON | The error template of JSON type can be edited in this field. |
| Content Type | The content type of the response to be returned. |
Placeholders
Values in the form #...# within response templates are used as placeholders where the relevant part of the error message will be placed.
| Placeholder | Description |
|---|---|
#CORRELATIONID# | Apinizer creates a unique key for each incoming request, enabling the request to be tracked throughout the flow. By using this key, for example, it becomes possible to correlate and track application log records with log records on Apinizer. |
#FAULTCODE# | Determines where the error code to be returned to the client will be placed in the response message. |
#FAULTMESSAGE# | Determines where the error message to be returned to the client will be placed in the response message. |
#FAULTMESSAGE_FIRSTLINE# | The first line or first 150 characters of the error message to be returned to the client are taken and placed in the response message. |
#FAULTSTATUSCODE# | Determines where the HTTP Status Code to be returned to the client will be placed in the response message. |
#RESPONSEFROMAPI# | If there is a response returned from the Backend API, this determines where that response will be placed in the response message to be returned to the client. |
#RESPONSEFROMAPI_FIRSTLINE# | The first line or first 150 characters of a response returned from the Backend API are taken and placed in the response message to be returned to the client. |
If desired, both templates can be activated. If both templates are active, which one will be used is decided according to the following criteria:
- If the content of the Content-Type header is JSON, the JSON Error Response Template is used.
- If the content of the Content-Type header is empty and the API Proxy type is REST, the JSON Error Response Template is used.
- If these are not valid, the XML Error Response Template is used.
If both templates are not activated or if the reason for the error is that the API Proxy could not be found (the address may be wrong, the API Proxy may not be deployed), in this case, the following response body is returned with the text/plain;charset=utf-8 header:
[#CORRELATIONID#],[#FAULTCODE#],[#FAULTMESSAGE#],[#FAULTSTATUSCODE#],[#RESPONSEFROMAPI#]
If the "Ignore Error Response Template In Case Of Error On Backend API" option is marked in the API Proxy's Routing tab, the templates defined in this section are not used, and the Backend API's error response is sent to the client as is.
Forwarded IP Header Setting
If the API Proxy is behind a Load Balancer or Proxy Server, the request from the client will be routed to the API Proxy by this layer, so the client's IP value cannot be known by the API Proxy or Backend API. Therefore, Load Balancers or Proxy Servers can forward the original client's IP value with a header. The Forwarded IP Header Parameters setting ensures that the client IP is accessible by the API Proxy and Backend API by specifying the name of this header, which may vary depending on software/hardware.
An image of the Forwarded IP Header Settings Configuration screen is shown below:
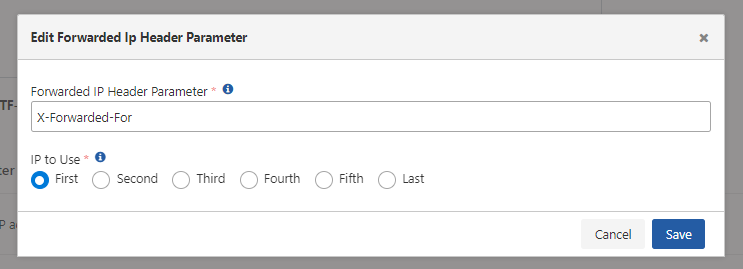
Forwarded IP Header Settings
| Field | Description |
|---|---|
| Forwarded IP Header Parameter | If the client is behind a Load Balancer or Gateway Server, the client's real IP number is reached using this parameter. |
| IP to Use | If the request has passed through multiple proxies, multiple IP addresses may accumulate in the XFF value. This field decides which address will be taken in this case. |
API Specification File Access Control
You can control access to the API specification file (WSDL, OpenAPI, XSD) through the API Proxy's external access address at four different levels. This setting has no effect on specification files visible through the Management Console.
| Access Type | Description |
|---|---|
| Public | Anyone can access the specification file without authentication. |
| Require Authentication | Basic Auth credentials (username and password) are required to access the specification file. When accessed via a browser, a credentials dialog is automatically displayed. |
| Hidden | Access to the specification file is completely blocked. |
| Backend Proxy | Access requests to the specification file are forwarded to the Backend API, and the actual specification file is served through the Backend API. |
With the Require Authentication option, you can additionally enable the Validate ACL for Client toggle. In this case, only clients that have access permission for the specific API Proxy can view the specification file.
If the API Proxy is in a Proxy Group and its access type is set to Hidden, the API Proxy's specification will not appear in the Proxy Group specification file. If all API Proxies in the Proxy Group have their access type set to Hidden, the user receives an access error.
You can visit the General Information Tab page for access to API Proxy specification files.
API Maintenance Mode
When the Maintenance Mode feature is activated, the API will return a message indicating that it is currently under maintenance. The API responds with a predefined HTTP status code and message structure.
An image of the Maintenance Mode Settings Configuration screen is shown below:
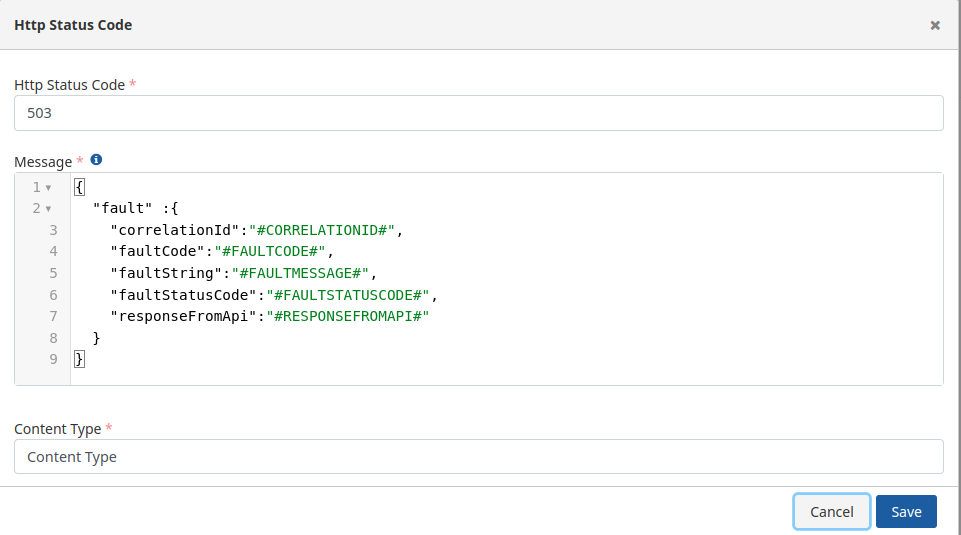
Maintenance Mode Settings
| Field | Description |
|---|---|
| HTTP Status Code | The default HTTP status code. |
| Message | The message template can be edited in this field. |
| Content Type | The content type of the response to be returned. |