REST API Proxy Creation
REST API Proxy performs message processing in JSON format. Request and response messages are in JSON format.
Supports standard HTTP methods such as GET, POST, PUT, DELETE, PATCH.
Supports OpenAPI 2.0 (Swagger) and OpenAPI 3.0 specifications.
Routing, policies, and settings can be configured flexibly.
REST API Proxy Creation Methods
There are several methods to create a REST API Proxy:
Import from OpenAPI/Swagger File
The most common method is to import from an OpenAPI (Swagger) specification file. This method automatically imports all endpoints, parameters, and schemas of your API.
Manual Creation
You can also manually create a REST API Proxy without an OpenAPI file. In this case, you need to manually define endpoints and schemas.
Copy from Existing API Proxy
You can create a new proxy by copying an existing REST API Proxy. This method saves time for similar APIs.
Create REST API Proxy from SOAP Web Service
The requirement to expose a Web Service developed with SOAP protocol as REST often arises, especially when existing services need to be used by newly developed mobile applications or JavaScript-based Web applications. Apinizer enables exposing SOAP Web services as REST and performing all necessary transformations through configuration.
Import from OpenAPI/Swagger File
Development → API Proxies item is selected in the main menu on the left. The +Add API Proxy button at the top right of the opened interface is clicked and REST API option is selected.
There are three methods to upload an OpenAPI file:
Method 1: Load from URL
The Enter URL link is clicked. The URL of the OpenAPI/Swagger file is entered (for example: https://petstore.swagger.io/v2/swagger.json) and the Parse button is clicked. The file is parsed and API information is displayed.
URL Access When loading from URL, Apinizer must be able to access this URL. If the URL is an internal address, make sure Apinizer has access permission to this address.
Authentication and SSL If the spec URL requires authentication, enable Use Spec Authorization to enter custom headers or Basic Auth (username/password). In the SSL / Certificate Settings panel, configure Connection Timeout, Customize SSL/TLS Settings, Skip SSL Verification, and Server Certificate Verification (System Default, TrustStore, or PEM) for HTTPS access. For details, see API Proxy Creation.
Method 2: File Upload
The Upload File button is clicked. An OpenAPI/Swagger file is selected from your computer (in JSON or YAML format). The file is automatically parsed and API information is displayed.
Method 3: Paste as Text
The Paste as Text option is selected. The OpenAPI/Swagger content is pasted into the text field and the Parse button is clicked. The content is parsed and API information is displayed.
After the parse operation is completed, the following information is displayed:
Name of the API (taken from OpenAPI file)
API version
Base URL of the API
All endpoints and HTTP methods
Request and response schemas
Client Route (Relative Path)
Client Route is the endpoint where the API Proxy is exposed to the outside world. Clients access the API through this endpoint.
Example:
Relative Path: /petstoreProxy
In this case, the API Proxy is accessed as follows:
https://{apinizer-gateway}/petstoreProxy/pets
Upstream Target (Backend Address)
Upstream Target is the address of your backend REST API. The API Proxy routes requests to this address.
All requests are routed to a single backend address.
Example:
https://api.example.com/v1
Automatically taken from servers or host information in the OpenAPI file.
Example:
https://petstore.swagger.io/v2
All information is checked. The Relative Path field is filled (required). Upstream Target information is checked or edited. The Save button at the top right is clicked.
API Proxy created successfully!
Supported OpenAPI Versions
Apinizer supports the following OpenAPI versions:
- OpenAPI 2.0 (Swagger 2.0): Full support
- OpenAPI 3.0: Full support
- OpenAPI 3.1: Full support
OpenAPI 2.0 Features
swaggerfield:"2.0"valuehost,basePath,schemesfieldspathsanddefinitionsstructureparametersandresponsesdefinitions
OpenAPI 3.0/3.1 Features
openapifield:"3.0.0"or"3.1.0"valueserversarraypathsandcomponentsstructurerequestBodyandresponsesdefinitionssecuritySchemesandsecuritydefinitions
Post-Import Configuration
After the API Proxy is created, the following configurations can be made:
HTTP Routing determines how endpoints will be routed.
Policies such as security, validation, transformation can be added to the API Proxy.
API Proxy can be tested.
API Proxy can be deployed to environment(s).
Common Scenarios
Scenario 1: Proxying Public API
To proxy a public API (for example, Petstore API):
The URL of the public API's OpenAPI file is used.
Relative Path is determined (for example: /petstoreProxy).
The public API's base URL is used as Upstream Target.
API Proxy is saved and deployed.
Scenario 2: Exposing Internal API
To expose an internal REST API to the outside world:
The internal API's OpenAPI file is uploaded.
Relative Path is determined.
The internal API's address is used as Upstream Target.
Security policies such as Authentication, Authorization, Rate Limiting are added.
API Proxy is saved and deployed.
Scenario 3: API Versioning
To create separate API Proxies for different versions:
A separate OpenAPI file is used for each version.
Different Relative Paths are used (for example: /api/v1, /api/v2).
Separate policies are defined for each version.
Migration strategy between versions is determined.
Best Practices
Make sure your OpenAPI file is valid and up-to-date. Invalid files may cause errors during import.
Use a consistent naming convention for Relative Paths. For example: /{service-name}/{version}
Define backend addresses as environment variables. This provides flexibility for different environments.
Always add security policies after creating the API Proxy. APIs are not secure by default.
Troubleshooting
Import Error
Problem: OpenAPI file cannot be imported.
Solution:
- Make sure the OpenAPI file is in valid JSON or YAML format.
- Make sure the OpenAPI version is supported.
- Check URL accessibility.
- Make sure the file size is within the limit.
Endpoints Not Visible
Problem: Endpoints are not visible after import.
Solution:
- Make sure the
pathsfield in the OpenAPI file is correctly defined. - Check that endpoints are correctly defined under
paths.
Routing Error
Problem: Requests are not routed to backend.
Solution:
- Make sure the Upstream Target address is correct.
- Check that the Backend API is accessible.
- Check HTTP Routing configuration.
Creating REST API Proxy from SOAP Web Service
The requirement to expose a Web Service developed with SOAP protocol as REST often arises, especially when existing services need to be used by newly developed mobile applications or JavaScript-based Web applications. Rewriting the existing service with REST or developing a new REST API that mimics its methods are not cost-effective solutions in terms of time and cost.
Apinizer enables exposing SOAP Web services as REST and performing all necessary transformations through configuration.
Creating REST Type API Proxy from SOAP Web Service
When creating a new API Proxy, WSDL type's Enter URL or Upload File options are selected as appropriate. In this example, the Enter URL option is used.
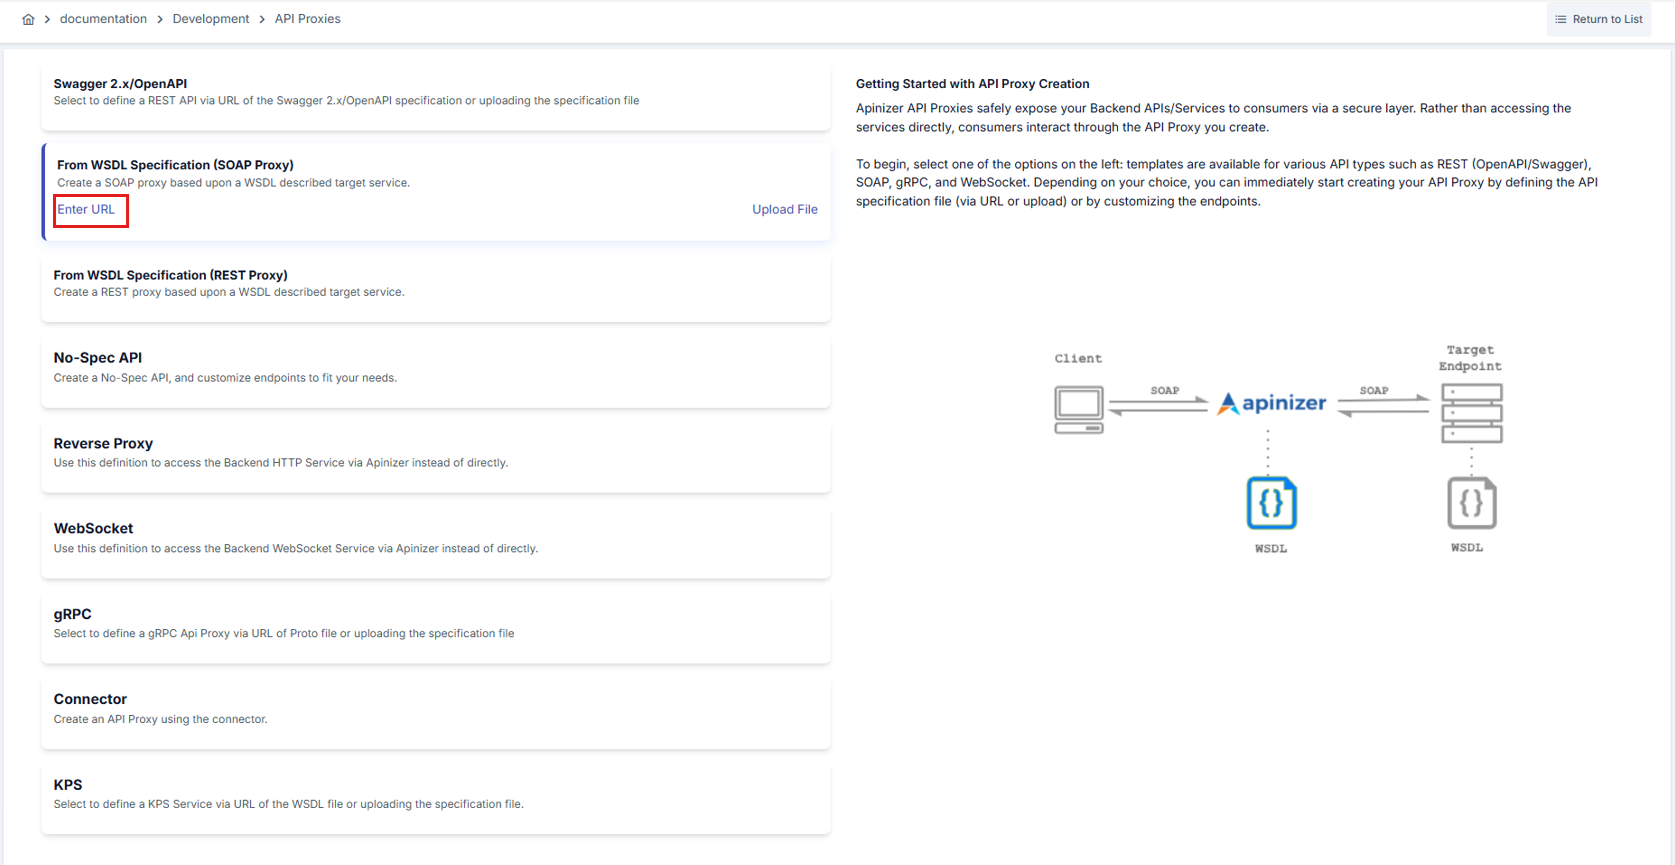
After the URL is entered and the Parse button is pressed, in the Protocol Transformation section on the screen that appears, the REST to SOAP to REST option is marked. Other required information is also filled in and the API Proxy is created.

Method Transformation Settings
After the API Proxy is created, if desired, how the transformation between REST - SOAP message structures will be done for request and response messages of methods can be customized. For this, go to the API Proxy's Development tab.
When All is selected in the method list on the left, icons that open the transformation settings for request messages at the top and response messages at the bottom appear in the middle section.
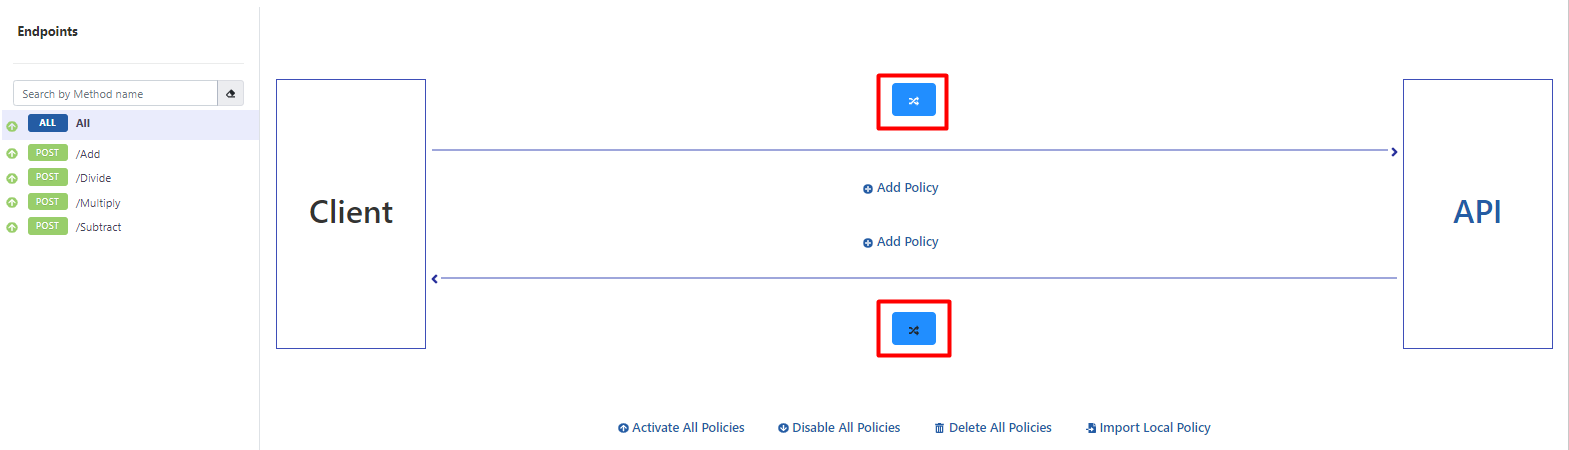
For example, when the icon for request messages is clicked, the following protocol transformation interface opens. This interface has Request Options and Response Options tabs. The relevant tab opens depending on which icon the user clicked.

In this interface, formatting is done regarding how the incoming request message will be converted to SOAP structure before being sent to the Backend API, in accordance with the REST protocol. The method whose message structure will be updated is selected from the left. The transformation settings for that method are made on the right.
Transformation Options
When a SOAP Service is exposed to clients as REST, request and response messages need to be transformed. The JSON message coming from the client must be converted to XML message before being sent to the SOAP service, and the XML message returned by the SOAP service must be converted to JSON message before being sent to the client. There are various options for performing this transformation:
Preferred when the JSON message to be used in request and response messages needs to be simple and easy to understand. Highly customizable compared to others. The most preferred method.
Preferred when the JSON message to be used in request and response messages needs to include XML Attribute values and XML Namespaces. JSON format is more complex compared to others. Data size increases because it resembles XML representation due to namespaces.
Works on the logic of creating the XML template to be sent to the SOAP Service, regardless of what format the incoming JSON message is in. "Request/response data manipulation" is used to fill the parameters in the XML template. Since there is no support for multiple sub-elements, it is useful when there are simple-structured XMLs. Especially preferred when data is desired to be taken from request header or request parameter instead of JSON message.
Request Message Transformation Options
This section explains the details of transformation options for request messages.
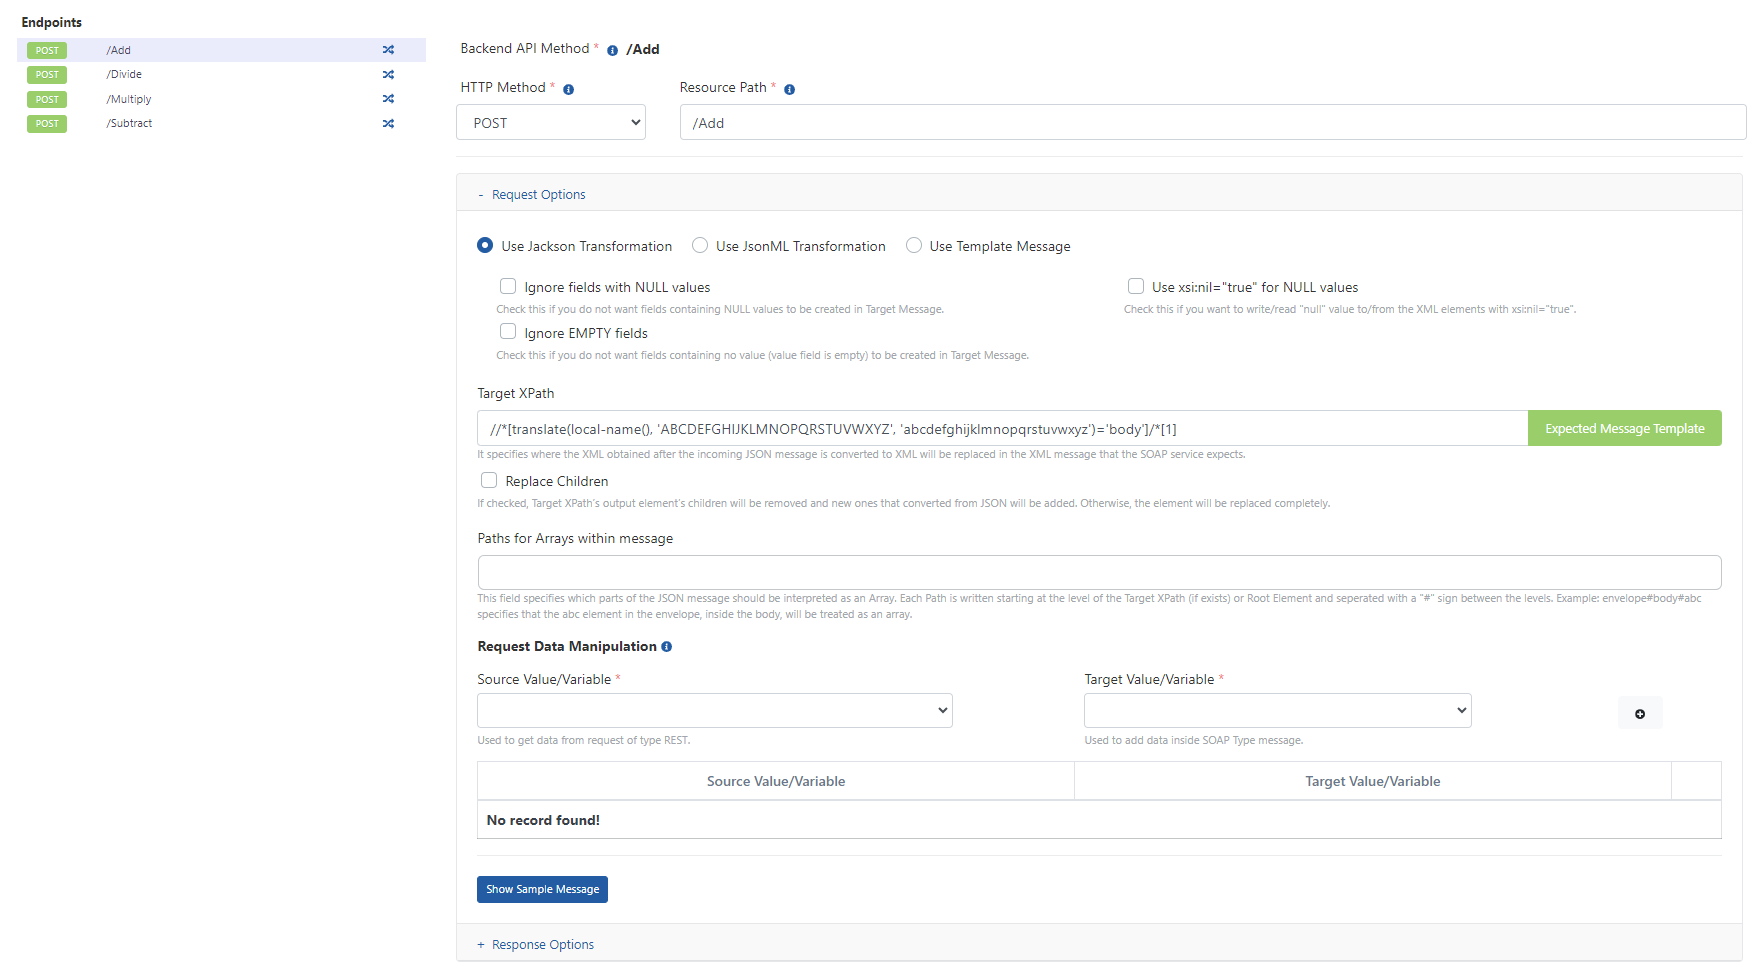
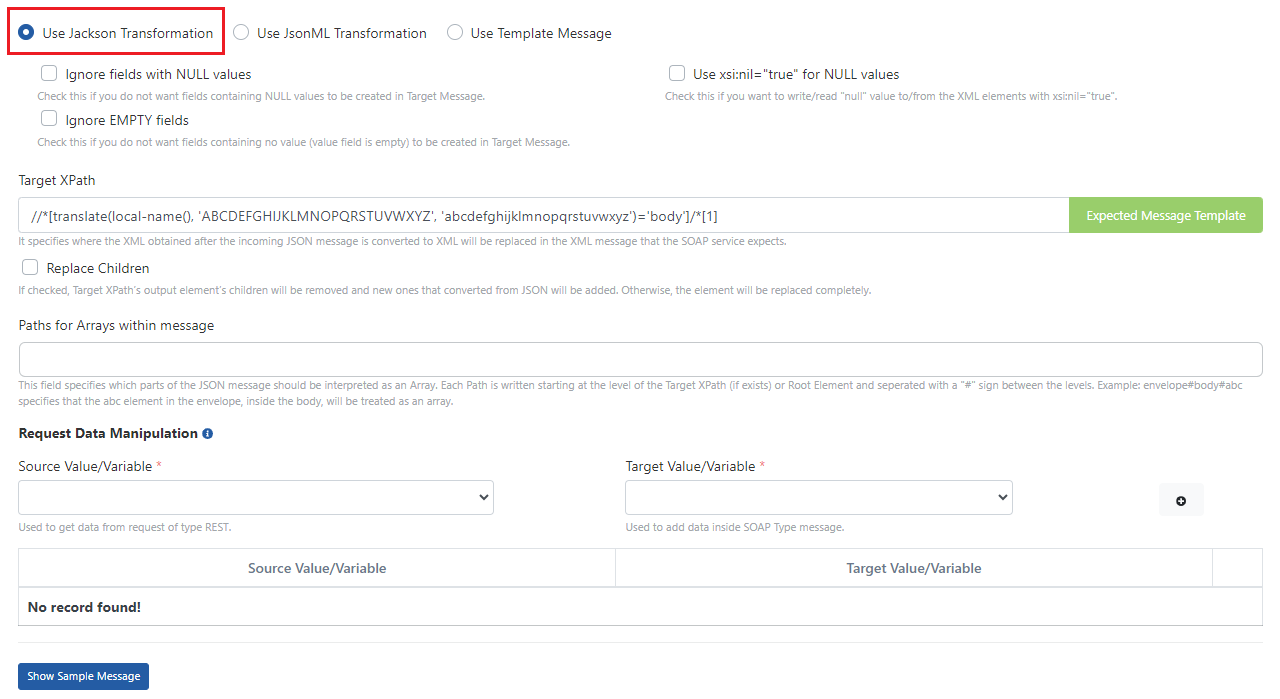
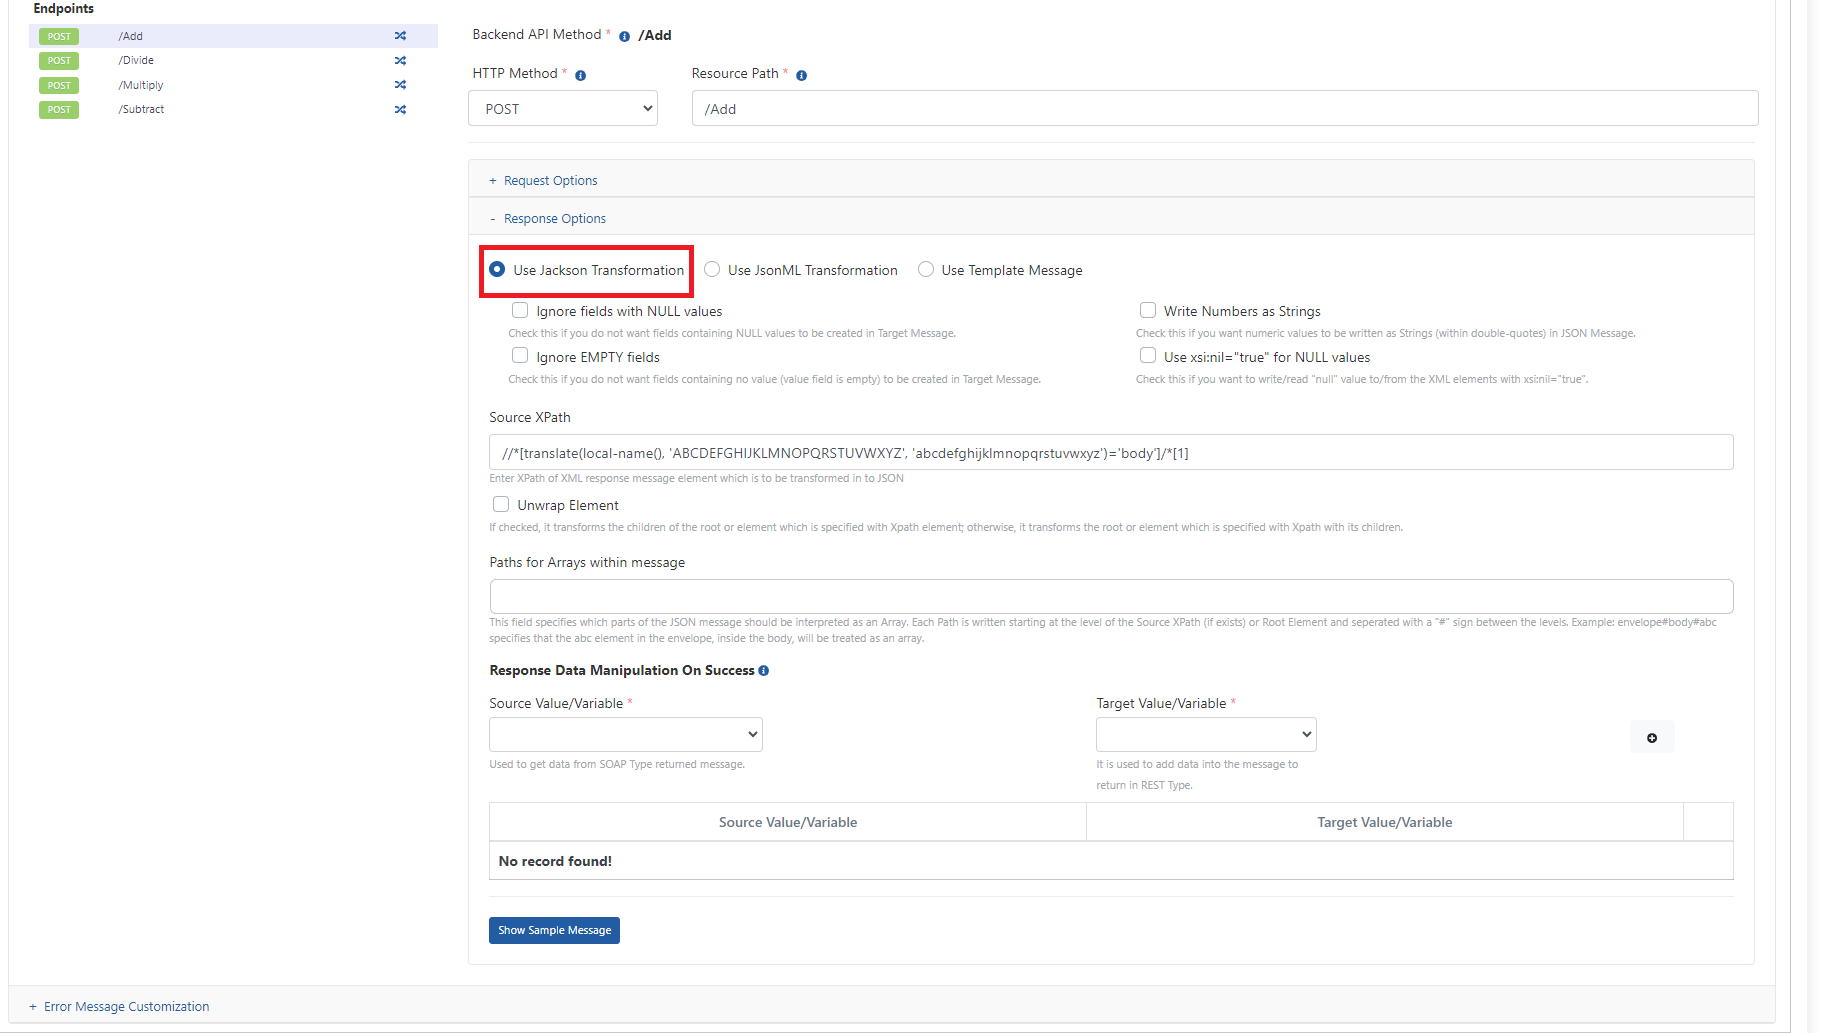
Use Jackson Transformation
| Field | Description |
|---|---|
| Ignore fields with NULL | If marked, NULL values in the JSON message coming in the request are not added as XML Elements to the XML message to be sent to the Backend API. |
| Ignore EMPTY fields | If marked, empty values in the JSON message coming in the request are not added as XML Elements to the XML message to be sent to the Backend API. |
| Use xsi:nil="true" for NULL values | If marked, the xsi:nil="true" attribute is used for NULL values in the JSON message coming in the request in the XML message to be sent to the Backend API. Otherwise, an empty element is added to the XML message for the relevant value. Activating this value ensures that values sent as null in the JSON message are transmitted with the xsi:nil="true" field added when converting to XML. |
| Target XPath | Specifies where the XML obtained after converting the incoming JSON message to XML will be placed in the XML message expected by the SOAP service. |
| Replace Children | If the option is marked, the children of the Target XPath's output element are deleted and the part converted from JSON is added in their place. Otherwise, the element is completely replaced. |
| Paths for Arrays within message | Specifies which parts in the JSON message should be interpreted as arrays. Each Path is written starting from the level of Target XPath (or from the top level if Target XPath is not given) and placing # between levels. Example: The expression "envelope#body#abc" indicates that the "abc" element inside "body" inside "envelope" will be processed as an array. When Array Within Array: When there is an array within an array and some objects sometimes come as array sometimes as singular, it is written starting from the outermost Array's path and when going down to the object below, #* expression must be added after array expressions. For example, if abc element is an array and def element inside it is an array, it should be written as "envelope#body#abc, envelope#body#abc#*#def" in order. |
| Request Data Manipulation | Any part of the original request can be transferred to a specified part of the transformed request. Source Value/Variable specifies which part of the original request message will be transferred, and Target Value/Variable specifies where the part specified by Source Value/Variable will be placed in the transformed message. |
| Show Sample Message | The Request Message created according to the settings can be viewed. |
Transformed Message Example:
| JSON Request Message Expected by API Proxy from Client | XML Request Message Expected by Backend API/Service |
|---|---|
{ "Add": { "intB": "?", "intA": "?" } } | <soap:Envelope xmlns:soap="http://www.w3.org/2003/05/soap-envelope" xmlns:tem="http://tempuri.org/"> <soap:Header/> <soap:Body> <tem:Add> <tem:intA>?</tem:intA> <tem:intB>?</tem:intB> </tem:Add> </soap:Body> </soap:Envelope> |
Use JsonML Transformation
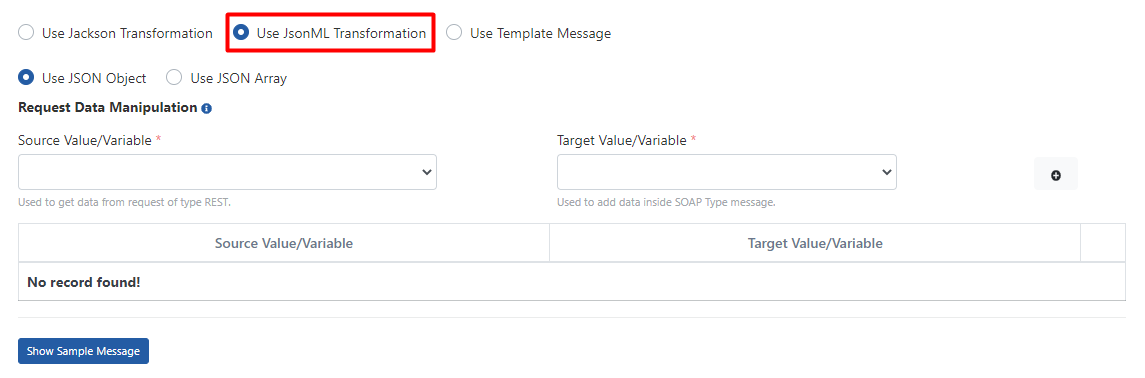
| Field | Description |
|---|---|
| Use JSON Object | Converts XML Elements as JSON Objects. |
| Use JSON Array | Converts XML Elements as JSON Array. |
| Request Data Manipulation | Any part of the original request can be transferred to a specified part of the transformed request. Source Value/Variable specifies which part of the original request message will be transferred, and Target Value/Variable specifies where the part specified by Source Value/Variable will be placed in the transformed message. |
| Show Sample Message | The Request Message created according to the settings can be viewed. |
Transformed Message Example:
| Transformation Type | JSON Request Message Expected by API Proxy from Client | XML Request Message Expected by Backend API/Service |
|---|---|---|
| JSON Object | { "soap:Envelope": { "xmlns:tem": "http://tempuri.org/", "soap:Header": "", "xmlns:soap": "http://www.w3.org/2003/05/soap-envelope", "soap:Body": { "tem:Add": { "tem:intA": "?", "tem:intB": "?" } } } } | <soap:Envelope xmlns:soap="http://www.w3.org/2003/05/soap-envelope" xmlns:tem="http://tempuri.org/"> <soap:Header/> <soap:Body> <tem:Add> <tem:intA>?</tem:intA> <tem:intB>?</tem:intB> </tem:Add> </soap:Body> </soap:Envelope> |
| JSON Array | [ "soap:Envelope", { "xmlns:tem": "http://tempuri.org/", "xmlns:soap": "http://www.w3.org/2003/05/soap-envelope" }, [ "soap:Header" ], [ "soap:Body", [ "tem:Add", [ "tem:intA", "?" ], [ "tem:intB", "?" ] ] ] ] | <soap:Envelope xmlns:soap="http://www.w3.org/2003/05/soap-envelope" xmlns:tem="http://tempuri.org/"> <soap:Header/> <soap:Body> <tem:Add> <tem:intA>?</tem:intA> <tem:intB>?</tem:intB> </tem:Add> </soap:Body> </soap:Envelope> |
Use Template Message
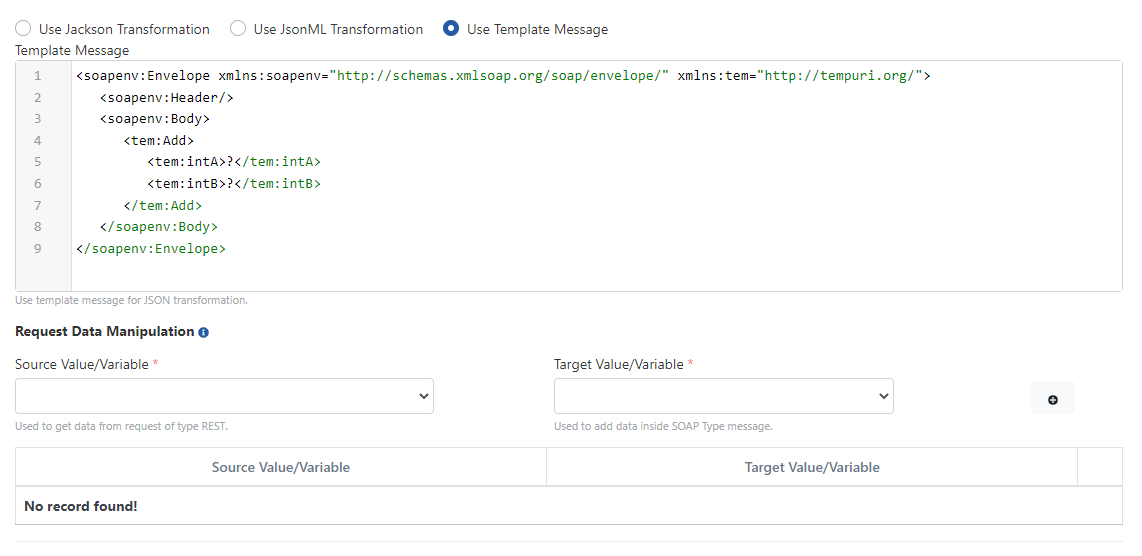
| Field | Description |
|---|---|
| Template Message | XML request message template expected by Backend API/Service |
| Request Data Manipulation | Any part of the original request can be transferred to a specified part of the transformed request. Source Value/Variable specifies which part of the original request message will be transferred, and Target Value/Variable specifies where the part specified by Source Value/Variable will be placed in the transformed message. |
Response Message Transformation Options
This section explains the details of transformation options for response messages.
Use Jackson Transformation
| Field | Description |
|---|---|
| Ignore fields with NULL | If selected, NULL fields in the XML message coming from the Backend API are not added to the JSON message. |
| Ignore EMPTY fields | If selected, NULL fields in the XML message coming from the Backend API are not added to the JSON message as empty values. |
| Write Numbers as Strings | If selected, numeric values are written to the JSON message as strings. |
| Use xsi:nil="true" for NULL values | Ensures that data coming with the xsi:nil="true" attribute in the XML message is transmitted as null when converting to JSON. |
| Source XPath | The XPath of the part of the response message returned as XML that will be converted to JSON is entered. |
| Unwrap Element | If marked, it converts the inside (children) of the element given with Source XPath, if not marked, it converts the element itself (with its contents/children). |
| Paths for Arrays within message | Specifies which parts in the JSON message should be interpreted as arrays. Each Path is written starting from the level of Target XPath (or from the top level if Target XPath is not given) and placing # between levels. Example: The expression "envelope#body#abc" indicates that the "abc" element inside "body" inside "envelope" will be processed as an array. When Array Within Array: When there is an array within an array and some objects sometimes come as array sometimes as singular, it is written starting from the outermost Array's path and when going down to the object below, #* expression must be added after array expressions. For example, if abc element is an array and def element inside it is an array, it should be written as "envelope#body#abc, envelope#body#abc#*#def" in order. |
| Response Data Manipulation on Success | Any part of the original response can be transferred to a specified part of the transformed response. Source Value/Variable specifies which part of the original response message will be transferred, and Target Value/Variable specifies where the part specified by Source Value/Variable will be placed in the transformed message. The defined operations are performed only when the Backend API/Service returns a successful response. |
| Show Sample Message | The Response Message created according to the settings can be viewed. |
Transformed Message Example:
| XML Response Message Returned by Backend API/Service | JSON Response Message Returned by API Proxy to Client |
|---|---|
<?xml version="1.0" encoding="utf-8"?> <soap:Envelope xmlns:soap="http://www.w3.org/2003/05/soap-envelope" xmlns:xsi="http://www.w3.org/2001/XMLSchema-instance" xmlns:xsd="http://www.w3.org/2001/XMLSchema"> <soap:Body> <AddResponse xmlns="http://tempuri.org/"> <AddResult>?</AddResult> </AddResponse> </soap:Body> </soap:Envelope> | { "AddResponse" : { "AddResult" : "?" } } |
Use JsonML Transformation
| Field | Description |
|---|---|
| Use JSON Object | Converts XML Elements as JSON Objects. |
| Use JSON Array | Converts XML Elements as JSON Array. |
| Response Data Manipulation on Success | Any part of the original response can be transferred to a specified part of the transformed response. Source Value/Variable specifies which part of the original response message will be transferred, and Target Value/Variable specifies where the part specified by Source Value/Variable will be placed in the transformed message. The defined operations are performed only when the Backend API/Service returns a successful response. |
| Show Sample Message | The Response Message created according to the settings can be viewed. |
Transformed Message Example:
| Transformation Type | XML Response Message Returned by Backend API/Service | JSON Response Message Returned by API Proxy to Client |
|---|---|---|
| JSON Object | <?xml version="1.0" encoding="utf-8"?> <soap:Envelope xmlns:soap="http://www.w3.org/2003/05/soap-envelope" xmlns:xsi="http://www.w3.org/2001/XMLSchema-instance" xmlns:xsd="http://www.w3.org/2001/XMLSchema"> <soap:Body> <AddResponse xmlns="http://tempuri.org/"> <AddResult>?</AddResult> </AddResponse> </soap:Body> </soap:Envelope> | { "soap:Envelope" : { "xmlns:xsd" : "http://www.w3.org/2001/XMLSchema", "xmlns:soap" : "http://www.w3.org/2003/05/soap-envelope", "xmlns:xsi" : "http://www.w3.org/2001/XMLSchema-instance", "soap:Body" : { "AddResponse" : { "xmlns" : "http://tempuri.org/", "AddResult" : "?" } } } } |
| JSON Array | <?xml version="1.0" encoding="utf-8"?> <soap:Envelope xmlns:soap="http://www.w3.org/2003/05/soap-envelope" xmlns:xsi="http://www.w3.org/2001/XMLSchema-instance" xmlns:xsd="http://www.w3.org/2001/XMLSchema"> <soap:Body> <AddResponse xmlns="http://tempuri.org/"> <AddResult>?</AddResult> </AddResponse> </soap:Body> </soap:Envelope> | [ "soap:Envelope", { "xmlns:xsd": "http://www.w3.org/2001/XMLSchema", "xmlns:soap": "http://www.w3.org/2003/05/soap-envelope", "xmlns:xsi": "http://www.w3.org/2001/XMLSchema-instance" }, [ "soap:Body", [ "AddResponse", { "xmlns": "http://tempuri.org/" }, [ "AddResult", "3" ] ] ] ] |
Use Template Message
| Field | Description |
|---|---|
| Template Message | JSON response message to be returned to the client |
| Response Data Manipulation on Success | Any part of the original response can be transferred to a specified part of the transformed response. Source Value/Variable specifies which part of the original response message will be transferred, and Target Value/Variable specifies where the part specified by Source Value/Variable will be placed in the transformed message. The defined operations are performed only when the Backend API/Service returns a successful response. |