WS-Security Timestamp
This document explains the detailed usage of a specific policy. If you are using Apinizer policies for the first time or want to learn the general working principles of policies, we recommend reading the What is Policy? page first.
Overview
What is its Purpose?
- Applies message time limits and narrows replay attack area by automatically adding WS-Security Timestamp header to SOAP-based requests.
- Ensures that target services mandatorily process the security header by optionally enabling the MustUnderstand flag.
- Provides reusability and centralized management as it can be defined as a global or local policy at API Proxy level.
- Produces consistent notifications about timeout or validation issues by customizing error messages centrally.
Working Principle
- Request Arrival: For each HTTP/HTTPS request arriving at the API Gateway, the source IP address of the request is identified.
- Policy Check: If the WS Security Timestamp policy is active, the system checks in the following order:
- Is a Condition defined? If so, is the condition met?
- Is the policy active (active=true)?
- Is a Variable used or is Apinizer default used?
- WS-Security Timestamp Injection: If Security header does not exist in SOAP envelope, it is created, marked according to mustUnderstand parameter, and Timestamp element is added by applying Time To Live value in seconds.
- Decision Making:
- Match Found: When conditions are met, timestamp header is added or updated; message body is routed to target with new time information.
- No Match: When conditions are not met, SOAP body is not modified and the process moves to the next step in the policy chain.
- Error Handling: Customizable HTTP status code and error message are returned for requests that do not comply with the policy rule.
Features and Capabilities
Basic Features
- Dynamic Validity Period: Can define how many seconds the timestamp will be valid with the Time To Live field; 0 value produces header without time limit; if value is not entered, safe default of 300 seconds is applied.
- MustUnderstand Requirement: Manages the mustUnderstand flag as
1if open,0if closed, to ensure that the SOAP security header is mandatorily processed by the target service. - Automatic Namespace Management: Automatically adds Security header namespace and missing SOAP header components, eliminating manual XML editing needs.
- Active/Passive Status Control: Easily change the active or passive status of the policy (active/passive toggle). In passive state, the policy is not applied but its configuration is preserved.
- Condition-Based Application: Determine when the policy will be applied by creating complex conditions with Query Builder (e.g., only for specific endpoints or header values).
Advanced Features
- Default TTL Fallback Mechanism: Applies safe starting values by automatically fixing negative or empty Time To Live values to 300 seconds.
- Security Header Generation: Creates new header when Security header does not exist in SOAP message, updates mustUnderstand flag if exists, providing unified management.
- Error Management Integration: Catches WSSecurityException or unexpected errors and forwards to Apinizer event management with customizable error codes and message lists.
- Export/Import Feature: Export policy configuration as a ZIP file. Import to different environments (Development, Test, Production). Version control and backup capability.
- Policy Group and Proxy Group Support: Manage multiple policies within Policy Group. Bulk policy assignment to Proxy Groups. Centralized update and deploy operations.
- Deploy and Versioning: Deploy policy changes to live environment. See which API Proxies use it (Policy Usage). Proxy Group and Policy Group usage reports.
Usage Scenarios
| Scenario | Status | Solution (Policy Application) | Expected Behavior / Result |
|---|---|---|---|
| SOAP Service Replay Protection | Partner banking service requires timestamp for replay attack protection. | Time To Live = 120, MustUnderstand = true. | Calls sent within 2 minutes are accepted, expired requests are rejected with customized error message. |
| Internal System Clock Alignment | Internal SOAP services experience slight clock drift and require long-lived tickets. | Time To Live = 0, MustUnderstand = false. | Timestamp is added but time limit is not applied; services process request tolerantly. |
| Regulation Compliance Check | Financial integration expects mustUnderstand="1" in WS-Security header. | MustUnderstand = true, Time To Live = 60. | Passes regulator checks, services ignoring header are warned with error. |
| Multiple WS-Security Chain | WS-Security Signature and Timestamp policies run sequentially in the same flow. | Timestamp policy is positioned before signature policy. | Signature process covers timestamp, security validations are gathered under same header. |
| Development Environment Testing | Integration teams want to validate timestamp-dependent error scenarios in development environment. | Time To Live = 30, MustUnderstand = false, custom error code defined. | Error generation becomes easier with short TTL, test reports are enriched with standard errors. |
| SOAP Gateway Consolidation | Different SOAP services are accessed through single proxy and centralized security header is required. | Active as global policy, condition is added to /payment/* endpoints with Query Builder. | All requests coming to relevant endpoints comply with common timestamp rule, other endpoints are not affected. |
Configuring Policy Parameters
In this step, users can create a new policy or configure existing policy parameters to define access rules. The defined parameters directly affect how the policy works (e.g., which IPs will be allowed, geographical restrictions, conditional activations, etc.). This allows the policy to be customized according to organization-specific requirements and managed centrally.
Creating a New WS Security Timestamp Policy
Configuration Steps
| Step | Description / Operation |
|---|---|
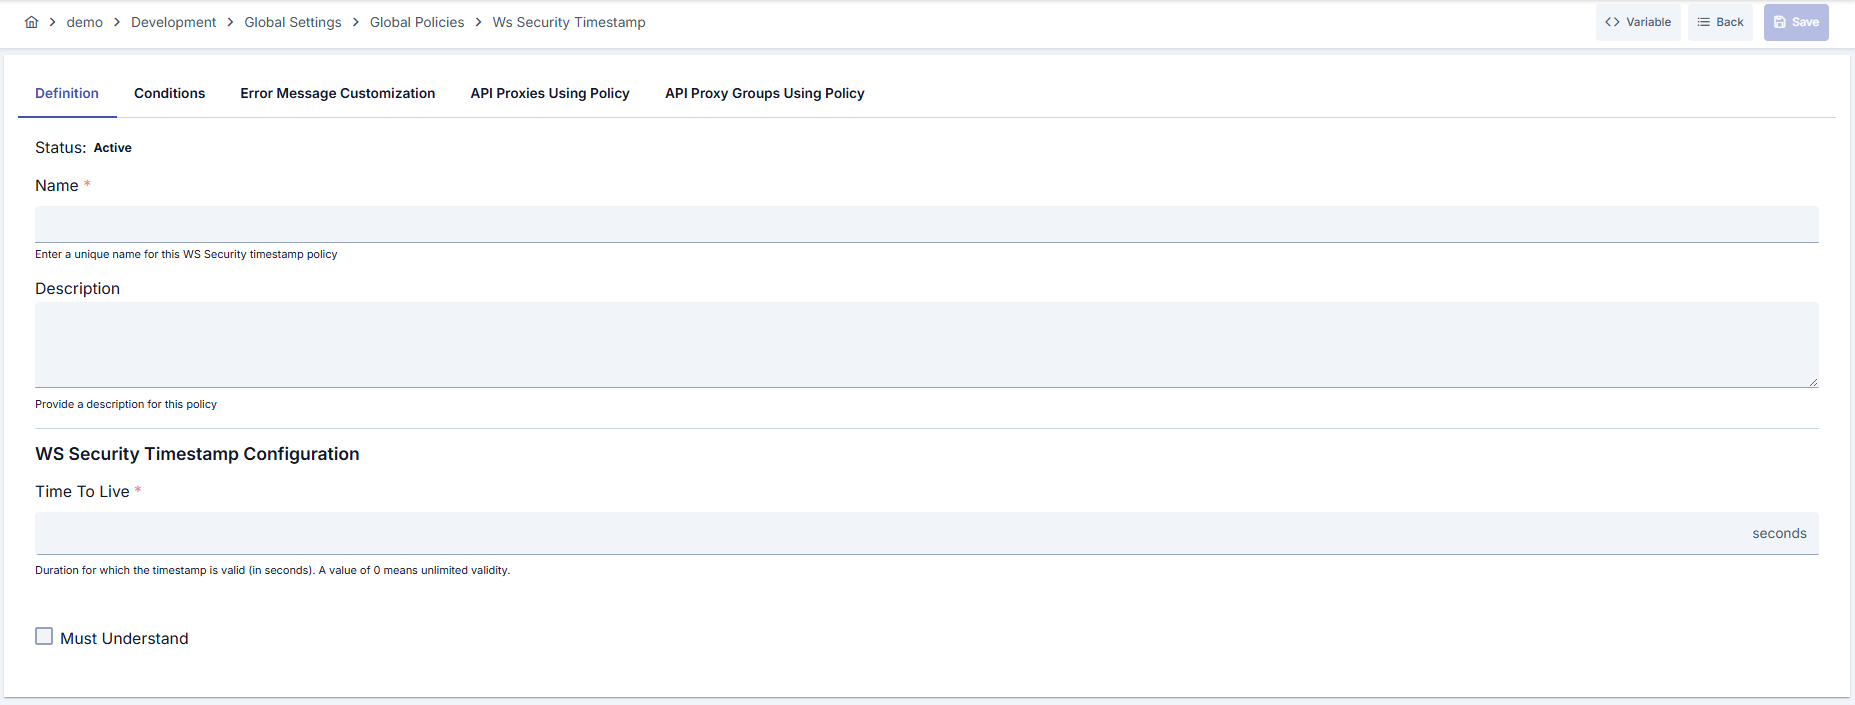
| Step 1: Going to Creation Page | - Go to Development → Global Settings → Global Policies → WS Security Timestamp from the left menu. - Click the [+ Create] button at the top right. |
| Step 2: Entering Basic Information | Policy Status (Policy Status): Shows Active/Passive status. New policies are active by default. Name (Name) Required: Example: Production_WsSecurityTimestamp- Enter a unique name, does not start with space. - System automatically checks. Green checkmark: available. Red X: existing name. Description (Description): Example: "Timestamp required for SOAP requests." - Max. 1000 characters. - Explain the purpose of the policy. |
| Step 3: Variable Usage | - In the action button area at the top of the page, you can use the [<> Variable] button to select dynamic values. - Using context/global variable expressions, you can manage policy parameters with variable-based values instead of fixed values. - This reduces manual update effort when values change and provides operational convenience. - For detailed information, review Dynamic Variables. |
| Step 4: WS-Security Timestamp Parameters | - Time To Live (seconds): Defines the validity period of the timestamp; if left empty, default 300 seconds is applied. - Keep TTL value as low as possible to reduce replay attack risk. - 0 value creates timestamp without time limit; prefer only in environments with strong clock synchronization. |
| Step 5: Must Understand Flag (If applicable) | - When checked, marks SOAP Security header as mustUnderstand="1".- If target service cannot process header, request is rejected; do not enable without verifying that all integrations support this behavior. |
| Step 6: Additional Security Headers (If applicable) | - This policy does not require extra parameters; combine with signing or encryption policies for additional WS-Security needs. - You can layer security by chaining the policy with other WS-Security components when needed. |
| Step 7: Defining Condition (Optional) | - Go to the Condition tab. - Conditions determine when the policy will be active. Examples: - Environment-based: Header = X-Environment, Operator = Equals, Value = production- API Key-based: Header = X-API-Key, Starts With = PROD-- Endpoint-based: Path = /api/admin/*If no condition is defined, the policy is always active For details, see: Conditions |
| Step 8: Error Message Customization (Optional) | - Go to the Error Message Customization tab. - Customize the message to be returned when access is denied. Default: { "statusCode": 403, "message": "[Default error message]" }Custom: { "statusCode": 403, "errorCode": "[CUSTOM_ERROR_CODE]", "message": "[Custom message]" } |
| Step 9: Saving | - Click the [Save] button at the top right. Checklist: Unique name. Required fields filled. At least one WS-Security configuration exists Result: - Policy is added to the list. - Can be connected to APIs. - If global policy, automatically applied. |
For the description of Conditions and Error Message Customization panels, you can review the Conditions and Error Message Customization sections on the What is Policy? page.
For a complete guide on all layers, priority order and scenario examples of the error message configuration system, see the Error Message Configuration Guide page.
Deleting the Policy
For the deletion steps of this policy and the operations to be applied while in use, you can refer to the Removing Policy from Flow section on the Policy Management page.
Exporting/Importing the Policy
For the export and import steps of this policy, you can refer to the Export/Import page.
Connecting the Policy to API
For the process of how this policy will be connected to APIs, you can refer to the Connecting Policy to API section on the Policy Management page.
Advanced Features
| Feature | Description and Steps |
|---|---|
| SOAP Header Consistency Check | - SOAP envelopes are scanned to check if Security header exists. - Header is automatically added if missing. - MustUnderstand value is updated according to policy setting. |
| TTL Fallback Operation | - Negative or empty Time To Live values are detected. - Default 300 seconds value is applied. - Updated value is logged to facilitate error analysis. |
| Error Message Customization Workflow | - Create new template in Error Message tab. - Fill HTTP status code, error code and message fields. - Validate message format with test calls before deploy. |
Best Practices
Things to Do and Best Practices
| Category | Description / Recommendations |
|---|---|
| Time Synchronization | Bad: Leaving TTL high on servers without NTP. Good: Ensuring NTP synchronization between servers. Best: Standardizing TTL ≤ 120 seconds with NTP monitoring alarms. |
| Time To Live Management | Bad: Using 0 value in all environments. Good: Setting high TTL in development/test environment, low TTL in Live Environment. Best: Using policy variants that automatically adjust TTL in 30-120 second range according to risk class. |
| MustUnderstand Usage | Bad: Mandating mustUnderstand in all integrations. Good: Enabling after verifying target service capabilities. Best: Documenting WS-Security compliance of services in contracts and opening mustUnderstand only in confirmed integrations. |
| Error Message Design | Bad: Leaving default 500 error as is. Good: Customizing error code and adding explanatory message. Best: Creating detailed error templates in JSON structure integrated with monitoring tools. |
| Policy Distribution Order | Bad: Running Timestamp policy after signing or encryption policies. Good: Positioning security policy before signature. Best: Standardizing policy flow and automatically enforcing same order in all proxies. |
Security Best Practices
| Security Area | Description / Warnings |
|---|---|
| Time Source Management | Use reliable NTP sources on all gateway and backend servers; time drift invalidates timestamp validation. |
| Multi-Layer WS-Security | Strengthen message integrity by using Timestamp policy together with signing and encryption policies. |
| Error Message Hygiene | Do not share internal system details in error messages; only add codes necessary for tracking. |
| Condition-Based Activation | Reduce unnecessary load by defining conditions that will be active only on endpoints requiring WS-Security. |
| Version Control | Version policy changes by exporting and test before moving to Live Environment. |
Things to Avoid
| Category | Description / Warnings |
|---|---|
| Keeping TTL Too High | Why avoid: Long validity periods increase replay attack risk. Alternative: Keep TTL between 30-300 seconds according to risk level. |
| Blindly Opening MustUnderstand | Why avoid: Incompatible services may reject request. Alternative: Enable after compatibility verification. |
| Not Defining Condition | Why avoid: Creates additional load on all unnecessary requests. Alternative: Define endpoint or header-based conditions. |
| Leaving Error Message Default | Why avoid: Troubleshooting becomes difficult. Alternative: Enter traceable error codes and human-readable descriptions. |
Performance Tips
| Criterion | Recommendation / Impact |
|---|---|
| Time To Live Value | Recommendation: Shorten TTL according to need. Impact: Less XML manipulation and less time-based cache load. |
| Condition Usage | Recommendation: Target only necessary endpoints with Query Builder. Impact: Policy does not run on unnecessary SOAP messages, saves CPU. |
| Policy Ordering | Recommendation: Place Timestamp before signing policies. Impact: Signature process is done once, repeat processing cost decreases. |
| Error Templates | Recommendation: Use lightweight JSON error templates. Impact: Smaller payload is transmitted over network. |
| Monitoring Integration | Recommendation: Collect policy logs with centralized monitoring. Impact: It becomes possible to optimize TTL settings immediately when issues occur. |
Frequently Asked Questions (FAQ)
| Category | Question | Answer |
|---|---|---|
| General | What happens if Time To Live value is left empty? | If value is not entered, policy automatically applies safe default of 300 seconds and this information is displayed on detail screen. |
| General | Is 0 value really unlimited? | When 0 is entered, timestamp is added but time limit is not applied; recommended in environments with strong clock synchronization, otherwise select time-limited value. |
| Technical | I get error when MustUnderstand is open, why? | If target service cannot process WS-Security header, it rejects request; request mustUnderstand support from integration team or close flag. |
| Technical | Can I use the policy on REST endpoints? | Policy works on SOAP envelope; has no effect on REST JSON requests, therefore enable only on SOAP-based endpoints. |
| Usage | Is it possible to convert global policy to local? | You can create local copy from global policy with [Localize] button on detail screen, make API-based adjustments. |
| Usage | How do I customize error messages? | Edit status code, error code and message fields from Error Message Customization tab on Update page and save new template. |