JOSE Application Policy
This document explains the detailed usage of a specific policy. If you are using Apinizer policies for the first time or want to learn the general working principles of policies, we recommend reading the What is Policy? page first.
Overview
What is its Purpose?
- Simplifies consumer integrations by repackaging API Proxy response or request as JWT in JOSE standards-compliant format.
- Secures claim data carried between application services with signature and encryption layers.
- Ensures centralized and auditable key management by working integrated with JWK vault.
- Dynamically triggered in specific endpoint, header, or environment combinations with condition engine support.
- Manages organization-specific token enrichments without code changes through additional claim map and data manipulation targets.
Working Principle
- Request Arrival: For each HTTP/HTTPS request arriving at the API Gateway, the source IP address of the request is identified.
- Policy Check: If the JOSE Application policy is active, the system checks in the following order:
- Is a Condition defined? If so, is the condition met?
- Is the policy active (active=true)?
- Is a Variable being used or is Apinizer default?
- Token Generation and Security Layer: After target field is determined, claim set is collected, additional claim map is added, signing and optional encryption is applied according to JWK selection.
- Decision Making:
- Match Found: Generated JWT is written to specified target (body, Authorization header, variable, or empty) and traffic continues.
- No Match: Policy remains disabled, request is transmitted with original content.
- Error Handling: Customizable HTTP status code and error message are returned for requests that do not comply with the policy rule.
Features and Capabilities
Basic Features
- Flexible JOSE Target: Token output can be set to body (Body), Authorization header (Authorization Header), selected variable (Choose from Variable), or empty target (Empty); facilitates response manipulations.
- JWT Claims Claim and Escape JSON String: When target is not EMPTY, which claim name the raw data is written to in the payload (jwtClaimsClaim) and whether the JSON string is escaped (escapeJsonString) can be configured.
- Ready Claim Keys: Core claim fields such as Issuer, Subject, Audience, Expiration, Issue Time, JWT ID and Type (add type to header) are managed with key/lock combinations.
- Additional Claim Map: Text, list, or numeric claims can be added and edited from the interface with type-controlled MapValue support.
- Active/Passive Status Control: Easily change the active or passive status of the policy (active/passive toggle). In passive mode, the policy is not applied but its configuration is preserved.
- Condition-Based Application: Determine when the policy will be applied by creating complex conditions with Query Builder (e.g., only for specific endpoints or header values).
Advanced Features
- Key Source Mode: Key for signature and encryption can be Embedded (JWK from Secret Manager) or Dynamic HTTP (remote key fetch via HTTP request).
- Dynamic Key Fetching: When Dynamic HTTP is selected, HTTP request (Test Console), Key Extraction Variable, Key Format (AUTO_DETECT, PUBLIC_KEY, PRIVATE_KEY, CERTIFICATE, JWK_JSON), Key Algorithm, Kid (optional), cache settings (Apply By variable, Capacity, TTL, Cache Storage Type, Respect Cache Invalidation Headers, Connection Timeout, Error Handling Type), Retry on Key Error, Invalidate Cache on Validation Error and Try It (Parse Response) button can be used for testing. Use Settings and Configure for secure connection options (Test Console).
- JWK Management Integration: In Embedded mode, JWK search, selection, update and new key generation through Secret Manager is done with single click.
- Dual-Layer Security: Token integrity and confidentiality are simultaneously ensured by applying signature and encryption combination in the same request.
- Data Manipulation Synchronization: For generated JWT/JWE, Injection Target (encoded claims target) and variable assignment for decoded claims (decoded claims target variable) enable data sharing between chain policies.
- Export/Import Feature: Export policy configuration as a ZIP file. Import to different environments (Development, Test, Production). Version control and backup capability.
- Policy Group and Proxy Group Support: Manage multiple policies within Policy Group. Bulk policy assignment to Proxy Groups. Centralized update and deploy operations.
- Deploy and Versioning: Deploy policy changes to live environment. See which API Proxies use it (Policy Usage). Proxy Group and Policy Group usage reports.
Usage Scenarios
| Scenario | Status | Solution (Policy Application) | Expected Behavior / Result |
|---|---|---|---|
| Converting Microservice Response to JWT | Service returns plain text JSON, consumer expects JWT | joseTarget=Body, ready claims active, signature open | Response returns in JWT format, consumer does not do additional work |
| Carrying JWT via Header | Mobile client wants signed token in Authorization header | joseTarget=Authorization Header, addTypeToHeader=true, typeValue=JWT | Token is added as Authorization: JWT <token> |
| Multiple Audience Management | Same API transmits token to different target systems | addAudience=true, multiple values added to audience list | Token contains multiple values in aud claim |
| Signing with Internal System Key | Token signed by issuer side is preferred | sign=true, signByIssuer=true is selected | Gateway does not require signature key, issuer signature is preserved |
| Dual-Layer Security | External integration requires signature+encryption combination | sign=true, encrypt=true, appropriate JWKs or Dynamic HTTP selected | Token is first signed then encrypted with selected method |
| Data Manipulation Chain | Next policy needs decoded claims | Set token write target with encodedClaimsTargetForDataManipulation, assign variable for decoded claims | Decoded claims are stored in the defined variable |
| Remote Key Signing/Encryption | Key will be fetched from an HTTP endpoint | Key Source Mode = Dynamic HTTP, define HTTP Request and Key Extraction Variable, test with Try It | Key is fetched remotely at runtime and can be cached |
Configuring Policy Parameters
In this step, users can create a new policy or configure existing policy parameters to define access rules. The defined parameters directly affect how the policy works (e.g., which target to write token to, conditional activations, signature/encryption source, etc.). This allows the policy to be customized according to organization-specific requirements while being centrally manageable.
Creating a New JOSE Application Policy
Configuration Steps
| Step | Description / Operation |
|---|---|
| Step 1: Go to Creation Page | - Go to Development → Global Settings → Global Policies → JOSE Application Policy from the left menu. - Click the [+ Create] button at the top right. |
| Step 2: Enter Basic Information (Definition tab) | Policy Status: Read-only; shows Active or Passive status. New policies are active by default. Can be changed via toggle. Name (Required): Example: Production_JOSE. Enter a unique name; must not start with space; max 255 characters. System checks automatically: green checkmark = available, red X = existing name.Description: Example: "Converts output body to signed JWT". Max 1000 characters; describes the purpose of the policy. |
| Step 3: Variable Usage | - In the action button area at the top of the page, you can use the [<> Variable] button to select dynamic values. - Using context/global variable expressions, you can manage policy parameters with variable-based values instead of fixed values. - This reduces manual update effort when values change and provides operational convenience. - For detailed information, review Dynamic Variables. |
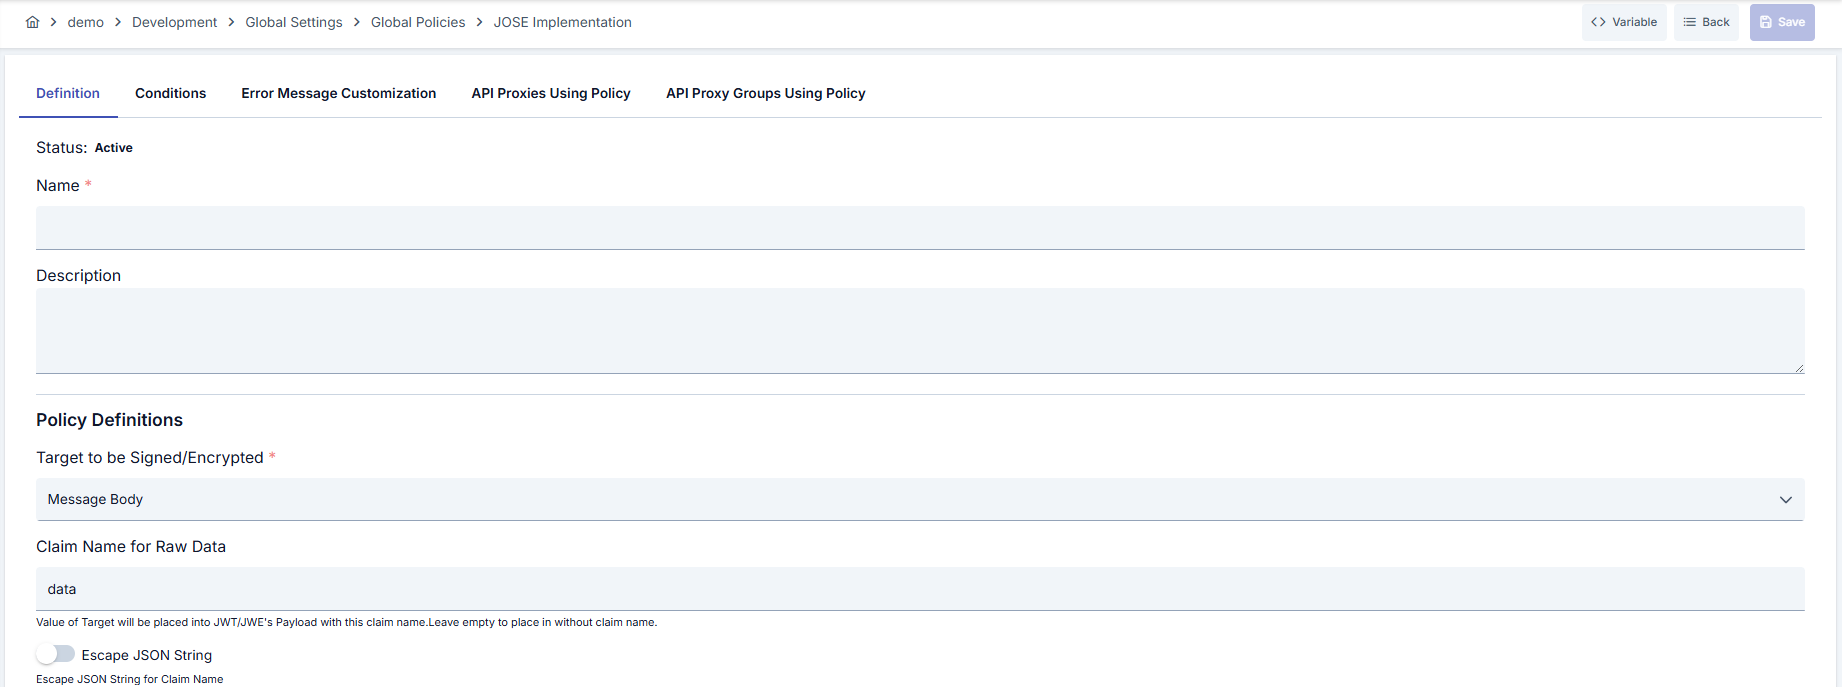
| Step 4: Policy Configuration | JOSE Target (Target for Signing/Encryption) — Required: Determines where the generated JWT/JWE is written. Body = request/response body, Authorization Header = Authorization header, Choose from Variable = a project variable, Empty = token is produced but not written to a target (usable as intermediate data in chain policies). Select according to where the consumer expects the token; e.g. if the REST response should carry it in the body choose Body, if a mobile client expects it in the header choose Authorization Header. When the policy runs, the token is written to the selected target; with Empty only signing/encryption is performed and output is not written.JOSE Target Variable — Conditional (only when Target = Choose from Variable): Points to the project variable where the generated token is written; at runtime the policy writes the token to this variable. Use Select Variable to assign; use Update to edit the variable definition. Subsequent policies or the flow can read the token from this variable; often used in data manipulation chains. JWT Claims Claim (Claim name for raw data) — Conditional (when JOSE Target ≠ Empty): Defines which claim name the current request/response body (raw data) is written under in the JWT payload; default data. To carry the whole body in a single claim use e.g. data or payload; leave empty to have raw data reflected directly in the payload structure. The consumer sees this claim name when decoding the token.Escape JSON String (Use JSON string as string) — Conditional (when JOSE Target ≠ Empty): When raw data is a JSON string, controls whether it is written as a string claim or as an object in the JWT. When on, JSON is escaped and written as a single string claim; when off it can be parsed and written as object/array. |
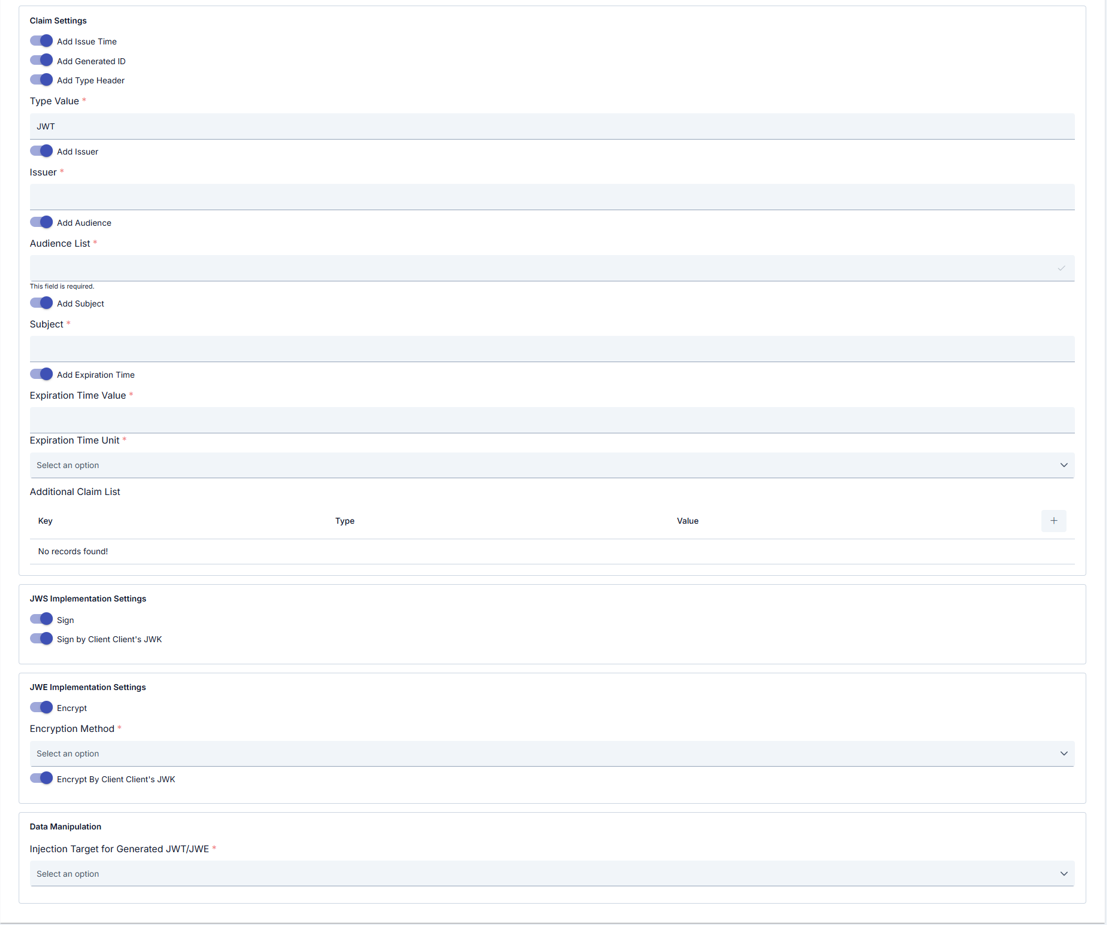
| Step 5: Claim Settings (Claim Settings panel) | Add Issue Time: Adds iat (issued at) claim to the token. The consumer can use it to check token age and validity.Add JWT ID: Adds a unique jti (JWT ID) claim. The token can be identified for replay or revocation lists.Add Type to Header: Adds type information to the JWT header. The consumer can read the token type from the header. Type Value — Conditional, required (only when Add Type to Header is on): Value written to the header (e.g. JWT or JWE).Add Issuer: Adds iss (issuer) claim to the token. Used for verification and key matching on the consumer side.Issuer — Conditional, required (only when Add Issuer is on): Issuer value; usually a URL or service name. E.g. https://api.your-domain.com.Add Audience: Adds aud (audience) claim to the token. The consumer checks whether its identifier is in the list.Audience List — Conditional, required (only when Add Audience is on): List of values written to the aud claim; multiple audiences can be added. Type a value and confirm to add as a chip; at least one value required.Add Subject: Adds sub (subject) claim to the token. Used for authorization and identity mapping.Subject — Conditional, required (only when Add Subject is on): Subject value (e.g. user ID, service name). Add Expiration Time: Adds exp (expiration) claim to the token. After that time the token is considered invalid.Expiration Time Value + Expiration Time Unit — Conditional, required (only when Add Expiration Time is on): Defines validity duration as number + unit (second, minute, hour). E.g. 60 + MINUTE. Additional Claim Map: Lets you add custom claims as key–type–value. Add a row with +; set Key = claim name, Value Type = STRING/NUMBER/BOOLEAN etc., Value = value. These claims appear in the token payload. |
| Step 6: Signature Configuration — JWS Application (Signature panel) | Sign: Toggle; enables/disables token signature. Sign by Issuer: Toggle; signature is provided by issuer. The following fields are visible only when Sign is on and Sign by Issuer is off: Key Source Mode — Required: Embedded or Dynamic HTTP. — If Embedded: JWK for Digital Signing (jwkIdForValidationAndSign) — Required: Dropdown (signature JWKs from Secret Manager), Clear and New buttons. Selected JWK is shown in table (Name, Description, Type, Algorithm); click row to edit/detail. — If Dynamic HTTP: The key is fetched remotely via the HTTP request defined in the policy. How Dynamic HTTP works: (1) Request: HTTP request is sent with the URL, method, header and optional body entered in Test Console (URL required before save). (2) Response handling: The response body is processed with the expression defined in Key Extraction Variable (e.g. JSONPath); a single key/certificate/JWK fragment is extracted. (3) Key usage: The extracted data is parsed according to Key Format and Key Algorithm and used for signing. (4) Cache (optional): When Enable Cache is on, the value of the variable selected in Apply By (e.g. issuer) is used as the cache key; the key is not requested again for the same value, subject to TTL and Capacity. Current keys can be fetched at runtime from JWKS or similar endpoints. • HTTP Request Configuration (httpRequest): Test Console; service URL and request (method, header, body, etc.). Required; URL must be filled before save. • Key Extraction Variable — Required: Project variable that defines where to extract the key from the HTTP response; it holds an expression (e.g. JSONPath $.keys[0]) pointing to the key field in the response body. At runtime the response is processed with this expression and the result is used as the signing key.• Key Format — Required: Response format: Auto-detect, Public Key, Private Key, Certificate, JWK JSON. Can be auto-detected with NONE + Parse Response (Try It). • Key Algorithm — Required: Algorithm list (e.g. NONE, RS256, ES256). Can be auto-assigned via Parse Response. • Kid (Key ID) — Optional: When the JWKS or response has multiple keys, specifies which one to use. When the same endpoint returns multiple keys (e.g. rotation), the correct key is selected. • Enable Cache: Toggle; when on, cache fields below are visible and required: Apply By (which value to key the cache by, e.g. issuer variable; same value does not trigger a new key fetch; separate cache entry per issuer/environment), Capacity, TTL, Cache Storage Type, Respect Cache Invalidation Headers, Cache Connection Timeout, Cache Error Handling Type. • Retry on Key Error, Invalidate Cache on Validation Error (visible when cache is on). • Parse Response (Try It): Lets you test the Dynamic HTTP key configuration without saving. (1) Fill HTTP Request Configuration (URL, method, header/body), Key Extraction Variable, Key Format, Key Algorithm (and optional Kid). (2) Click Parse Response; the system sends the request, receives the response, and extracts and parses the key. (3) A result dialog opens: on success Detected Key Format and Detected Algorithm can be written to the policy fields (when Key Format = Auto-detect or Key Algorithm = NONE); on error Error Details and HTTP status are shown. Interpreting results: Success = request succeeded, key was extracted and parsed; you can save if Detected Key Format / Detected Algorithm are shown. Error = request failed, timeout, or key could not be extracted; check Error Details and HTTP Response Status (URL/access, Key Extraction Variable path, Key Format/Algorithm match). Extracted Key String / Key Info = raw key and detected type; use to verify the correct key was fetched; ensure sensitive data is not logged in production. Settings tab (Dynamic HTTP request): On the Settings tab you see timeout and secure connection summary; use Configure for TrustStore, KeyStore, optional PEM certificate, TLS protocols, and hostname verifier. See Test Console — Settings for details. |
| Step 7: Encryption Configuration — JWE Application (Encrypt panel) | Encrypt: Toggle. Encryption Method — Conditional, required: Visible only when Encrypt is on; select from encryption method list. Encrypt by Issuer: Toggle; encryption is done by issuer. The following fields are visible only when Encrypt is on and Encrypt by Issuer is off: Key Source Mode — Required: Embedded or Dynamic HTTP. — If Embedded: JWK for Encryption (jwkIdForDecryptionAndEncryption) — Required: Dropdown (encryption JWKs from Secret Manager), Clear and New buttons. Selected JWK is shown in table. — If Dynamic HTTP: Same logic as Step 5: HTTP Request Configuration (URL required), Key Extraction Variable, Key Format, Key Algorithm, Kid, Enable Cache and Apply By. How Dynamic HTTP works (request, response handling, key usage, cache) and how to use Parse Response (Try It) and interpret test results are as described in Step 5; the same fields and flow apply in the encryption panel. Settings tab (Dynamic HTTP request): Configure secure connection from the Settings tab; see the Settings description in Step 6 (Signature panel). |
| Step 8: Data Manipulation (Data Manipulation panel) | Encoded Claims Target for Data Manipulation (Injection Target for generated JWT/JWE) — Required: Where the generated token (JWT/JWE) is written: Body, Authorization Header, or Choose from Variable. Choose based on where the next policy or backend will read the token. The token is written to this target; if Choose from Variable it is written to the project variable and other policies can use it. Decoded Claims Target Variable — Conditional, required (only when Injection Target = Choose from Variable): Project variable where decoded claims are written. After the token is decoded, the payload is stored in this variable; other policies in the chain can use the same variable as source. Assign with Select Variable / Change / Remove and Update buttons. |
| Step 9: Define Condition (Condition tab) — Optional | Go to Condition tab. Define condition rules with Query Builder; determines when the policy is active. Examples: Environment-based Header = X-Environment, Equals, production; API Key Header = X-API-Key, Starts With = PROD-; Endpoint Path = /api/admin/*. If no condition is defined, policy is always applied. |
| Step 10: Error Message Customization (Error Message Customization tab) — Optional | Go to Error Message Customization tab. Customize HTTP status code and message to return when access is denied. Default: { "statusCode": 403, "message": "[Default error message]" }. Custom: { "statusCode": 403, "errorCode": "[CUSTOM_ERROR_CODE]", "message": "[Custom message]" }. |
| Step 11: Save | Click the [Save] button at the top right. Checklist: Unique name; JOSE Target and (if Choose from Variable) JOSE Target Variable; if Add Type to Header then Type Value; if Add Issuer then Issuer; if Add Audience then at least one Audience; if Add Subject then Subject; if Add Expiration Time then Expiration Time Value + Unit; if Sign is on and Sign by Issuer is off then per Key Source Mode Embedded with JWK selected or Dynamic HTTP with URL + Key Extraction Variable + Key Format (+ if cache on: Apply By, Capacity, TTL etc.); if Encrypt is on then Encryption Method and (if Encrypt by Issuer off) same JWK/Dynamic HTTP rules; Encoded Claims Target; if Choose from Variable then Decoded Claims Target Variable. Result: Policy is added to list; can be connected to APIs; if global policy, automatically applied. |
Tabs (besides Definition): Definition, Condition, Error Message Customization; in page mode API Proxies Using Policy and API Proxy Groups Using Policy tabs are also visible.
For descriptions of Conditions and Error Message Customization panels, you can review the Conditions and Error Message Customization sections on the What is Policy? page.
For a complete guide on all layers, priority order and scenario examples of the error message configuration system, see the Error Message Configuration Guide page.
Deleting the Policy
For deletion steps of this policy and operations to be applied when in use, you can refer to the Removing Policy from Flow section on the Policy Management page.
Exporting/Importing the Policy
For export (Export) and import (Import) steps of this policy, you can refer to the Export/Import page.
Connecting the Policy to API
For the process of how this policy will be connected to APIs, you can refer to the Connect Policy to API section on the Policy Management page.
Advanced Features
| Feature | Description and Steps |
|---|---|
| Dynamic Claim Mapping | - Press + from Additional Claim Map table.- Select claim key and appropriate valueType.- Fill value and save; change is immediately reflected in list. |
| Embedded JWK Signing/Encryption | - In signature or encryption panel, when Key Source Mode = Embedded, open the relevant JWK selector. - Select existing key or go to Secret Manager with New. - Policy form is automatically updated when current JWK is saved. |
| Dynamic HTTP Key Fetching | - Select Key Source Mode = Dynamic HTTP. - Define service URL and request in HTTP Request field with Test Console. - Under Settings, use Configure for secure connection (same as Test Console). - Configure Key Extraction Variable (required), Key Format, Key Algorithm; if enabling cache fill Apply By variable, Capacity, TTL and other cache fields. - Test with Parse Response (Try It); on success, detected format/algorithm can be auto-assigned. |
| Token Chain Manipulation | - From Injection Target for generated JWT/JWE, select target where token will be written (Body, Authorization Header, or Choose from Variable). - If Choose from Variable, define Target variable for decoded claims to pass decoded data to another policy. - Complete data flow by using the same variable as source in the relevant second policy. |
Best Practices
Things to Do and Best Practices
| Category | Description / Recommendations |
|---|---|
| Claim Design | Bad: Adding all unnecessary fields as claims. Good: Defining only functional claims. Best: Maintaining minimal but sufficient set with regular claim audits. |
| JWK and Dynamic Key Management | Bad: Continuing to use expired keys or incorrect Dynamic HTTP URL. Good: Performing Embedded JWK rotation at intervals; for Dynamic HTTP, test with Try It and use cache. Best: Reliable key supply via automatic rotation through Secret Manager (Embedded) or cache + retry/invalidate settings (Dynamic HTTP). |
| Signature and Encryption Combination | Bad: Unnecessarily adding both signature and encryption to same token. Good: Being satisfied with only one according to security requirements. Best: Ensuring full security by applying signature first then encryption on sensitive data. |
| Data Manipulation | Bad: Writing decoded data to variables with empty names. Good: Using meaningful variable names. Best: Documenting data flow between policies and determining standard names. |
| Error Message Strategy | Bad: Leaving default error message in all environments. Good: Preparing environment-based custom messages. Best: Including reference codes in error messages for traceability. |
Security Best Practices
| Security Area | Description / Warnings |
|---|---|
| Key Storage | Keep JWKs only within Secret Manager in Embedded mode; for Dynamic HTTP, endpoint security and cache access restrictions are important. |
| Token Lifetime | Keep Expiration values short, establish Sliding or Refresh token mechanisms. |
| Issuer and Audience Accuracy | Determine issuer and audienceList values according to corporate naming standard and update in revisions. |
| Additional Claim Hygiene | Make encryption mandatory if personal data exists in additional claims and apply data minimization. |
| Signature Key Authorities | Limit JWK editing authority to ROLE_API_SECURITY, track audit logs. |
Things to Avoid
| Category | Description / Warnings |
|---|---|
| Inconsistent Claim Structure | Why to avoid: Claims outside schema cause parse errors on consumer side. Alternative: Deploy claim changes in version-controlled manner. |
| Wrong JWK or Dynamic Key Mapping | Why to avoid: Selecting missing or different-algorithm JWK/format breaks token verification. Alternative: Use filtered JWK list for the algorithm (Embedded) or correct Key Format/Algorithm and Try It (Dynamic HTTP). |
| Infinite Token Duration | Why to avoid: Token revocation is not possible in case of security breach. Alternative: Design short-term tokens and revocation list. |
| Target Field Incompatibility | Why to avoid: Token written to header instead of response body may not be consumed. Alternative: Clarify target field according to integration documentation. |
Performance Tips
| Criterion | Recommendation / Impact |
|---|---|
| Token Size | Remove unnecessary claims and keep JSON in minimal format. Transmission time and bandwidth decrease. |
| Encryption Method | Prefer algorithms with hardware support (e.g. A256GCM). CPU usage decreases, latency drops. |
| Additional Claim Count | Define only necessary claims in MapValue table. Token size decreases, verification time shortens. |
| Condition Engine | Avoid unnecessary nested conditions in Query Builder. Policy evaluation process speeds up. |
| Embedded JWK Lookup | Activate Secret Manager options that cache frequently used JWKs. I/O delays decrease during signing/encryption. |
| Dynamic HTTP Cache | Keep Enable Cache on with appropriate Capacity and TTL so remote key is not fetched repeatedly. Latency and external service load decrease. |
Frequently Asked Questions (FAQ)
| Category | Question | Answer |
|---|---|---|
| General | When is JOSE Application Policy used? | Used in integrations requiring token generation, claim management, and secure transmission; especially effective in scenarios where consumer expects JWT. |
| General | Is it mandatory to open both signature and encryption simultaneously? | No, only signature or only encryption can be used according to requirements; both together are recommended for sensitive data. |
| Technical | How is JWK selection done? | When Key Source Mode = Embedded, Secret Manager JWK list is opened; key matching appropriate algorithm and purpose is selected or new key is created. |
| Technical | How is key used with Dynamic HTTP? | Select Key Source Mode = Dynamic HTTP; configure HTTP Request (Test Console) with URL and request, Key Extraction Variable (required), Key Format and Key Algorithm. Optional cache and Try It (Parse Response) for testing. |
| Technical | What happens when variable is selected as target? | When JOSE Target = Choose from Variable, the policy writes the token to the specified project variable; other policies or backend can read this variable. |
| Usage | How are values added to audience list? | Activate Add Audience, type value in the input box and confirm; each value is listed as a chip. |
| Usage | When is Type Value required? | When Add Type to Header is on, the type value to add to header (e.g. JWT) is required. |
| Usage | Do I have to customize error message? | Not mandatory; however, customization can be done in Error Message tab if directive information is needed for consumer side. |