JOSE Verification
This document explains the detailed usage of a specific policy. If you are using Apinizer policies for the first time or want to learn the general working principles of policies, we recommend reading the What is Policy? page first.
Overview
What is its Purpose?
- Designed to ensure reliability of identity information by verifying JOSE/JWT tokens entering the API Proxy flow.
- Prevents unauthorized access and protects sensitive endpoints by enforcing specified issuer, audience, and claim rules.
- Provides clean data transfer to downstream services by securely decrypting encrypted JWE contents.
- Works integrated with centralized authorization policies in downstream services by broadcasting identity and role information at header level.
Working Principle
- Request Arrival: For each HTTP/HTTPS request arriving at the API Gateway, the source IP address of the request is identified.
- Policy Check: If the JOSE Verification policy is active, the system checks in the following order:
- Is a Condition defined? If so, is the condition met?
- Is the policy active (active=true)?
- Is a Variable being used or is Apinizer default?
- JOSE Content Resolution: Token is read from specified source (body, Authorization header, or variable); if needed, decryption is performed with selected JWK and claim set is prepared for verification.
- Decision Making:
- Match Found: If signature/encryption is valid, claim and audience rules are met, and issuer ACL is approved, request continues in flow, user information is added to header if needed.
- No Match: If token cannot be resolved, signature cannot be verified, claim rules are violated, or ACL rejection occurs, request is terminated by policy.
- Error Handling: Customizable HTTP status code and error message are returned for requests that do not comply with the policy rule.
Behavior change when ACL is off. Before, a request validated with ACL off was not marked as authenticated, Limit Plans were not applied, and the credential's expiry and IP list were not checked. Now the same identity rules as the other authentication policies apply: the credential must exist and be enabled, its organization and parent organizations must be active, its validity period and contracts must not have ended, and the client IP must be in the credential's IP list when Validate Client Address is on. Requests from other IPs, expired credentials and ended contracts are rejected. The request is marked as authenticated, Limit Plans apply, and the resolved identity is written to the traffic log. This applies only when the issuer is a credential: ACL on, or ACL off with decrypt-by-issuer or validate-by-issuer. Only the credential's access row for this API Proxy or Proxy Group (and API Client subscription grants) is skipped. The IP check, identity and authorization fields are no longer hidden when ACL is off. See Identity-Only Mode (ACL Off).
Features and Capabilities
Basic Features
- Flexible JOSE Target: Token can be read from body (Body), Authorization header (Authorization Header), or selected variable (Choose from Variable); in variable scenarios it is assigned with variable selector.
- Client Source: Source where issuer/client information is read: Header, Claims, or Variable. If Variable, Client Source Variable is required; otherwise Client Fieldname (JSON Path or claim name, e.g.
iss) is required. - Granular Claim Verification: Accepted audience list, Exact Match Claim (key-type-value), Required Claim and Prohibited Claim lists enable multi-layer verification.
- Identity and Role Broadcasting: User identity extracted from request can be added to header via Add User to Header (User Header Name required); supports centralized authorization control.
- Active/Passive Status Control: Easily change the active or passive status of the policy (active/passive toggle). In passive mode, the policy is not applied but its configuration is preserved.
- Condition-Based Application: Determine when the policy will be applied by creating complex conditions with Query Builder (e.g., only for specific endpoints or header values).
Advanced Features
- Key Source Mode: Key for signature verification and decryption can be Embedded (JWK from Secret Manager) or Dynamic HTTP (remote key fetch via HTTP request).
- Dynamic Key Fetching: When Dynamic HTTP is selected, HTTP Request Configuration (Test Console), Key Extraction Variable, Key Format, Key Algorithm, Kid, cache settings (Apply By, Capacity, TTL, Cache Storage Type, Respect Cache Invalidation Headers, Connection Timeout, Cache Error Handling Type), Retry on Key Error, Invalidate Cache on Validation Error and Parse Response (Try It) button can be used for testing. On the same HTTP request, open Settings to enable secure connection and use Configure for mTLS/SSL options; field behavior matches Test Console.
- JWK Lifecycle Management: In Embedded mode, signature and encryption keys are selected via Secret Manager or new key is created; necessary roles can define new keys.
- Issuer ACL and IP Control: Validate ACL for Issuer for issuer-based allow list; Check Client IP Address for client IP verification of the request maker (visible when policy list type is Request, regardless of the Validate ACL for Issuer setting).
- Claim Decode and Rewrite: Strip and Decode (None, All, Partial) isolates and decodes JWT/JWE payload; if Partial, JWT Claims to Decode (jwtClaimsToDecode) is required. Decoded Claims Target (Body, Authorization Header, Choose from Variable) and optionally Decoded Claims Target Variable direct the output.
- Authorization Configuration: When policy list type is Request and policy is not global, Authorization Configuration component is visible, whether Validate ACL for Issuer is on or off; role-based access and method access are configured.
- Export/Import Feature: Export policy configuration as a ZIP file. Import to different environments (Development, Test, Production). Version control and backup capability.
- Policy Group and Proxy Group Support: Manage multiple policies within Policy Group. Bulk policy assignment to Proxy Groups. Centralized update and deploy operations.
- Deploy and Versioning: Deploy policy changes to live environment. See which API Proxies use it (Policy Usage). Proxy Group and Policy Group usage reports.
- Sender-Constrained Verification with DPoP (RFC 9449): Ensures an access token can only be used by the client that obtained it; a stolen token cannot be used by another client. See the DPoP Verification section below.
Usage Scenarios
| Scenario | Status | Solution (Policy Application) | Expected Behavior / Result |
|---|---|---|---|
| Mobile JWT Verification | Mobile app carries JWT in Authorization header | joseTarget=Authorization Header, validateSign=true, use issuer JWKS or Embedded JWK | Valid token is accepted, invalid signatures return 401 |
| IoT JWE Resolution | IoT devices send encrypted payload | decrypt=true, decryptByIssuer=false, Key Source Mode with Embedded or Dynamic HTTP, select encryption JWK | Payload is decrypted, content is transferred to downstream services |
| Issuer Whitelisting | Access is not desired except for specific issuer values | clientSourcePart=Claims, clientFieldname=iss, exact match map with list | Requests with incompatible issuer are blocked with 403 |
| Audience Segmentation | Microservices expect different audience | Fill acceptedAudienceList environment-based | Requests containing wrong audience receive customized error |
| User Header Injection | Downstream services require identity header | addUserToHeader=true, userHeaderName=X-Authenticated-UserId | Identity information is securely transmitted in header |
| Authorization Integration | Role-based access control is required | enableAuthorization=true, configure method access in Authorization Configuration component | Request is stopped by policy if role match is not provided |
| Remote Key Verification/Decryption | Key will be fetched from an HTTP endpoint | Key Source Mode = Dynamic HTTP, define HTTP Request and Key Extraction Variable, test with Try It | Key is fetched remotely at runtime and can be cached |
| Policy Group Synchronization (optional) | Same rules will be used in multiple API Proxies | Create global policy, add to Policy Group | Policy is updated in all API Proxies with single change |
| Sender-Constrained Token with DPoP | Prevent a stolen token from being used by another client | enableDpop=true, dpopValidateCnfBinding=true | Proof and token binding are validated; mismatched or replayed proofs return 401 |
Configuring Policy Parameters
In this step, users can create a new policy or configure existing policy parameters to define access rules. The defined parameters directly affect how the policy works (which source to read token from, claim/audience rules, signature/decryption source, ACL and authorization, etc.). This allows the policy to be customized according to organization-specific requirements while being centrally manageable.
Creating a New JOSE Verification Policy
Configuration Steps
| Step | Description / Operation |
|---|---|
| Step 1: Go to Creation Page | - Go to Development → Global Settings → Global Policies → JOSE Verification Policy from the left menu. - Click the [+ Create] button at the top right. |
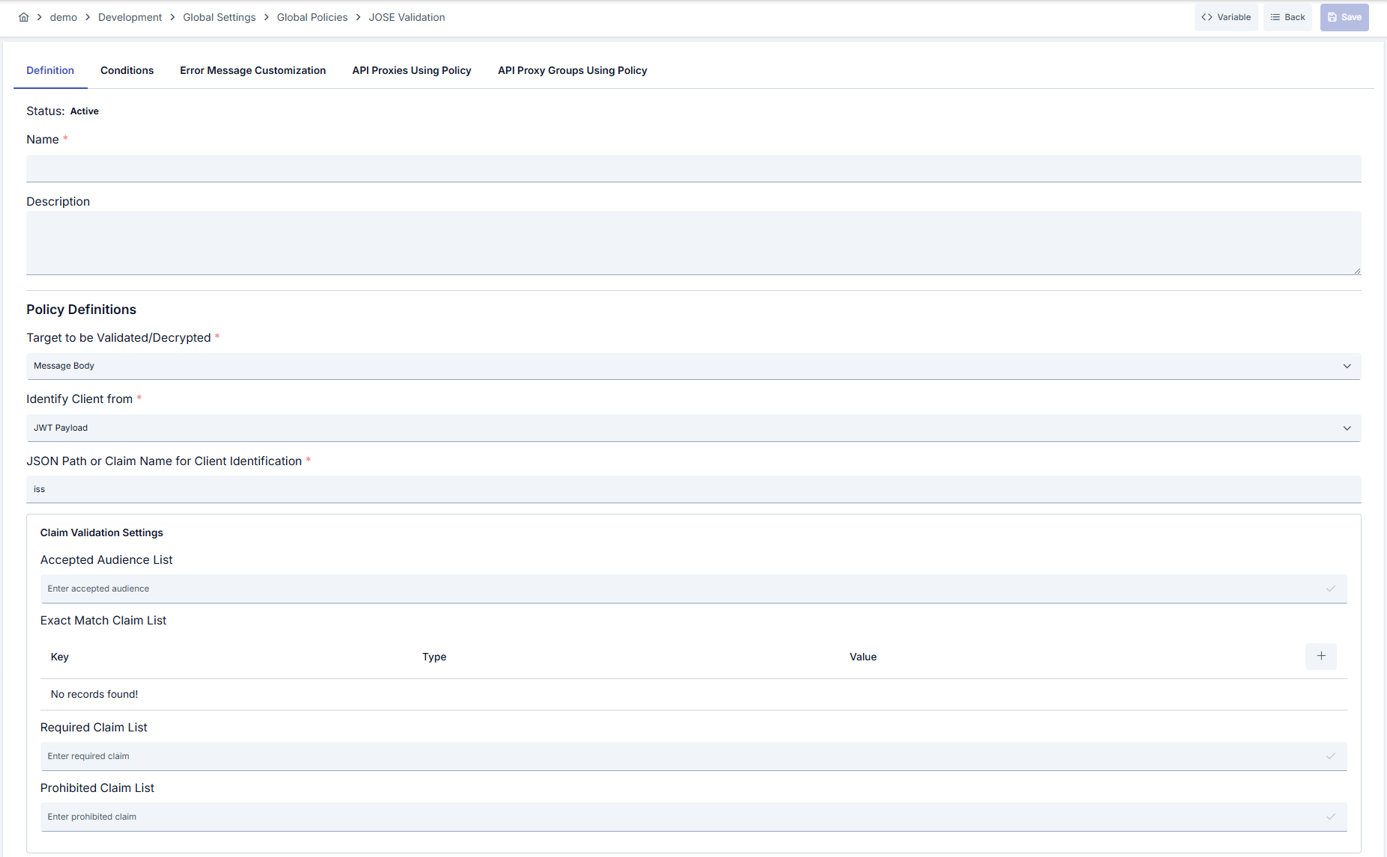
| Step 2: Enter Basic Information (Definition tab) | Policy Status: Shows Active or Passive status. New policies are active by default. Can be changed via toggle. Name (Required): Example: Production_JOSEValidation. Enter a unique name; must not start with space; max 255 characters. System checks automatically: green checkmark = available, red X = existing name.Description: Example: "Performs JWT signature and encryption verification." Max 1000 characters; describes the purpose of the policy. |
| Step 3: Variable Usage | - In the action button area at the top of the page, you can use the [<> Variable] button to select dynamic values. - Using context/global variable expressions, you can manage policy parameters with variable-based values instead of fixed values. - This reduces manual update effort when values change and provides operational convenience. - For detailed information, review Dynamic Variables. |
| Step 4: Policy Configuration — JOSE Source and Client Information | JOSE Target (Target for Verification/Decryption) — Required: Determines where the token is read from. Body = from request body, Authorization Header = from Authorization header, Choose from Variable = from a project variable. Select according to your scenario; e.g. most JWTs arrive as Authorization: Bearer <token>, in which case choose Authorization Header.JOSE Target Variable — Conditional (only when Target = Choose from Variable): Points to the project variable that holds the token value; the policy reads the token from this variable at runtime. Another policy or flow must have written the token to this variable beforehand. Use Select Variable to assign; use Update to edit the variable definition. Client Source Part — Required: Where issuer/client identity is read from: Header = from an HTTP header, Claims = from a JWT claim, Variable = from a project variable. In multi-tenant setups, Claims with iss is commonly used.Client Source Variable — Conditional (only when Client Source Part = Variable): Specifies which variable to read issuer from. That variable’s value (e.g. issuer URL) is used for ACL and key matching. Select a project variable. Client Fieldname — Conditional (when Client Source Part = Header or Claims): Defines the field name used to read issuer. For JWT, typically enter iss; the token’s iss claim is read. When reading from a header, enter the header name (e.g. X-Tenant-Id) or a JSON Path (e.g. $.header.tenant_id). This value is used for verification and issuer-based key/ACL selection. |
| Step 5: Claim Verification Settings (Claim panel) | Accepted Audience List: Requires the token’s aud claim to match at least one value in this list; otherwise verification fails. Type a value (e.g. https://api.your-domain.com) in the text box and confirm to add it as a chip. You can add multiple audiences. Leave empty to skip audience checks.Exact Match Claim Map: Enforces exact match (key + type + value) for specific claim names; those claims must have the same value in the token. Add a row with +; set Key = claim name (e.g. role), Value Type = STRING/NUMBER/BOOLEAN etc., Value = expected value. If the claim is missing or the value differs, verification is rejected.Required Claim List: These claims must be present in the token; if any is missing, verification fails. No value check, only presence. Add claim names (e.g. sub, email).Prohibited Claim List: These claims must not appear in the token; if present, verification is rejected. Used for security or schema constraints. Add the claim names to prohibit as chips. |
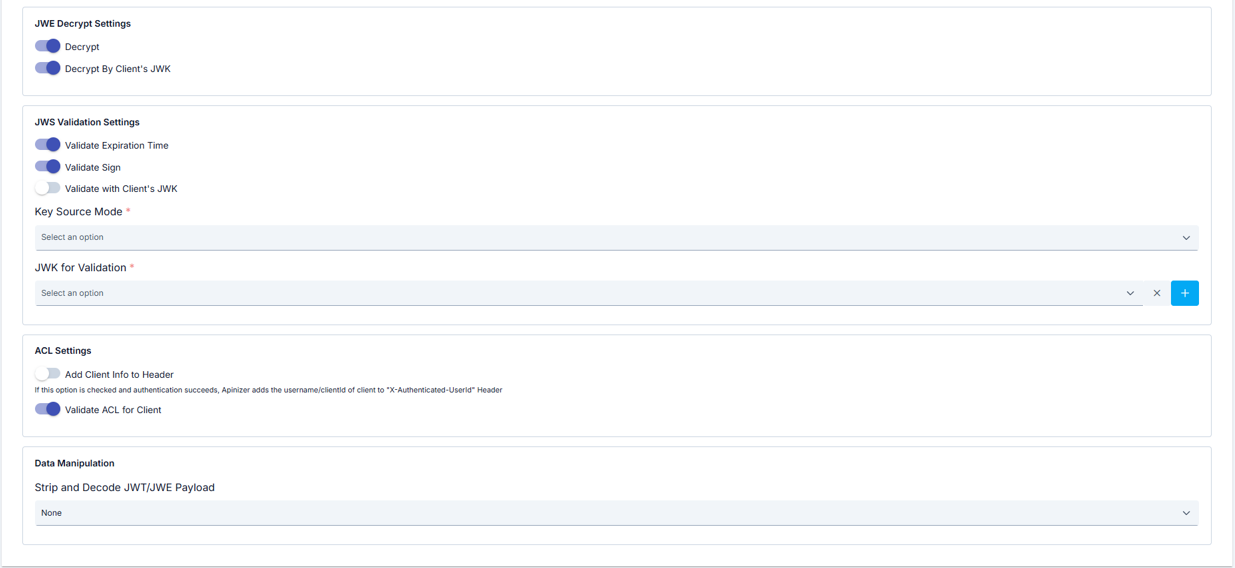
| Step 6: JWE Decryption Settings (Decrypt panel) | Decrypt: Toggle; enables/disables JWE decryption. Decrypt by Issuer: Toggle; visible only when Decrypt is on; decryption uses issuer-side key. The following fields are visible only when Decrypt is on and Decrypt by Issuer is off: Key Source Mode — Required: Embedded or Dynamic HTTP. — If Embedded: JWK for Decryption (jwkIdForDecryptionAndEncryption) — Required: Dropdown (encryption JWKs from Secret Manager), Clear and New buttons. Selected JWK is shown in table. — If Dynamic HTTP: Key is fetched remotely via the HTTP request defined in the policy. HTTP Request Configuration: URL and request where the key is obtained; enter in Test Console (URL required). Key Extraction Variable: Project variable that defines where to extract the key from the HTTP response; the variable holds an expression (e.g. JSONPath $.keys[0]) pointing to the key field in the response body. At runtime the response is processed with this expression and the extracted data is used as the key. Key Format / Key Algorithm: Response format and algorithm; can be auto-detected with NONE + Try It. Kid (Key ID) — Optional: When the JWKS or response has multiple keys, specifies which one to use. Enable Cache and Apply By: When cache is on, Apply By defines the value (e.g. issuer variable) used to key the cache; the key is not fetched again for the same value. Parse Response (Try It): Test without saving; on success, format/algorithm can be auto-assigned.Settings tab (Dynamic HTTP request): On the Settings tab you see timeout and secure connection summary; use Configure for TrustStore, KeyStore, optional PEM certificate, TLS protocols, and hostname verifier. See Test Console — Settings for details. |
| Step 7: JWS Validation Settings (Validation panel) | Validate Expiration Time: When on, the token’s exp is checked; expired tokens fail verification. When off, exp is not evaluated at all and an expired token is accepted.Clock Skew Tolerance: The allowance for clock differences between servers (default 300 seconds). All of the time checks below — and the DPoP layer — share this allowance. Validate Issue Time (iat): When on, the token’s issue time is checked and two more fields appear: Maximum IAT Age (a token older than this is rejected) and Allow Future Issue Time (when off, a token whose iat is in the future is rejected). When the setting is off, iat is not evaluated at all.Validate Not Before (nbf): When on, the token’s nbf claim is checked; a token that has not yet reached its validity start is rejected, with the clock skew tolerance taken into account. When off, nbf is not evaluated at all — a token carrying a future nbf is not rejected for that reason. If the token carries no nbf, no check is performed even with the setting on; to make nbf mandatory, add it to the Required Claim List in Step 5.Validate Sign: Toggle; enables/disables signature verification. When on, JWS signature is verified; key is taken from Embedded JWK or Dynamic HTTP (when Validate by Issuer is off). Validate by Issuer: When on, the key is fetched from the issuer’s JWKS endpoint; when off, the key source you configure is used. Key Source Mode (when Validate Sign is on and Validate by Issuer is off): Embedded or Dynamic HTTP — where the verification key comes from. — Embedded: Select the signature JWK from Secret Manager via JWK for Validation. Every signed token is verified with this key. — Dynamic HTTP: Same logic as Step 5: HTTP Request Configuration (URL required), Key Extraction Variable (variable that extracts the key from the response; points to the key field via JSONPath), Key Format (response format), Key Algorithm (auto-detect with NONE + Try It), Kid (which key when multiple exist), Enable Cache and Apply By (cache keyed by e.g. issuer variable). You can test without saving with Parse Response (Try It). Settings tab (Dynamic HTTP request): Configure secure connection from the Settings tab; see the Settings description under Step 6 (Decrypt panel). |
| Step 8: ACL Settings (Authentication panel) | Set Resolved Identity to Context: Determines whether the resolved identity (username/key) is recorded as the request identity. When on (default), this identity appears in traffic logs and subsequent policies and scripts. When off, the identity is used only for the necessary internal checks (credential, ACL, issuer-based key) and is not persisted as the request identity. Add User to Header: After verification, user identity is written to an HTTP header. Toggle to add user identity to the header after verification. User Header Name: Name of the header to write the identity to; e.g. X-Authenticated-UserId. Required only when Add User to Header is on.Validate ACL for Issuer: Enables issuer-based access list (ACL) checks; requests are rejected if the issuer is not on the allow list. Check Client IP Address: Requires the client IP to match the ACL IP list. Visible when policy list type is Request, whether Validate ACL for Issuer is on or off. |
| Step 9: Data Manipulation (Data Manipulation panel) | Strip and Decode (Isolate and Decode JWT/JWE Payload): None, All, or Partial. None = no decode/redirect; with All or Partial the following fields apply. JWT Claims to Decode — Conditional, required: Visible only when Strip and Decode = Partial; in this mode only the claim you specify is decoded. Claim name to decode (e.g. data).Decoded Claims Target — Conditional, required: Visible only when Strip and Decode ≠ None. Body, Authorization Header, or Choose from Variable. Decoded Claims Target Variable — Conditional, required: Visible only when Strip and Decode ≠ None and Target = Choose from Variable; decoded claims are stored in this variable. Project variable where decoded claims will be written. |
| Step 10: Authorization Configuration — Conditional | Authorization Configuration component is visible only when policy list type is Request and policy is not global. It is not hidden when Validate ACL for Issuer is off. Role-based access, method access and authorization service settings are configured in this component. |
| Step 11: Define Condition (Condition tab) — Optional | Go to Condition tab. Define condition rules with Query Builder. Examples: Environment-based Header = X-Environment, Equals, production; API Key Header = X-API-Key, Starts With = PROD-; Endpoint Path = /api/admin/*. If no condition is defined, policy is always applied. |
| Step 12: Error Message Customization (Error Message Customization tab) — Optional | Go to Error Message Customization tab. Customize HTTP status code and message to return when access is denied. Default: { "statusCode": 403, "message": "[Default error message]" }. Custom: { "statusCode": 403, "errorCode": "[CUSTOM_ERROR_CODE]", "message": "[Custom message]" }. |
| Step 13: Save | Click the [Save] button at the top right. Checklist: Unique name; JOSE Target and (if Choose from Variable) JOSE Target Variable; Client Source Part; (if Variable) Client Source Variable, (otherwise) Client Fieldname; if Add User to Header then User Header Name; if Strip and Decode ≠ None then Decoded Claims Target and (if Choose from Variable) Decoded Claims Target Variable; if Validate Sign is on and Validate by Issuer is off then per Key Source Mode JWK or Dynamic HTTP (URL, Key Extraction Variable, Key Format); if Decrypt is on and Decrypt by Issuer is off then same JWK/Dynamic HTTP rules. Result: Policy is added to list; can be connected to APIs; if global policy, automatically applied. |
Tabs: Definition, Condition, Error Message Customization; in page mode API Proxies Using Policy and API Proxy Groups Using Policy tabs are also visible.
For descriptions of Conditions and Error Message Customization panels, you can review the Conditions and Error Message Customization sections on the What is Policy? page.
For a complete guide on all layers, priority order and scenario examples of the error message configuration system, see the Error Message Configuration Guide page.
DPoP Proof Validation (RFC 9449)
DPoP (Demonstrating Proof-of-Possession, RFC 9449) makes access tokens sender-constrained: on every request the client sends a proof signed with a private key only it holds, and the platform verifies that this proof is bound to the access token. As a result, even if a token is stolen, the attacker cannot use it because they cannot produce a matching proof.
DPoP defines three roles: the client generates the proof, the authorization server (IdP) issues an access token bound to the client's key through the cnf.jkt claim, and the resource server validates the proof against that binding. This policy implements the resource-server role — Apinizer verifies the proof and checks the cnf.jkt binding, but it does not issue tokens or write cnf.jkt. That claim must be produced by your authorization server at token issuance, so your IdP must support DPoP (Keycloak, for example, does). If binding validation is on and the access token carries no cnf.jkt, the request is rejected (fail-closed). Apinizer does not act as a DPoP-issuing authorization server.
DPoP proof validation does not replace the existing JWS/claim validation — it is layered on top. The access token still passes signature (Validate Sign) and claim (Validate Expiration Time, etc.) checks; DPoP additionally verifies the proof and binds it to the token. The Clock Skew Tolerance is shared by both layers.
The DPoP Proof Validation Settings panel contains the following settings:
| Setting | Description |
|---|---|
| Enable DPoP Validation | Turns DPoP proof validation on or off. When off (default) no DPoP check runs and the policy behaves as before. |
| DPoP Proof Header Name | The HTTP header carrying the proof (default: DPoP). |
| Maximum Proof Age | The freshness window for the proof based on its iat value (default 60 seconds); the clock skew tolerance is added on top. Proofs that are too old or dated in the future are rejected. |
| Validate htm (HTTP Method) | Requires the proof htm value to match the request HTTP method. |
| Validate htu (Request URI) | Requires the proof htu value to match the request URI. |
| Expected htu Value | Left blank, the address the platform sees is used. Behind a reverse proxy or load balancer that terminates TLS, enter the public address the client calls (variables are supported). |
| Validate Access Token Binding (cnf.jkt) | The core DPoP protection: checks that the access token's cnf.jkt claim matches the SHA-256 thumbprint of the proof's key. Disabling it leaves a stolen token unprotected. This check runs against the access token read from the JOSE target (Body, Authorization Header, or Variable). |
| Validate Access Token Hash (ath) | Checks that the proof ath value matches the access token hash, binding the proof to that specific token (default off). The proof is bound to the access token read from the JOSE target; it works with any target. |
| Enable Replay Protection (jti) | Remembers seen proof identifiers (jti) in the distributed cache so the same proof cannot be used twice. |
| jti Retention | Left blank, it is derived from the maximum proof age plus the clock skew tolerance. |
| Cache Connection Timeout | Connection timeout to the replay-protection cache (seconds). |
| Action on Cache Connection Error | When the cache is unreachable: Continue lets the request pass but replay protection is skipped for that request; Reject rejects the request. |
Cache Fail-Open Behavior: When Action on Cache Connection Error is set to Continue and the cache becomes unreachable, replay protection (jti) is silently disabled for that request. The request is allowed to pass even if the same proof was previously used. This is a fail-open mechanism for availability. Consider the security risk in your environment: if backend cache availability is low, consider using Reject instead, or ensure the cache is highly available before production deployment.
DPoP proof validation binds the proof to the access token read from the target to be validated (JOSE Target) — the target may be Body, Authorization Header, or a Variable. In addition, JWT validation and DPoP can run together: keep Validate Sign and the claim rules on while enabling DPoP, or, for DPoP-only, turn Validate Sign off (no separate key configuration is needed because the DPoP proof self-verifies from its own embedded key).
If proof validation fails, the request is rejected with 401 for one of two reasons: the proof is invalid (missing, malformed, or replayed), or the access token is not bound to the proof key. The returned messages can be customized from the Error Message Customization tab.
End-to-end scenario (with a DPoP-capable IdP)
A typical sender-constrained flow with Keycloak as the authorization server:
- The client generates an ephemeral key pair and requests a token from Keycloak, presenting a DPoP proof. Keycloak issues an access token whose
cnf.jktclaim is the SHA-256 thumbprint of the client's public key. Only the authorization server writescnf.jkt. - On each API call the client sends the access token and a fresh DPoP proof — a short-lived JWT signed with its private key, carrying
htm,htu,iat,jti(and optionallyath). - Apinizer (the resource server) runs the checks below and either forwards the request or rejects it with 401 (fail-closed) — any single failed check blocks the request.
The htm, htu, ath, replay (jti) and binding (cnf.jkt) checks are individually toggleable; the binding check is the core protection and should stay on in production.
Deleting the Policy
For deletion steps of this policy and operations to be applied when in use, you can refer to the Removing Policy from Flow section on the Policy Management page.
Exporting/Importing the Policy
For export (Export) and import (Import) steps of this policy, you can refer to the Export/Import page.
Connecting the Policy to API
For the process of how this policy will be connected to APIs, you can refer to the Connect Policy to API section on the Policy Management page.
Advanced Features
| Feature | Description and Steps |
|---|---|
| Dynamic JWK Integration (Embedded) | When Key Source Mode = Embedded in signature or encryption panel, open the relevant JWK selector. Select existing key or go to Secret Manager with New. Saved JWK changes are automatically matched with the policy. |
| Dynamic HTTP Key Fetching | Select Key Source Mode = Dynamic HTTP. Configure HTTP Request (Test Console) with URL and request, Key Extraction Variable (required), Key Format, Key Algorithm; if enabling cache fill Apply By, Capacity, TTL and other cache fields. Define secure connection under Settings with Configure (same behavior as Test Console). Test with Parse Response (Try It); if successful, detected format/algorithm can be auto-assigned. |
| Issuer ACL and IP Verification | Enable Validate ACL for Issuer. Update issuer-based ACL rules through security service. When policy list type is Request, verify incoming request IP with Check Client IP Address. |
| Claim Decode & Rewrite | Set Strip and Decode to All or Partial. If Partial, enter JWT Claims to Decode (jwtClaimsToDecode). Direct output with Decoded Claims Target to Body, header, or variable; if Choose from Variable assign Decoded Claims Target Variable. Use the same variable in other policies. |
| Authorization Configuration | When policy is Request type and not global, configure enableAuthorization, addRolesToHeader, rolesHeaderName and method access in the visible Authorization Configuration component. |
Retry for Dynamic Key Fetching
When the key is fetched over HTTP, a transient network failure at the key endpoint would otherwise fail signing or validation altogether. Under Retry in the dynamic key settings you can make the key request be sent again automatically.
| Field | Description |
|---|---|
| Retry on failure | Master toggle. Disabled by default; the key request is attempted once as before. |
| Retry Count | Number of additional attempts after the first one. |
| Delay Strategy | No Delay, Fixed Delay or Exponential Backoff, with the related delay fields. |
| Status Codes To Retry | Which HTTP status codes trigger a retry. Defaults to 502, 503, 504. |
Connection-phase failures (connection refused, connect timeout, DNS or TLS failure) are always retried because the request never reached the key endpoint. Failures that occur after the request was sent are retried only for idempotent methods. The behaviour is identical to the API Call policy; see API Call — Retry on Failure for the full table.
This is not the same as Retry on key error, which sits one level above: that option clears the cached key and fetches it once more when the key itself turns out to be cryptographically unusable. Retry described here applies to the key request itself when it fails at the network level. Both can be enabled together; each fetch stays within its own retry limit.
When the key is served from the key cache no HTTP request is made, so retry does not come into play. A fetched key is written to the cache only after a successful response.
Best Practices
Things to Do and Best Practices
| Category | Description / Recommendations |
|---|---|
| Audience Management | Bad: Leaving Accepted audience empty. Good: Defining separate audience value for each microservice. Best: Managing environment-based audience lists (Development/Test/Production) with separate policies. |
| Signature Verification | Bad: Running with validateSign closed.Good: Using issuer JWKS endpoint with validateByIssuer or selecting Embedded JWK.Best: Enforcing centralized JWK vault or Dynamic HTTP cache in scenarios without issuer. |
| Encryption Management | Bad: Leaving decrypt closed in encrypted tokens.Good: Enabling Decrypt by Issuer or Embedded JWK for decryption. Best: Defining separate encryption key per issuer and periodic key rotation; use Try It and cache for Dynamic HTTP. |
| Claim Policies | Bad: Leaving claim lists undefined. Good: Determining required and prohibited claim lists. Best: Performing value-type verification with exact match map. |
| Header Integration | Bad: Not transmitting user identity to downstream services. Good: Adding identity header with addUserToHeader.Best: Matching role headers with security logs and auditing. |
Security Best Practices
| Security Area | Description / Warnings |
|---|---|
| Key Management | Store JWKs in Secret Manager in Embedded mode; for Dynamic HTTP, endpoint security and cache access restrictions are important. |
| Issuer Trust | Regularly update issuer whitelist; immediately remove suspicious issuers. |
| Token Lifetime | validateExpirationTime should always be open; restrict long-term tokens. |
| Header Hardening | Transmit added identity/role headers only over HTTPS; ensure masking in logs. |
| Error Messages | Do not share internal details in error messages; use generic message + error code combination. |
Things to Avoid
| Category | Description / Warnings |
|---|---|
| Static Embedded JWK | Why to avoid: Keys embedded in code are vulnerable to leakage. Alternative: Use Secret Manager (Embedded) or Dynamic HTTP for secure key supply. |
| Ambiguous Claim Rules | Why to avoid: Accepting all claims creates security vulnerability. Alternative: Define required and prohibited lists. |
| Undecoded Encrypted Data | Why to avoid: Encrypted data passes without verification. Alternative: Keep decrypt mandatory and bind appropriate JWK or Dynamic HTTP. |
| Unmonitored Header Additions | Why to avoid: Unaudited headers can be abused. Alternative: Log header usage and apply access control. |
Performance Tips
| Criterion | Recommendation / Impact |
|---|---|
| JWK Cache | Share frequently used JWKs via Secret Manager cache (Embedded) or Dynamic HTTP Enable Cache. Signature verification time decreases. |
| Claim Rule Count | Remove unnecessary claim checks. Policy execution time shortens. |
| Decode Options | Decode only needed claims (PARTIAL + jwtClaimsToDecode). Memory and CPU consumption decrease. |
| Global vs Local Usage | Prefer global policy for APIs sharing same rules. Management and deploy times shorten. |
| Condition Simplification | Remove unnecessary conditions in Query Builder. Condition evaluation time per request decreases. |
| Dynamic HTTP Cache | Keep Enable Cache on with appropriate Capacity and TTL. Remote key is not fetched repeatedly; latency decreases. |
Frequently Asked Questions (FAQ)
| Category | Question | Answer |
|---|---|---|
| General | What token types does the policy verify? | Supports JOSE standards (JWS/JWE); performs verification according to JSON Web Signature/Encryption rules. |
| General | Can the policy be shared for multiple API Proxies? | Yes, if defined globally, it is shared with multiple API Proxies through Policy Group. |
| Technical | How is it configured if issuer provides its own JWKS endpoint? | Enable Validate by Issuer so the gateway fetches keys from issuer JWKS. |
| Technical | How is encrypted JWE content resolved? | Enable Decrypt; if Decrypt by Issuer is off, configure Key Source Mode with Embedded (select JWK) or Dynamic HTTP (URL, Key Extraction Variable, Key Format, Key Algorithm and optional cache). Decrypted payload is written to the specified target. |
| Technical | How is key used with Dynamic HTTP? | Select Key Source Mode = Dynamic HTTP; configure HTTP Request (Test Console), Key Extraction Variable (required), Key Format, Key Algorithm. Test with Parse Response (Try It). |
| Usage | Is it safe to add user identity to header? | Transmit over HTTPS, mask header name (User Header Name), and allow only authorized services to read it. |
| Usage | How can I separate claim rules by environment? | Create separate policy copy per environment or define condition by environment header in Condition tab. |
| Usage | When is Check Client IP Address visible? | When policy list type is Request, this toggle appears in the ACL Settings panel, whether Validate ACL for Issuer is on or off. |